Chapter 4: Media Station|V10 Software
43
5
In the Track button on the far left, select the
top video track. Only the selected tracks and the
video tracks below it will be recorded.
6
Select the audio tracks. Only the selected
tracks will play.
7
Use the track buttons on the right to select
which tracks to record on the tape, audio and
video.
8
Select the Entire Sequence option, unless you
only want to record from the In Point to the Out
Point.
9
Select the Video Effect Safe Mode option. This
will warn you if any effects remain un-rendered.
10
If desired, select Digital Cut Native (DV25
only) to output a DV25-only sequence directly
to a DV25 device without any loss due to com-
pression and decompression.
11
Select Stop on Dropped Frames to stop the
tape if the audio and video did not record cor-
rectly.
12
Select the Add Black At Tail option.
13
Configure Deck Control as follows:
• Use Local mode to manually initiate
record. This is useful if you are recording to
a tape which does not have timecode.
• Use Remote mode to record to a tape that
already has timecode. Media Station|V10
will start the deck and drop into record at
the specified timecode.
• Specify the Sequence Time to start record-
ing. For example, if the sequence starts at
1:00:00 in the Timeline, Media Station|V10
will start recording when the tape reaches
1:00:00.
• Specify the Record Deck Time to start re-
cording wherever the deck is currently
parked.
• Specify the Mark In Time to start recording
at the address entered in the top window to
the right of the transport controls.
14
Click the yellow Preview button to check
that all of the desired tracks are playing and that
the insert points on the tape are correct.
15
To record using Local mode, press play on
the deck. When ready, click the record button in
the Digital Cut window.
– or –
To record using Remote mode, press Record in
the Digital Cut window. Media Station|V10 will
queue the tape, play, then drop in at the appro-
priate location.
Exporting a Digital Movie
To export a sequence as a QuickTime, QuickTime
Reference, or other type of digital movie:
1
Select the desired sequence in the Bin and
drag it to the Record Monitor.
2
Render all effects in the Timeline.
3
Select the Track Enable buttons for the video
and audio tracks to export.
4
Select File > Export.
5
Type a name and select the destination for the
export.
6
Select Fast-Export QuickTime from the Export
Settings pull-down menu.
7
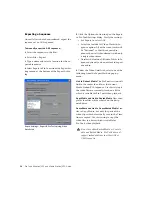
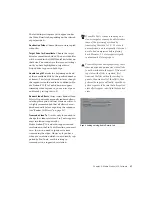
Click Options and configure the settings as de-
sired.
Be sure to record at least a few seconds of
black to the tape before performing a digital
cut. This will guarantee that the video tape
is correctly formatted when your digital cut
starts


