Pro Tools AVoption|V10 and Media Station|V10 Guide
28
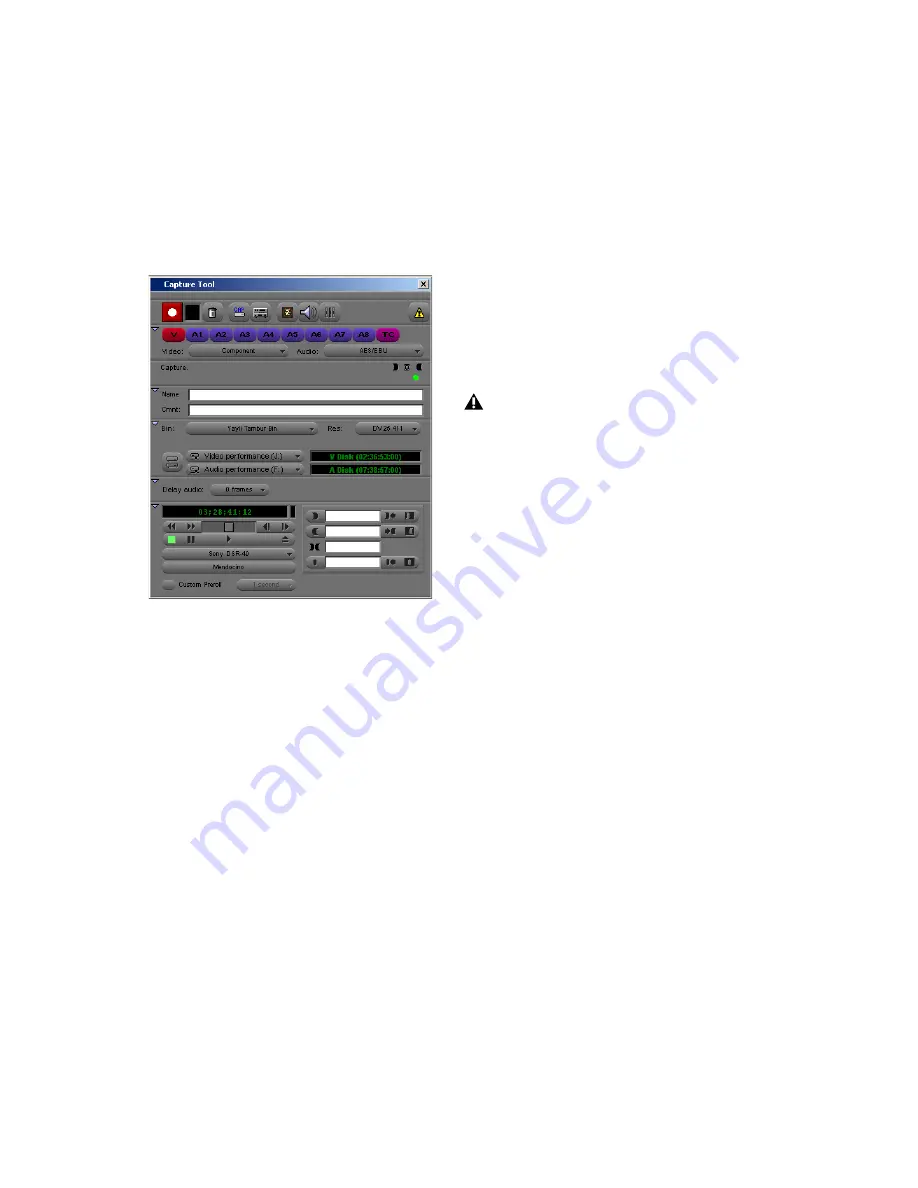
To capture audio and video:
1
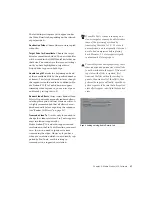
Select Tools > Capture to open the Capture
Tool.
2
Make sure that all the reveal triangles on the
left side of the Capture Tool window are point-
ing down so that all of the controls are visible.
3
If necessary, click the Capture/Log Mode but-
ton (to the right of the Trash icon) in the Cap-
ture tool to select Capture mode (CAP).
4
Verify that the Toggle Source button (to the
right of the Capture/Log Mode button) does not
have a circle/slash over it.
5
Below the Record button is a row of record en-
able buttons. V is for video, A1–A8 are for audio.
Select the desired source tracks. TC is the time-
code channel and should also be enabled.
6
Select the correct video and audio input
sources.
7
Select the Bin in which you would like the
captured clips to appear.
8
Select the resolution (RES) you would like to
capture. 1:1 is uncompressed and offers the best
quality, but takes up the most storage space.
20:1 takes up the least amount of storage space,
but is the lowest quality picture. Select the level
of compression which is appropriate for your
project. DV25 offers a good quality picture with
a moderate level of compression. 10:1m and
4:1m are multi-cam resolutions and should not
be used for Pro Tools.
9
Select the drives where you would like the au-
dio and video to be stored. The button on the
left toggles between 1 and 2 drives. Since
Pro Tools requires audio and video to be on sep-
arate drives, toggle this button so that 2 drives
are showing and select the appropriate drives for
audio and video. The available recording time
for each drive is shown in the window on the
right. The digitized files will be stored in a folder
called “OMFI MediaFiles” on each of those
drives.
10
Ensure that Delay Audio is set to 0 frames.
11
Insert the desired tape into the tape deck.
Media Station|V10 will present a list of tapes al-
ready associated with this project and ask you
what tape you have inserted. Either select a tape
name or create a new one and click OK.
12
To check your inputs, press play on the trans-
port controls. Video should appear in the
Record monitor, as well as in your client moni-
tor. Select Tools > Audio Tool to meter audio in-
put levels. Adjust the output levels of your tape
deck if necessary.
Avid Capture Tool
When capturing from the AVoption|V10
DV input, resolution options for the capture
are limited to: 1:1, 15:1s, DV25 420 and
DV25 411.


