Rev 07/04/2015
48
a) Insert replacement board on clips, press down to snap in place.
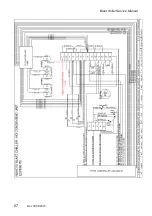
b) Rewire according to the wiring marking and wiring diagram.
c) Ensure all parameters are set correctly (see Parameter List).
4.10 REPLACING THE KEYPAD
a) Remove the front panel (3.1.) and unscrew the keypad
b) Disconnect the wiring harness.
c) Remove the mounting nuts, lock washers and flat washers.
d) Remove the board from the mounting studs.
e) Install replacement board by reversing the above procedure.
SPACER
FLAT WASHER
LOCK WASHER
MOUNTING NUT
MOUNTING STUC
Summary of Contents for GBC-15
Page 1: ...Service Manual Blast Chiller...
Page 2: ...Rev 07 04 2015 2...
Page 3: ...Blast chiller Service Manual 3 Rev 07 04 2015...
Page 32: ...Rev 07 04 2015 32...
Page 40: ...Rev 07 04 2015 40...
Page 50: ...Rev 07 04 2015 10 20 10 0 10 20 30 40 kOhms C kOhmsVsTempChart NTC 10kOhms 25 C ZOOM...
Page 57: ...Blast chiller Service Manual 17 Rev 07 04 2015 L1 L2...
Page 91: ...Blast chiller Service Manual 51 Rev 07 04 2015 6 SCHEMATICS 6 1 SCHEME OF COMPONENTS...
Page 97: ...Blast chiller Service Manual 57 Rev 07 04 2015...
Page 100: ...Rev 07 04 2015 60...


