Bring the ECS system online
Once you have built the ECS system in the racks, and used the necessary cabling to
connect the components, you must bring the system online. Bringing the system
online includes the following operations.
1.
Upload the switch configuration files.
2.
Upload the switch configuration files
Once the switches have been installed and plugged in, you must upload the
configuration files for the back-end switches. Optionally, you can also upload the
configuration files for the front-end switches.
Validate the switches are powered on
There are no power buttons for the switches. The switches are turned on once they
have been plugged in and connected to a power source.
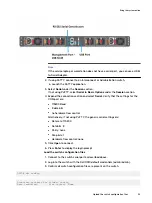
A solid green color on the Power LED, and System LED indicates the switch is on and
operating normally.
Power LED
System LED
Connect to the switch serial port
This section describes how to connect your service laptop to a serial port on an S5148
switch. You must perform this procedure when the switch contains factory settings or
cannot be accessed by telnet or ssh through the ECS back-end network.
1. Connect one end of a serial cable from the serial port on the switch. Connect the
other end of the cable to your workstation.
Bring the system online
38
EX300
Third-Party Rack Installation Guide
Summary of Contents for ECS EX300
Page 1: ...ECS EX300 Third Party Rack Installation Guide 302 005 206 02 ...
Page 6: ...FIGURES 6 EX300 Third Party Rack Installation Guide ...
Page 7: ...Planning your lift 46 1 TABLES EX300 Third Party Rack Installation Guide 7 ...
Page 8: ...TABLES 8 EX300 Third Party Rack Installation Guide ...
Page 13: ...Third Party Rack Installation Overview Components for EX300 systems 13 ...
Page 14: ...Third Party Rack Installation Overview 14 EX300 Third Party Rack Installation Guide ...
Page 17: ...Figure 1 PDU component location Rail Installation Dell EMC PDU rail and component location 17 ...
Page 42: ...Bring the system online 42 EX300 Third Party Rack Installation Guide ...


