


26
How to replace the sample Logos
You can replace the supplied Datavideo example logos with logos of your own design using an SD card.
The Datavideo sample logos are designed to butt together and form one large logo. You can use two completely
separate logos, each
128 x 96 pixels
, or if you need a larger logo, split the image in two as shown on the previous
page.
For the HS-600 to recognise the logos
they must be called logo1.bmp and logo2.bmp
. The Logos are
transferred to the HS-600 on an SD Card. This is inserted into the SD card slot on the left hand edge of the HS-600
keyboard.
See page 9
,
Keyboard Overview, Item 8.
Press the LOGO SETTING button in the EFFECTS area of the HS-600 keyboard so that it becomes active. The
menu options will be displayed on the Multi-Image Preview between the PST_SUB and PGM_MAIN images.
The LOGO 1 SETTING options provided here are:
[LOGO 1 SETTING (LUMA KEY) ]
1: SOURCE = LOGO FILE
2: LOGO POSITION = X= 10 , Y= 7
3: KEY LEVEL MAX. = 240 (OFF WHITE )
4: KEY LEVEL MAX. = 20 (OFF BLACK )
5: TRANSPARENT PT. = 20 W
[ ] B
6: TRANSPARENCY = 0
7: WINDOW LEFT_TOP = X=000 , Y=000
8: WINDOW RIGHT_BOTTOM = X=720 , Y=576
9: COPY LOGO FILE. = LOGO_1
ESCAPE
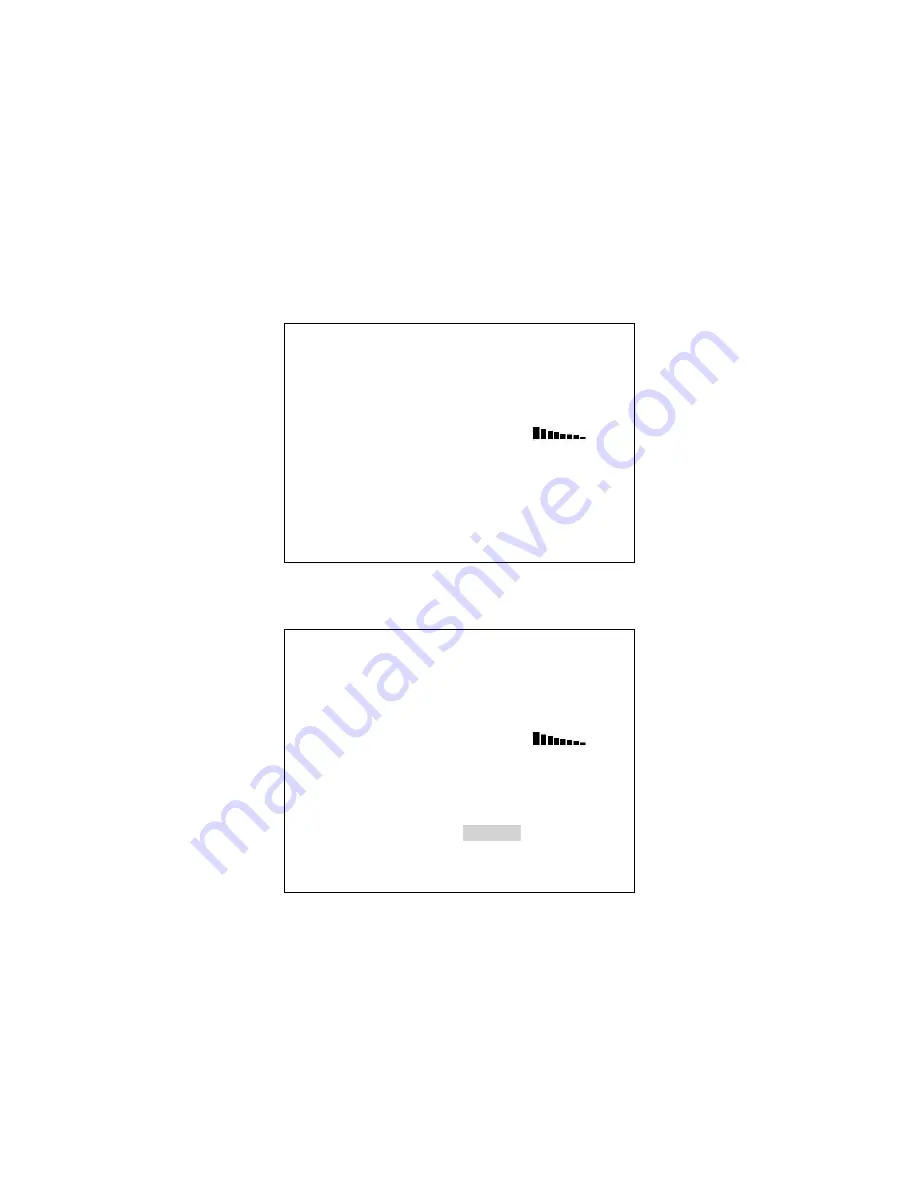
Using the arrow keys in the EFFECTS area of the HS-600 keyboard highlight LOGO_1 in option 9. The menu will
then display the copy option as shown below.
[LOGO 1 SETTING (LUMA KEY) ]
1: SOURCE = LOGO FILE
2: LOGO POSITION = X= 10 , Y= 7
3: KEY LEVEL MAX. = 240 (OFF WHITE )
4: KEY LEVEL MAX. = 20 (OFF BLACK )
5: TRANSPARENT PT. = 20 W
[ ] B
6: TRANSPARENCY = 0
7: WINDOW LEFT_TOP = X=000 , Y=000
8: WINDOW RIGHT_BOTTOM = X=720 , Y=576
9: COPY LOGO FILE. = LOGO_1
ESCAPE
Press ‘
▼
’ key 2 SEC = Start to copy.
Pressing the down arrow key for two seconds starts the copy process. Your logo1.bmp file on the SD card will be
read and copied into the logo1 memory of the HS-600. Once the process is complete it will return the menu display
back to the normal options.
The same process can be applied to logo2. You will have to ESCAPE the LOGO 1 SETTING first and then choose
option 4 : LOGO from the initial SETTINGS menu before you can see the choice for LOGO 2 SETTING.


