18
Prodigy Max Operator’s Manual
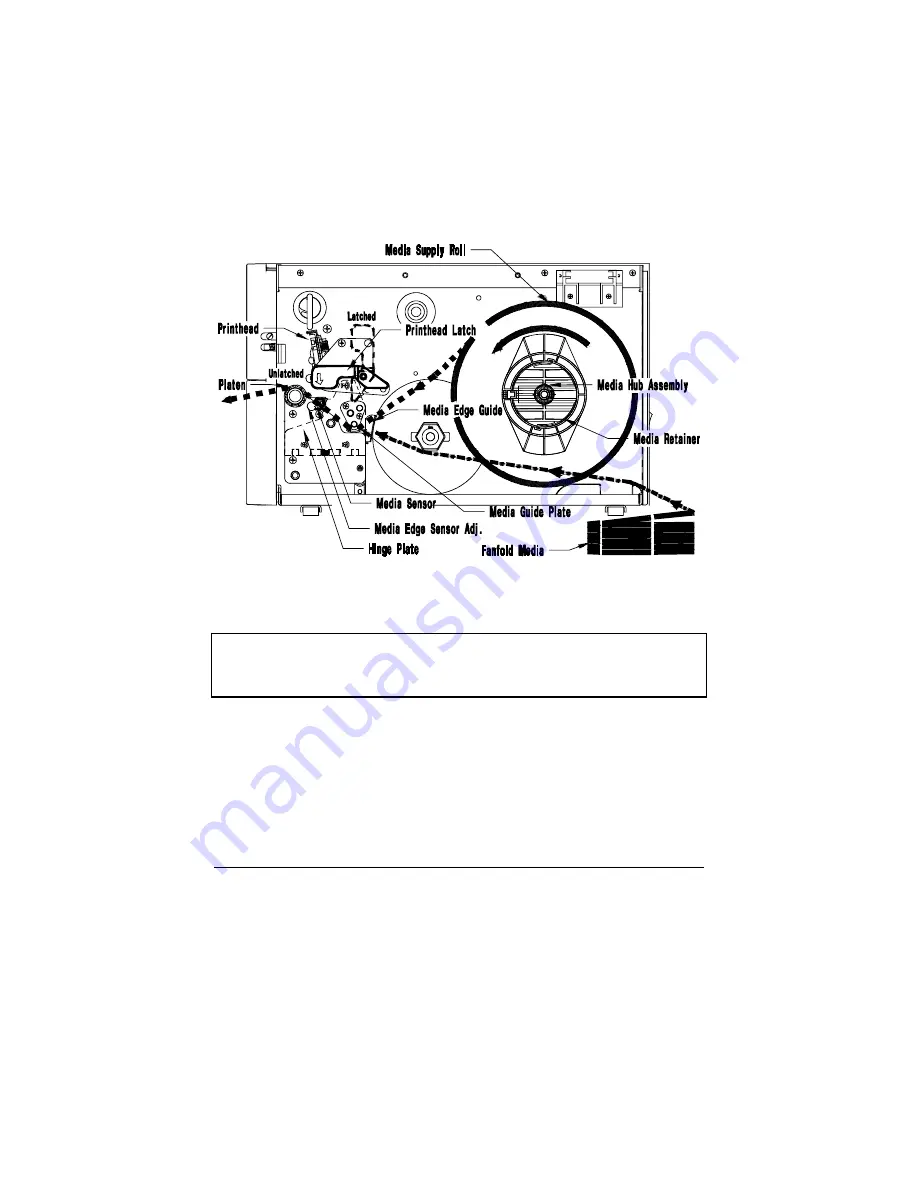
6. Route the media over the Guide Plate, between the Media Sensor,
and over the Platen Roller, (located beneath the Printhead), as shown
in Figure 2-5b.
7. Rotate the Media Edge Guide up and slide it to the media's edge.
8. Close the Hinge Plate and lower the Printhead by rotating the
Printhead Latch clockwise to the latched position.
Figure 2-5b Media Installation
Note:
If the media is not sensing, try adjusting the Media Edge
Sensor by turning the Media Edge Sensor Adjustment knob,
(see Section 5.3.2).
Summary of Contents for Prodigy Plus
Page 1: ...Prodigy Plus Operator s Manual ...
Page 4: ......
Page 6: ......
Page 12: ...Getting Started 4 Prodigy Plus Figure 1 3 Mechanism Detail Figure 1 4 Rear View ...
Page 44: ...Troubleshooting 36 Prodigy Plus ...
Page 55: ...Available Fonts and Barcodes Prodigy Plus C 5 Prodigy Plus 152 Font 4 continued ...
Page 58: ...Available Fonts and Barcodes C 8 Prodigy Plus Prodigy Plus 152 Font 6 continued ...
Page 61: ...Available Fonts and Barcodes Prodigy Plus C 11 Prodigy Plus 152 Font 9 continued ...
Page 66: ......
Page 68: ...D 2 Prodigy Plus ...
Page 84: ...Warranty Information G 4 Prodigy Plus ...
Page 85: ...Prodigy Max Operator s Manual ...
Page 92: ...ii Prodigy Max Operator s Manual Figure 1 1 Overall View ...
Page 117: ...Prodigy Max Operator s Manual 27 Figure 3 1 Front Panel ...
Page 129: ...Prodigy Max Operator s Manual 39 Table 3 1 Internal Dip Switch Settings ...
Page 133: ...Prodigy Max Operator s Manual 43 ...
Page 154: ......
Page 156: ...A 2 Prodigy Max Operator s Manual US 31 1F 63 3F _ 95 5F 127 7F ...
Page 158: ......
Page 165: ...Prodigy Max Operator s Manual B 7 ...
Page 166: ...B 8 Prodigy Max Operator s Manual Barcode O ...
Page 167: ...Prodigy Max Operator s Manual B 9 Barcode S Barcode T Barcode z ...
Page 168: ......
Page 170: ...C 2 Prodigy Max Operator s Manual ...
Page 175: ...Prodigy Max Operator s Manual D 5 ...
Page 176: ......
Page 178: ...C 2 Prodigy Max Operator s Manual ...


