38
Prodigy Max Operator’s Manual
3.3.2 Configuration Test Label
The following are explanations of the Configuration Test Label
elements, top to bottom, (see Figure 3-5).
Rom Checksums
indicates whether the ROMs that store the
Printer's program and resident fonts are 'good' or 'bad'. Good part
numbers are displayed normally. Checksum values replace the part
numbers to indicate an error. If either the ROM or RAM test is bad,
service is required.
System Ram Checks
indicates 'good' or 'bad'.
System Ram Size
indicates the amount of available RAM in the
Printer.
Thermal Transfer Switch
Should be 'on' if using a ribbon, and
'off ' if in the direct-thermal mode (no ribbon).
Switch 1
indicates the status of dip switch 1 on the rear of the
printer, (see Section 2.3.2, Table 2-3).
Internal
indicates the status of the Printer's internal dip switch
located on the main logic board (see Table 3-1).
Paper
this value indicates when paper is present in the sensor.
Edge and Refl
indicates when media is present at the respective
sensor. These sensors tell the Printer where the start of the label is
located. Refer to the Programmer's Manual when determining which
sensing mode to use.
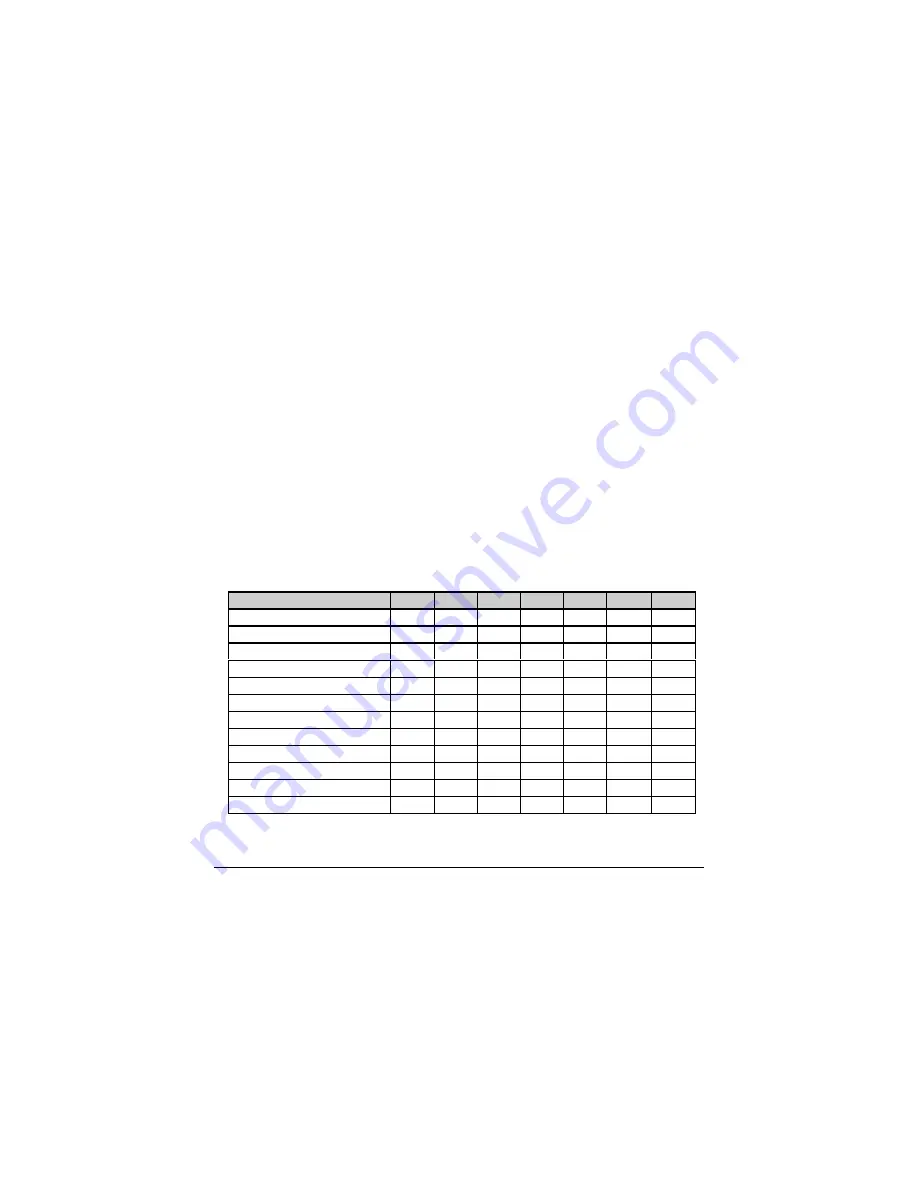
Switch Functions
1
2
3
4
5
6
7
RS-422 Disabled
OFF
OFF
OFF
X
X
X
X
RS-422 Address 1
ON
OFF
OFF
X
X
X
X
RS-422 Address 2
OFF
ON
OFF
X
X
X
X
RS-422 Address 3
ON
ON
OFF
X
X
X
X
RS-422 Address 4
OFF
OFF
ON
X
X
X
X
RS-422 Address 5
ON
OFF
ON
X
X
X
X
RS-422 Address 6
OFF
ON
ON
X
X
X
X
RS-422 Address 7
ON
ON
ON
X
X
X
X
Spare
X
X
X
OFF
X
X
X
Resettable Counter Reset
X
X
X
X
OFF
X
X
Spare
X
X
X
X
X
OFF
X
RS-422 Termination (hw)
X
X
X
X
X
X
OFF
Summary of Contents for Prodigy Plus
Page 1: ...Prodigy Plus Operator s Manual ...
Page 4: ......
Page 6: ......
Page 12: ...Getting Started 4 Prodigy Plus Figure 1 3 Mechanism Detail Figure 1 4 Rear View ...
Page 44: ...Troubleshooting 36 Prodigy Plus ...
Page 55: ...Available Fonts and Barcodes Prodigy Plus C 5 Prodigy Plus 152 Font 4 continued ...
Page 58: ...Available Fonts and Barcodes C 8 Prodigy Plus Prodigy Plus 152 Font 6 continued ...
Page 61: ...Available Fonts and Barcodes Prodigy Plus C 11 Prodigy Plus 152 Font 9 continued ...
Page 66: ......
Page 68: ...D 2 Prodigy Plus ...
Page 84: ...Warranty Information G 4 Prodigy Plus ...
Page 85: ...Prodigy Max Operator s Manual ...
Page 92: ...ii Prodigy Max Operator s Manual Figure 1 1 Overall View ...
Page 117: ...Prodigy Max Operator s Manual 27 Figure 3 1 Front Panel ...
Page 129: ...Prodigy Max Operator s Manual 39 Table 3 1 Internal Dip Switch Settings ...
Page 133: ...Prodigy Max Operator s Manual 43 ...
Page 154: ......
Page 156: ...A 2 Prodigy Max Operator s Manual US 31 1F 63 3F _ 95 5F 127 7F ...
Page 158: ......
Page 165: ...Prodigy Max Operator s Manual B 7 ...
Page 166: ...B 8 Prodigy Max Operator s Manual Barcode O ...
Page 167: ...Prodigy Max Operator s Manual B 9 Barcode S Barcode T Barcode z ...
Page 168: ......
Page 170: ...C 2 Prodigy Max Operator s Manual ...
Page 175: ...Prodigy Max Operator s Manual D 5 ...
Page 176: ......
Page 178: ...C 2 Prodigy Max Operator s Manual ...


