background image


A-14

SD460 Laminating System

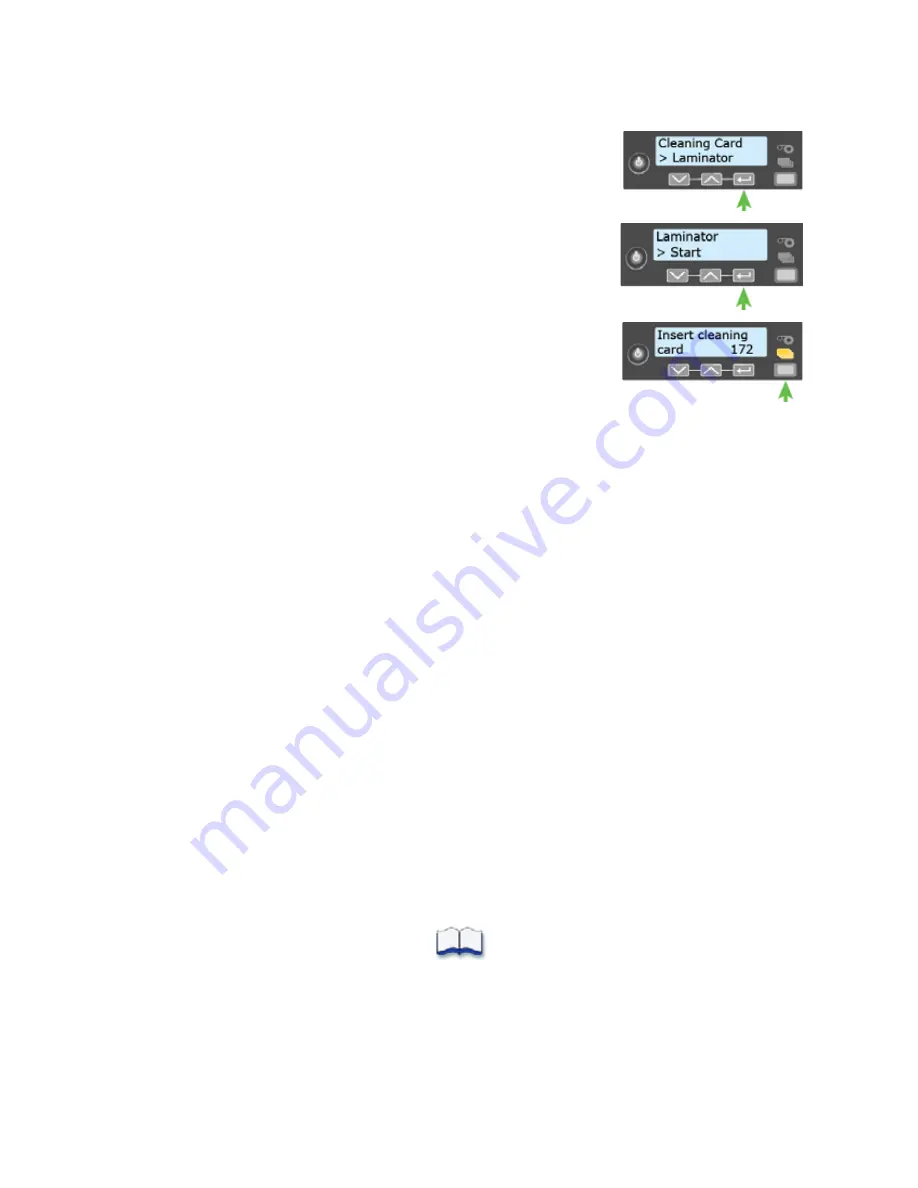
f. 

Laminator


displays


on


line


2.


Press


E

NTER

.


g. 

Start


displays


on


line


2


of


the


LCD


panel.


Press


E

NTER


to


start


the


cleaning


process.


h. 

Insert


cleaning


card


displays


on


the


LCD


panel.


Press


the


U

SER


button


to


start


the


cleaning


cycle.


The


laminator


pulls


the


cleaning


card


from


the


card


exit


slot


into


the


laminator


and


moves


it


back


and


forth


through


the


L1


and


L2


cartridge


areas,


the


card


entry


area,


and


the


exit


rollers


several


times.


The


used


card


is


ejected


into


the


laminator


output


hopper.

5. 

Inspect


the


laminator


cartridges


for


particles.


If


particles


are


present:

a. 

Retrieve


the


laminator


cleaning


card


from


the


output


hopper


and


use


it


to


remove


the


particles


of


overlay


material


from


the


cartridges.


b. 

If


particles


still


remain


on


the


cartridge


and


inside


of


the


laminator,


use


a


vacuum


cleaner


with


a


small


plastic


hose


attachment


to


carefully


remove


the


particles.


Also


clean


any


remaining


particles


from


the


output


hopper.

H

INTS


&


T

IPS



If


the


cleaning


card


is


not


pulled


into


the


laminator,


the


card


is


not


in


the


correct


position.


The


cleaning


card


must


be


located


under


the


rollers


of


the


card


exit


slot


inside


the


output


hopper.



At


the


end


of


the


laminator


cleaning


cycle,


the


card


can


stick


to


the


rollers


in


the


output


hopper.


Pull


gently


on


the


card


to


remove


it.




Discard


the


laminator


cleaning


card


after


one


use.



If


cleaning


the


laminator


does


not


solve


the


problem,


contact


your


service


provider


for


assistance.

Summary of Contents for SD260L

Page 1: ...Datacard SD260L SD360 SD460 Card Printers User s Guide February 2015 Part No 527400 001 Rev B...

Page 2: ...MasterCard International Incorporated Visa is a registered trademark of Visa International Service Association All other product names are the property of their respective owners Proprietary Notice Th...

Page 3: ...ce The following basic safety tips are given to ensure safe installation operation and maintenance of Datacard equipment Connect equipment to a grounded power source Do not defeat or bypass the ground...

Page 4: ...es applicables aux appareils num riques de la classe A prescrites dans le R glement sur le brouillage radio lectrique dict par le minist re des Communications du Canada RSS Gen Issue 3 December 2010 S...

Page 5: ...cause radio interference in which case the user may be required to take adequate measures Notice for China Simplified Chinese A Notice for Taiwan Traditional Chinese Notice for Japan Japanese Voluntar...

Page 6: ...reproductive harm Wash hands after handling Datacard Group believes that its products are not harmful when used as designed However the above warning is made in compliance with the State of Californi...

Page 7: ...ide Revision Date Description of Changes A March 2014 First release of this document formerly Part No 527248 001 Updated for XPS Card Printer Driver 5 0 and SD460 laminating system B February 2015 Upd...

Page 8: ...viii...

Page 9: ...er 3 Using the System 11 How the Card Travels 11 Card Printer System Overview 12 Equipment 12 Tasks and Users 12 Printer Controls 13 Power Button 13 Down Arrow Up Arrow and Enter Key 13 LCD Panel Menu...

Page 10: ...dows print queue does not provide expected data 40 Printer Messages do not display on the PC 41 Card Appearance 41 Something did not print 42 Printing includes unexpected data 43 The color printing ha...

Page 11: ...up 66 149 Option not installed 67 152 Insert new card side 2 up 67 153 Insert same card side 2 up 67 170 Insert new card side 1 up 67 171 Insert same card side 1 up 67 172 Insert cleaning card 68 173...

Page 12: ...uspended 74 Driver SDK Messages 75 511 Cannot lock or unlock the printer Locks are not installed 75 512 Cannot lock or unlock the printer The password is incorrect or invalid 75 513 Cannot lock or unl...

Page 13: ...d LCD menus card processing basics how to print a test card and how to load and replace supplies How to perform routine maintenance and troubleshooting tasks An additional Installation and Administrat...

Page 14: ...2 Introduction...

Page 15: ...An optional 200 card input hopper is available for some printers Options available for the card printer include magnetic stripe smart card and automatic duplex modules and a reject hopper The configur...

Page 16: ...Use the handle to remove the print ribbon cartridge from the printer Card Input Hopper The input hopper loads cards to print The hopper holds up to 100 cards 0 030 in or 0 762 mm thickness Front Panel...

Page 17: ...he track to clear a card jam Cable Lock Receptacle The receptacle allows you to insert the security plate before attaching the optional Kensington lock Printer Connections Printer connections include...

Page 18: ...and date of manufacture the printer serial number and lists the options installed Printhead The printhead transfers images to cards using the print ribbon Print Ribbon Cartridge The cartridge holds th...

Page 19: ...ds Replaceable Cleaning Sleeve The cleaning sleeve removes dust and other particles from cards to maintain print quality Duplex Module The duplex module automatically turns the card for two sided prin...

Page 20: ...endix A SD460 Laminating System for complete information Laminator The laminator attaches to the printer and applies patch or topcoat overlay material to the card Laminator Access Door Open the door t...

Page 21: ...ation that is useful when requesting service The label shows the following information Printer model and serial number Configuration which includes options installed in the printer Date and country of...

Page 22: ...10 About the Printer...

Page 23: ...the card is verified and sent to the printer The hopper pick mechanism picks a card and moves the card into the printer for processing Optionally the card moves to the magnetic stripe encoding area or...

Page 24: ...Capture devices such as A digital camera connected to the PC to take photos for ID badges and other cards A signature capture pad or fingerprint reader 3 The printer with supplies and a facility power...

Page 25: ...eys to move through the printer menu system and the ENTER key to make a selection Press the up or down arrow key when the LCD panel displays Ready to display additional information about the printer o...

Page 26: ...hows the printer s menu system and displays printer messages or conditions When the printer is in the Ready status the LCD displays the model number of the printer For a list of messages and recovery...

Page 27: ...e the Activate menu to enable or disable the printer for transport HINTS TIPS You can access the menu system when Ready displays on line 1 of the LCD panel The printer returns to the Ready status afte...

Page 28: ...y printing press and hold the USER button for 2 seconds or more Make sure that this action is allowed in your card system Determine whether the printer is ready busy printing or not available Indicato...

Page 29: ...ollowing Off The print ribbon is okay Blinking amber A blinking light indicates one of the following The printer problem applies to the print ribbon The print ribbon is low The print ribbon is out Off...

Page 30: ...u system Status menu The printer supports both IPv4 and IPv6 addressing Because an IPv6 address is much longer than an IPv4 address the LCD displays the two types of addresses differently Retrieve an...

Page 31: ...ENTER to return to the Network IPv4 menu Subnet Mask displays on line 2 6 Press ENTER to display the subnet mask Record it if necessary 7 Press ENTER to return to the Network IPv4 menu Gateway Addres...

Page 32: ...s Manual IPv6 Address The printer has a designated IPv6 address on a specified subnet The address does not change without manual intervention This is similar to an IPv4 static IP address The method us...

Page 33: ...t groups of four hexadecimal digits separated by colons The address requires 39 characters to display Because the LCD is limited to 16 characters per line the IPv6 address is spread across three scree...

Page 34: ...s steady green 2 Press the USER button to display Suspended on line 1 of the LCD panel 3 Press ENTER to enter the menu system 4 Press ENTER to enter the Maintenance menu 5 Press the down arrow until T...

Page 35: ...ading the laminator cartridges Load Cards Do the following to load cards in the printer 1 Open the input hopper 2 Load the cards into the input hopper Cards can stick together Slide or fan the cards t...

Page 36: ...emove the cleaning roller spindle from the ribbon cartridge 2 Slide the spindle into the continuous cleaning sleeve a 3 Place the spindle with the cleaning sleeve onto the ribbon cartridge b 4 Remove...

Page 37: ...information about preparing the laminator The card design is set up If you need to set up or modify the design refer to Elements of Card Design in your printer s Installation and Administrator s Guid...

Page 38: ...nto the printer if necessary Print from Other Software 1 Open the software application and select the card printer as the current printer 2 Use the application s setup page to select the ISO ID 1 page...

Page 39: ...gular basis Follow the cleaning guidelines for your site to keep the printer in good working condition Clean the printer when There is debris on completed cards A new roll of print ribbon is installed...

Page 40: ...thead is touched accidentally Oils from hands can affect print quality and damage the printhead Do the following to clean the printhead 1 Power off the printer 2 Open the printer cover and remove the...

Page 41: ...to verify the quality of printing Refer to Print a Test Card on page 22 for more information HINTS TIPS Avoid touching the printhead edge with your fingers Contamination due to skin oils eventually ca...

Page 42: ...or if print quality diminishes 1 Prepare the printer for cleaning a Power on the printer b Open the printer cover and remove the print ribbon cartridge c Close the cover d Open the input hopper and r...

Page 43: ...cleaning card is not in the input hopper insert it now Press the USER button to start the cleaning cycle The printer moves the card through the printer several times and ejects it into the output hop...

Page 44: ...ning card and cleaning sleeve HINTS TIPS Use the cleaning card one time only Change the cleaning sleeve each time you clean the printer or change the print ribbon If the card light blinks amber and th...

Page 45: ...ts with an overview of card production and printer issues you may encounter Locate a Problem Within the Card Production System on page 34 Locate a Problem with Basic Printer Functions on page 35 This...

Page 46: ...uction software features you use work with your printer If you do not use card production software make sure that the software you use supports the requirements for creating cards If you use magnetic...

Page 47: ...er supply is working properly request service for the printer from your system administrator If the power supply is not functioning replace it and begin with step 1 3 Print a test card Refer to Print...

Page 48: ...lected in the Print Setup or Print dialog If the printer produced a blank card review the page size or driver settings If the card causes an error the card might have a type of data the printer does n...

Page 49: ...cables can cause communication problems The recommended USB cable is 6 ft 2 meters long Make sure that the cable is rated for USB 2 0 data transmission If you are using a USB hub a self powered hub i...

Page 50: ...shows the printer is not available but the printer shows Ready on the LCD panel Follow your network troubleshooting procedures to isolate and test each component of the computer to printer communicat...

Page 51: ...o static IP addressing For more information about setting the Card Printer Driver network communication value refer to the Printer Manager section of the card printer s Installation and Administrator...

Page 52: ...plays the actual percentage of ribbon remaining and cannot be changed As a result the indicators may not be in agreement A print job disappears from the print queue but does not print The printer USB...

Page 53: ...ut the message does not display on the PC Windows has a 15 character limit for the computer name If the computer name is longer than 15 characters it treats the name as not valid and does not display...

Page 54: ...ter you select the printer Printing is not visible The entire card was printed using the UV F panel Print only small areas of text and images using the UV panel Color printing on top of a black backgr...

Page 55: ...ns at the correct page size Problem Probable Cause Solution One or more lines appear on the card The printhead is dirty or damaged Clean the printhead Refer to Clean the Printhead on page 28 The print...

Page 56: ...cards that meet the requirements for the printer Refer to Cards in your printer s Installation and Administrator s Guide The rollers are dirty or the card packaging contains debris Run a cleaning car...

Page 57: ...and Administrator s Guide The printhead is not installed correctly Contact your service provider for instructions to install the printhead correctly The printhead power is too low Log on to Printer Ma...

Page 58: ...card is being printed with monochrome ribbon Contact your service provider Format text to print black so that the text is not dithered Printing is uneven or is missing in some areas The monochrome K...

Page 59: ...to clean the magnetic stripe head Refer to Run a Printer Cleaning Card on page 30 The magnetic stripe on the card is low coercivity material and the High Coercivity setting is selected To use the card...

Page 60: ...t to the same format and the error message displays repeatedly contact the application provider for assistance The application sent track data for a track not supported by the magnetic stripe module V...

Page 61: ...t correctly Change the card debow time Refer to the Printer Manager Laminator section of the printer s Installation and Administrator s Guide The temperature is too high for the card stock used Lower...

Page 62: ...Load the overlay material correctly Refer to Load Laminator Overlay Material on page A 8 The laminator cartridge is not fully seated in the laminator Make sure that the cartridge is seated in the lam...

Page 63: ...rrect Contact your service provider for assistance The patch is missing from the finished card The supply spool is not positioned correctly in the cartridge Make sure that the overlay is loaded correc...

Page 64: ...the printer s Installation and Administrator s Guide Note Reducing the temperature can reduce the number of particles but does not eliminate them The topcoat shows wavy lines along the length of the c...

Page 65: ...t remove the cartridge and turn the take up spool clockwise several turns The overlay is not loaded correctly in the cartridge Remove the cartridge and reload the overlay Refer to Load Laminator Over...

Page 66: ...e printer 2 Remove the print ribbon cartridge 3 Turn the manual advance knob to move the jammed card until it is accessible from the rollers or exits into the output hopper 4 Remove the card 5 Replace...

Page 67: ...overing from problems The printer displays a message number and a short description for each message If more than one message was issued the next message displays after you correct the problem and pre...

Page 68: ...er paused the printer Amber Flash Off Off Warning 121 Print ribbon not identified Amber Flash Off Off None 122 Magstripe format problem Amber Flash Off Off Error 123 Insert new card side 1 up Amber Fl...

Page 69: ...Flash Error 201 L1 supply problem Off Amber Flash Off Red Flash Error 202 L1 supply out or missing Off Amber Flash Off Red Flash Warning 203 L1 supply type problem Off Amber Flash Off Red Flash Error...

Page 70: ...Debow problem Green Flash Off Off Red Flash Error 218 Impresser problem Green Flash Off Off Red Flash Error 219 Impresser sensor problem Green Flash Off Off Red Flash Error 220 Impresser heater probl...

Page 71: ...f more than one message was issued the next message displays after you close the current message If there is more than one card printer installed on the PC messages display one at a time The title bar...

Page 72: ...a printer that is configured to support the personalization being requested Press the USER button on the printer or click OK on the PC to clear the message 101 Job could not complete The card took to...

Page 73: ...wer off the printer 2 Request service The system must remain powered off Click OK on the PC to clear the message 105 Magstripe data error The printer failed to verify that the correct magnetic stripe...

Page 74: ...canceled 1 Make sure that you are using magnetic stripe cards that match the printer settings 2 Make sure that the cards are placed in the printer correctly Press the USER button on the printer or cli...

Page 75: ...e printer Press the USER button on the printer to clear the message On the PC click OK or click Cancel to cancel the card HINTS TIPS Used ribbon has negative images of printed data To keep the data co...

Page 76: ...he message On the PC click Retry or click Cancel to cancel the card HINTS TIPS Make sure that the ribbon cartridge is installed properly with the handle even with the edges of the printer Press down o...

Page 77: ...the card production application 118 Print ribbon type problem The printer cannot use the ribbon installed The card will be canceled Use ribbon designed for this printer Press the USER button on the pr...

Page 78: ...OK on the PC to clear the message HINTS TIPS Ask your dealer or authorized reseller for a replacement ribbon 122 Magstripe format problem The magnetic stripe data sent does not match the format set i...

Page 79: ...If the card is not immediately picked press the printer s USER button or click OK Click Cancel on the PC if you want to cancel the card 153 Insert same card side 2 up 1 Take the card from the printer...

Page 80: ...sage on the PC that issued the card print job 177 Laminator not available The printer and laminator cannot communicate The card will be canceled 1 Make sure the data cable from the laminator to the pr...

Page 81: ...ve the card 3 Replace the supply cartridge and close the laminator 200 Laminator exit card problem The card is not where it should be in the laminator 1 Open the laminator 2 Turn the knob to remove th...

Page 82: ...laminator and remove the L2 cartridge 2 Reposition repair or replace the supply and advance the repaired area one full turn 3 Replace the cartridge and close the laminator 207 L2 supply out or missing...

Page 83: ...anceled 1 Press the printer POWER button to power off the system 2 Request service The system must remain powered off 214 L2 heater sensor problem The laminator has encountered a critical error The ca...

Page 84: ...ered off 219 Impresser sensor problem The laminator has encountered a critical error The card will be canceled 1 Press the printer POWER button to power off the system 2 Request service The system mus...

Page 85: ...he printer is not available The computer cannot communicate with the printer To complete the current card 1 Make sure that the printer is powered on and in the Ready state 2 Make sure the printer is c...

Page 86: ...ng notify your printer support contact Click OK to clear the message 506 A card is currently processing The printer is busy processing an interactive job The card will be canceled Wait until the curre...

Page 87: ...alled Severity Critical 512 Cannot lock or unlock the printer The password is incorrect or invalid Severity Critical 513 Cannot lock or unlock the printer The printer is busy Severity Notice 514 Canno...

Page 88: ...76 Troubleshooting...

Page 89: ...onsists of a card printer and the SLM laminator The SD460 system can print cards and apply an overlay material on the front and back of the card for increased durability and security Using an overlay...

Page 90: ...of the laminator Refer to Laminator Status Light on page A 3 Card Entry Area The card entry area receives the card from the printer and places it into position for laminating Reject Card Tray Unfinis...

Page 91: ...n Busy Solid blue Idle Sleeping Blinking blue Heating Blinking red Error Card Output Hopper The card output hopper holds up to 100 completed cards Laminator Access Door The access door provides access...

Page 92: ...m the system Use the knobs to clear a card jam L1 Laminator green cartridge The L1 laminator cartridge holds overlay material and applies it to the card L2 Laminator orange cartridge The L2 laminator...

Page 93: ...or cartridge to see the label If an L2 laminator is not installed open the L2 transport access door to see the label If your system includes the optional second laminator L2 make sure that the laminat...

Page 94: ...Driver Guide for information on designing a card to use a UV ribbon Laminator Overlay Materials The L1 and L2 laminators can apply either topcoat or patch material Topcoat is a continuous film and pat...

Page 95: ...on each card Registered holographic topcoat has a registration mark so that the image can be aligned with the card Refer to the printer s Installation and Administrator s Guide for information on orde...

Page 96: ...the L1 green laminator cartridge from the laminator Place the cartridge on a smooth level surface for loading 3 Push the release latch a and open the gate on the laminator cartridge b 4 Remove both us...

Page 97: ...remove slack from the material e The overlay material loads in an S shape Make sure that the overlay material is between the guides on both the take up and supply sides of the cartridge 6 Close the la...

Page 98: ...tion and Administrator s Guide for information on using Printer Manager Verify Setup After you set up the printer print several test cards to determine how well the laminator applies the overlay to th...

Page 99: ...rd Jam 1 Open the laminator access door 2 Remove the L1 and L2 if installed laminator cartridges 3 Turn the manual advance knobs inside of the laminator until the card is accessible 4 Remove the card...

Page 100: ...n page 49 1 Open the laminator access door and remove the L1 and L2 laminator cartridges 2 Remove printed cards from the output hopper if necessary This procedure uses a double sided sticky cleaning c...

Page 101: ...place 4 Use the LCD menu system to start the cleaning cycle a Begin when the printer displays Ready and the USER button shows steady green Press the USER button Suspended displays on line 1 of the LC...

Page 102: ...aning card from the output hopper and use it to remove the particles of overlay material from the cartridges b If particles still remain on the cartridge and inside of the laminator use a vacuum clean...

Reviews: