


DGS-3312SR Gigabit Layer 3 Switch
choices as to the method SSH will use to authorize the user, and they are Host Based, Password, Public Key,
and None.
3. Configure the encryption algorithm that SSH will use to encrypt and decrypt messages sent between the
SSH Client and the SSH Server, using the
SSH Algorithm
window.
4. Finally, enable SSH on the Switch using the
SSH User Authentication
window.
After following the above steps, you can configure an SSH Client on the remote PC and manage the Switch using secure,
in-band communication.
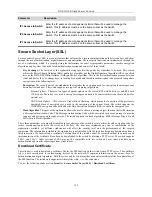
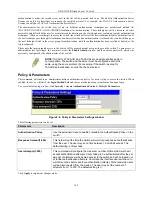
SSH Configuration
The following window is used to configure and view settings on the SSH server and can be opened by clicking
Security >
Secure Shell (SSH) > SSH Configuration
:
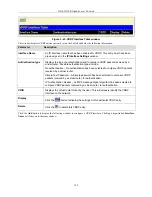
Figure 6- 4. Current SSH Configuration Settings window
To set up the SSH server on the switch, configure the following parameters and click
Apply
.
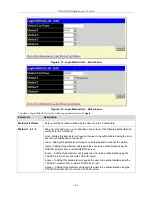
Parameter
Description
SSH Server Status
Use the pull-down menu to enable or disable SSH on the switch. The default is
Disabled
.
Max Session(1-8)
Enter a value between
1
and
8
to set the number of users that may simultaneously
access the switch. The default is
8
.
Time Out(120-600)
Allows the user to set the connection timeout. The user may set a time between
120
and
600
seconds. The default is
300
seconds.
138
Summary of Contents for DGS-3312SR
Page 13: ...DGS 3312SR Gigabit Layer 3 Switch xii...
Page 46: ...DGS 3312SR Gigabit Layer 3 Switch Figure 3 14 Stack Information web page 33...
Page 53: ...DGS 3312SR Gigabit Layer 3 Switch 40...
Page 165: ...DGS 3312SR Gigabit Layer 3 Switch Figure 6 22 Enter Network Password dialog box 152...
Page 228: ...DGS 3312SR Gigabit Layer 3 Switch 215...
Page 244: ......


