background image

Operators Manual

37

A FRESH APPROACH TO VENDING

Se

ctio

n 9

- R

ec

om

m

en

de

d S

pa

re 

Pa

rts

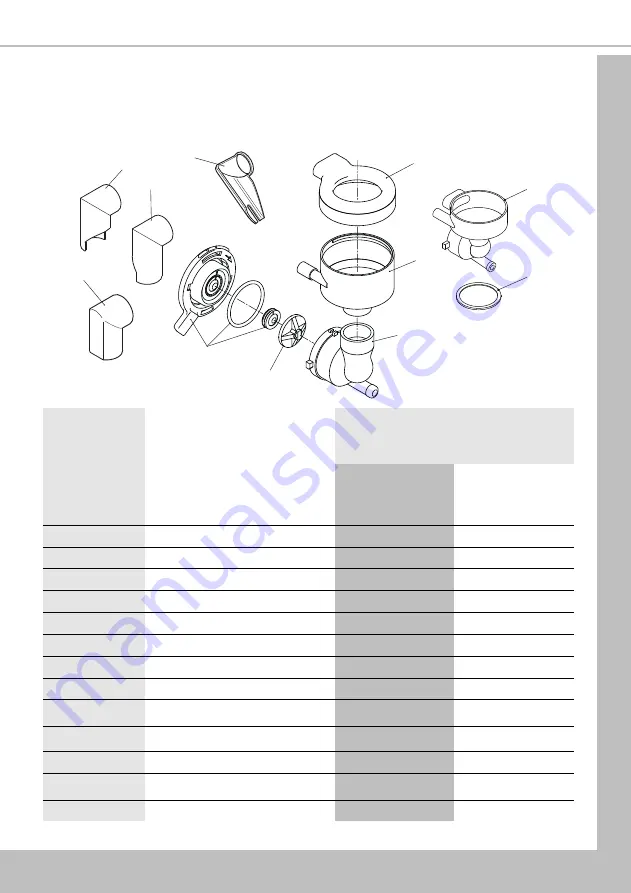
Section 9 - Recommended Spare Parts

The spares items listed on the following pages are available from your machine supplier and will

ensure long and trouble free service from your machine.

9.1 Hygiene Kits

1

2

3

4

5

7

6

8

9

10

11

Ref. No

Item

Hygiene Kit - Part No.

(& item quantity per kit)

HYG INFIN INTS

(Instant)

HYG INFIN FBREW

(Freshbrew)

1

Whipper base

7

6

2

Impeller

7

6

3

Whipper body

7

6

4

Mixing bowl

7

6

5

Steam trap

7

6

6

Chute, cannister central

6

5

7

Chute, LH, long

1

2

8

Chute, RH, long

1

1

9

Chute, LH, special

-

1

10

Whipper System, Mini

-

-

11

Gauze, Moulded

-

-

Not shown

Silicone, pipe 8mm x 13mm

-

1.0 M

Not shown

Silicone, pipe 6mm x 10mm

3.0 M

2.2 M

Summary of Contents for Autobar INFINITY

Page 1: ...Part Number PR13176000 Issue NEW 3 10 Operatorʼs Manual INFINITY ...

Page 2: ...INFINITY AUTOBAR ...

Page 3: ... Procedure 10 Section 5 Service Keypad Functions 15 5 1 Button 1 Program Entry 15 5 2 Button 2 Brewer Open Freshbrew Models 15 5 3 Button 3 Rinse Flush 15 5 4 Button 4 Brewer Clean Freshbrew Models 15 5 5 Button 5 View Counters 16 5 6 Button 6 Test Vend 16 5 7 Button 7 Cup Test 16 5 8 Button 8 Park Head 16 5 9 Button 9 Boiler Fill B2C Machines 16 5 10 Button 10 Machine Cool Down B2C Machines 17 5 ...

Page 4: ...37 9 2 Dispense Area Components 38 Section 10 Error Messages And Simple Problem Solving 39 10 1 Error Messages 39 10 2 Simple Problem Solving 40 10 3 Machine Leaking 41 Section 11 Decommisioning Your Machine 41 The following Symbol is used throughout this Operatorʼs Manual Safety First Take care risk of personal injury Crane Merchandising Systems accepts no responsibility for damage caused to the ...

Page 5: ...re your machine to remain connected and switched on Only trained personnel should carry out these routines and independently of all other operations Observation of safe working practices in accordance with current regulations is necessary at all times Important Unless otherwise specified always disconnect your machine from the electricity supply before commencing work 3 Do not operate your machine...

Page 6: ...idth 700 mm Depth 785 mm Cup Capacity 840 7oz Approximate and are for guidance only 1 2 Electrical Services Voltage 220 240 Volts AC Current 13 Amp Fused Frequency 50 Hz 1 3 Water Services Pressure 200 Kpa 2 Bar 600 Kpa 6 Bar Stopcock 15 mm BSP from rising main All weights and dimensions are approximate and are for guidance only ...

Page 7: ...nsit packing all installation kit and the box containing the cup stack assembly from your machine Check for visual signs of damage which may have occurred during transit If your machine is damaged or any parts are missing you must contact the supplier immediately 5 Level your machine in both the front to back and side to side planes by adjusting the feet using a 12 mm spanner Ensure that the door ...

Page 8: ... the tubes directly from the packaging DO NOT touch the cups with your hands Important Do not fill the tube directly above the cup dispense position Allow the cup turret motor to rotate a full tube to the cup dispense position when the machine is powered up Rotating the cup turret by hand will damage the mechanism Note If you are loading paper cups first inspect each pack for damage to the cup rim...

Page 9: ...he Service Keypad on the rear of the door and ensure that the dispense head moves to its fully extended position Press the button again to return the dispense head to its correct homed position 10 If fitted check that the coin mechanism and cash box operate correctly To do this swing the cover away from the door b Fill the coin tubes with correct coinage Ensure coin return mechanism functions corr...

Page 10: ...lection menu as shown press any touch key Drink selections are made by pressing the corresponding touch key found to the immediate left or right of the menu item The customer may then alter the drink strength and add milk sugar to suit their personal preference by following the options displayed on screen The following example describes how to vend a Verse Koffie selection from a freshbrew machine...

Page 11: ...btain a stronger or milder beverage press the corresponding Stronger or Milder touch key In this example Stronger is pressed twice to achieve a strength selection of five as shown If no further adjustment is required press Start to begin the vend see 3 3 Vending A Drink 3 2 Adding Milk Sugar If milk is required select Melk by pressing the corresponding touch key The screen updates and displays the...

Page 12: ...choices do not allow the strength option or milk sugar to be selected e g Chocolate If no further adjustment is required press Start to begin the vend see 3 3 Vending A Drink 3 3 Vending A Drink Once the required drink has been selected and no further adjustment is required 1 Press Start to begin the vend Whilst the drink dispenses the screen updates and dis plays the confirmation message as shown...

Page 13: ...will display the message as shown The drink can then be carefully removed from the dispense area N B After the drink has been removed by the customer the screen will briefly display a thank you message as shown The machine will beep once then return to standby mode Section 3 How To Vend A Drink ...

Page 14: ...must be rinsed in clean water to remove traces of the cleaning agent 4 3 Liquid Destainer Brewer Units Crane Merchandising Systems recommends that a liquid destaining product is used for cleaning the paper paperless brewer units fitted to freshbrew machines The product must be used in accordance with the instructions on the product packaging following all health and safety guidelines 4 4 Daily Cle...

Page 15: ...ray see para 4 4 3 for details 6 Refit the whipper base Push the whipper base onto the motor shaft with the ʻarrowʼ symbol lined up with the motor plate fixing screw f as shown Turn the whipper base clockwise until it locates with the first click locking position g Ensure ʻOʼ ring h is correctly located as shown 7 Refit the impellers to motor shafts ensuring that the ʻflatʼ in the moulding lines u...

Page 16: ...t canisters and refill if required Remove canister lid and place the canister into the canister filling station located on the door d Fill canister with correct ingredient Carefully remove the canister from the filling station and replace the lid Refit canister into machine Rotate the canister outlets to their correct operating positions Important Ensure that the canisters are refitted to correct ...

Page 17: ...blies ensuring that the drain tube from the cup catcher moulding is located correctly at the rear of the tray Remove and discard the drip catcher cup i and replace with a new cup Note A 7 9oz cup should be used on all models inc 12oz 4 4 8 Cup Check Check the levels of the cups in the cup turret and where necessary refill with correct sized cups for more detailed instructions see 2 4 Commissioning...

Page 18: ...k Head button 8 to ensure that the dispense head operates correctly and that the dispense pipes are fitted correctly 3 Place a suitable container under the dispense head and press the Rinse Flush button 3 The machine will flush the system Check that all of the mixing stations are water tight Empty the contents of the container 4 Place an empty cup under the dispense head Press the Test Vend button...

Page 19: ...t temperature determined by the thermistor 2 In order to guarantee the highest standards of cleanliness the boiler fill valve is disabled ensuring that the water used in the sequence is delivered at the optimum temperature to kill any micro organisms 3 Each hot water valve and the corresponding whipper is switched on in sequence for a pre set flush time Once the flush cycle is complete the machine...

Page 20: ...e Test Vend button 6 enables the operator to vend a drink from the machine to ensure correct operation after cleaning or maintenance 1 When the button is pressed and released the LCD will display Test Vend Insert Money or Make a Selection Make a drink selection to begin the vend sequence 2 Ensure that the selection is correct has not under overfilled the cup and most importantly tastes good 3 Exit...

Page 21: ...n 12 Reset Waste Counter F Brew B2C Machines Only Important Every time that the waste container is emptied the waste counter must be reset Press button 12 on the service keypad Two audible bleeps confirm that the counter has been reset to zero 5 13 Button 13 Syrup Prime Still Carbonated Machines Only This button enables the operator to prime the syrup selections after replacing a syrup container 5...

Page 22: ...bsequent menus follow the same format as this Root Menu 2 A menu item is selected by pressing the corresponding touch key found to the immediate left or right of the item The icon flashes briefly to indicate that it has been selected N B The bottom of the screen will often show important information In certain configuration menus it will display the current value for the selected item 3 When a men...

Page 23: ...the operator has entered the code correctly the LCD will display the operatorʼs top level programming menu Main Menu From here the operator can easily navigate through all of the menus contained within the Operatorʼs Program see 6 2 Navigating through the Menu Display for details 6 4 Entering or Updating Parameters To enter or update parameters key in the actual digits of the number required using...

Page 24: ...s have been selected To return to the previous screen press Up One Level 2 Radio Buttons The example opposite shows the State screen accessed via the Timed Events Menu This screen requires the engineer to select only one of the options shown Using the touch keys select and set the required option a filled radio button indicates that it is selected To return to the previous screen press Up One Leve...

Page 25: ...chines memory 7 1 1 Non Resettable Sales Data This menu allows the engineer to view and record monetary and sales values This data cannot be reset and will remain intact for the service life of the controller board unless the back up battery is removed 1 Navigate Data Recall Non Resettable Sales Data Overall Totals By Product Cash Cashless or Token Vends 2 Select Overall Totals This menu displays ...

Page 26: ...of the drink selections available from the machine 6 Select the required product e g Chocolate The LCD will display the screen as shown below This screen displays both the total amount and total vend count as previously described N B Individual By Product screens also display the price set for the selection as shown 7 Referencing the list displayed record the audit data When complete press Previou...

Page 27: ... can be deleted by pressing Reset then Yes to confirm Press Previous Page to exit the menu without clearing the data 3 Referencing the list displayed record the audit data When complete press Previous Page to return to the Resettable Sales Data menu screen 4 The operator can also view and record resettable monetary and vend data for individual product by entering the By Product menu and also view ...

Page 28: ...ogramming mode see 6 3 Accessing the Programming Mode 6 1 6 Mug Vends This menu displays the number of vends that the machine has made without dropping a cup 1 Navigate Data Recall Mug Vends 2 Once the operator has viewed and recorded the data it can be cleared by pressing Clear Data then Yes to confirm To return the machine to standby mode at any point close the front door To re enter the program...

Page 29: ...the machine 1 Navigate Price Individual Prices all drink selections 2 Upon entry into this sub menu all drink selections available from the machine are listed along with the current drink price The example shown illustrates an Instant Coffee selection with a price set currently at 35p 3 To change the price of the Instant Coffee select Instant Coffee The LCD will change and display the screen as sh...

Page 30: ...ide any individual prices previously programmed 7 3 3 Mug Discount This sub menu allows the operator to program a discount value against all drink selections for customers who use their own cup mug When a customer places their own cup into the dispense area and selects a drink the SureVend sensors will detect the cup and disable the cup drop mechanism The price set for Mug Discount is then subtrac...

Page 31: ...nu N B If a single price is currently in force this value will be displayed in both fields When complete press Up One Level to return to the operatorʼs Main Menu screen To return the machine to standby mode at any point close the front door To re enter the programming mode see 6 3 Accessing the Programming Mode 7 4 Product Configuration Menu Entry into this menu allows the operator to disable drin...

Page 32: ...ight across the cup station that is broken by a cup as it falls into position from the cup drop unit or by a customer placing his own mug in the dispense area The SureVend software monitors the cup station sensor during the time that the cup ring is operated and for three seconds afterwards If a cup is not detected the software will then attempt to drop a cup a second and if necessary a third time...

Page 33: ...o cost To enable Free Vend proceed as follows 1 From the Operatorʼs Main Menu screen select Free Vend N B By default Free Vend is factory set to disabled 2 To enable free vend select Enabled A filled radio button indicates that it is selected 3 To save the new parameter to the machines memory and return to the Operatorʼs Main Menu screen press Up One Level 7 6 System Settings Menu This menu allows...

Page 34: ... 12 or 24 hour format To update the time 1 Navigate System Settings Clock Time The LCD will display the screen as shown below By default the time is displayed in 24 hour format e g 8 52 is 8 52am To display the time in 12 hour format press Switch To 12h Mode 2 To advance the hour or minute press the appropriate far left for the hour far right for the minute To decrease the hour or minute press the...

Page 35: ...zone is set to Greenwich Mean Time GMT 00 00 with daylight saving applied British Summer Time There are 2 methods available within the program for setting the machineʼs local time zone inc daylight saving To set time zone by region 1 Navigate System Settings Clock Daylight Saving Time Select Region The LCD will display the screen as shown in the following example the machineʼs time zone is set app...

Page 36: ...nd events stored in the machines memory to a data carrier or other device Data Transfer Standard EVA DTS Overview The standard makes it possible to transfer information from vending machines payment systems to PC based accounting management systems and or the opposite way It is important that all suppliers of vending machines and payment systems agree to a common standard for the Electronic Data T...

Page 37: ...nload by selecting them from the list displayed an will appear in each adjacent box indicating that it is selected Continue until all required fields have been selected CA304 Data Type This sub menu determines whether the data will be displayed as currency or numerical for example assuming that the value of pound coins in the machine is 3 00 when set to currency CA304 will read 300 in the DEX DDCM...

Page 38: ... temperature is displayed proceed as follows 1 From the System Settings menu select Temperature Units The LCD will display the screen as shown N B By default Temperature Units are factory set to C 2 To change C to F select Fahrenheit A filled radio button indicates that it is selected 3 To save the new parameter to the machines memory and return to the System Settings screen press Up One Level 7 6...

Page 39: ...selected To re enter the programming mode see 6 3 Accessing the Programming Mode 7 7 Security Codes Menu The security code for entry into the Operators Program is factory set so that the operator presses button 1 on the service keypad followed by the sequence 3 3 3 3 on the drink selection interface On no account should this code be altered without first consulting your supervisor or manager Secti...

Page 40: ...390mm 340mm 320mm 320mm 350mm 380mm 420mm Diameter 6mm I D x 9 5mm O D H Hot Water Dispense Pipe 8mm I D x 12 5mm O D 1 5 6 7 3 4 2 H 8 2 Single Freshbrew Machine Paperless Brewer Pipe No 1 2 3 4 5 6 7 8 Length 420mm 370mm 350mm 350mm 340mm 200mm 380mm 130mm Diameter 6mm I D x 9 5mm O D No 7 8mm I D x 12 5mm O D H Hot Water Dispense Pipe 8mm I D x 12 5mm O D 1 2 3 4 5 7 8 H 6 ...

Page 41: ...r machine 9 1 Hygiene Kits 1 2 3 4 5 7 6 8 9 10 11 Ref No Item Hygiene Kit Part No item quantity per kit HYG INFIN INTS Instant HYG INFIN FBREW Freshbrew 1 Whipper base 7 6 2 Impeller 7 6 3 Whipper body 7 6 4 Mixing bowl 7 6 5 Steam trap 7 6 6 Chute cannister central 6 5 7 Chute LH long 1 2 8 Chute RH long 1 1 9 Chute LH special 1 10 Whipper System Mini 11 Gauze Moulded Not shown Silicone pipe 8mm...

Page 42: ...PL13126000 Cup Catcher Moulding Squat Cup 2 PL13125000 Cup Catcher Moulding Tall Cup 3 PL13128000 Cup Catcher Moulding 12oz Cup 4 SIO1142960 Silicon pipe 16mm OD 5 PL13123000 Cup Stand 6 PL13131000 Drip Tray 7 PL13122000 Mounting Bracket Cup Stand 8 PL13133000 Grille 9 PL13132000 Surround Grille 10 MT11611000 Mounting Bracket Drip Catcher ...

Page 43: ...ing the service keypad immediately Co Ex Setup Required Co Ex brewer has not been setup Call an engineer Freshbrew and B2C drinks cannot be dispensed Out Of Cups Please Insert Mug Cup stacks empty SureVend has detected an error with the cup drop unit Refill cup stacks with correct size and type of cup Check the CDU if error remains call engineer Please Remove Cup A cup or mug has been left in the ...

Page 44: ...Incorrect cup size Remove cups from cup stack and replace with correct size cups No change given from change giver where fitted Coin tubes jamming Coin tubes empty or below pre set level Clear coin tubes and check for blockage Check and refill coin tubes where necessary Low water indicated on LCD display Water supply turned off Ensure water supply is turned on at stop tap Error Message Cause Solut...

Page 45: ...r of vends dispensed through CoEx brewer Empty coffee waste bin and reset waste counter see 4 12 for details 10 3 Machine Leaking Should the machine develop a leak switch off the mains water supply at the stop tap and if safe to do so switch off the mains electricity supply Contact your machine supplier for further assistance Safety First Do not attempt to repair the machine yourself Section 11 De...

Page 46: ...INFINITY 42 AUTOBAR ...

Page 47: ...Operators Manual 43 A FRESH APPROACH TO VENDING ...

Page 48: ...ther manuals and technical information for the Crane range www cranems co uk technical Pipsmore Park Bumpers Farm Industrial Estate Chippenham Wiltshire SN14 6NQ Tel 44 0 1249 444807 Fax 44 0 1249 444819 Email sales cranems co uk Website www cranems co uk ...

Reviews: