BATTERY CHARGER
Test Procedures
15
TEST PROCEDURES
See General Warnings, Section 1, Page 1-2.
Index of Test Procedures
1 – Battery Voltage Using Multimeter
2 – Battery Condition Using Charger – All Batteries
3 – On-Charge Battery Voltage Using Charger And Multimeter
4 – AC Power and Continuity Test of AC Circuit
5 – Charger DC Circuit Continuity Test
TEST PROCEDURE 1 – Battery Voltage Using Multimeter
See General Warnings on page 1-2.
1.
Check battery pack voltage.
See Measuring Voltage of Battery Set, Section 14, Page 14-2.
2.
Normal no-load voltage should be between 50 and 52 volts for a fully charged battery set. Normal no-load voltage
of an individual battery should not be less than 0.5 volts of the other 7 batteries (for 8 x 6 volt battery set).
TEST PROCEDURE 2 – Battery Condition Using Charger – All Batteries
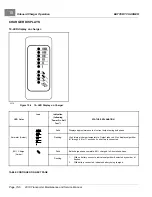
The easiest way to monitor the condition of a vehicle’s batteries is simply to observe the charger display (usually found
on the dash) at the end of the charge cycle. After a full charge, disconnect the charger AC plug, wait 30 seconds
and reconnect the charger AC plug. The green battery icon will flash quickly and then flash slowly within 10 to
20 minutes, indicating sound, fully charged batteries.
NOTE:
Batteries near the end of their useful lives may not allow the battery charge current to taper and the green
battery icon will continue to flash quickly.
Continued poor performance may indicate a problem in the vehicle electrical system, brakes or battery charger. If the
problem is not found in the vehicle or charging system, proceed to the on-charge voltage test. If the green battery icon
does not change to a slow flash, the batteries should be tested further using the on-charge voltage test.
TEST PROCEDURE 3 – On-Charge Battery Voltage Using Charger And Multimeter
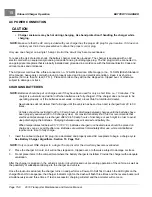
When the batteries are fully charged, disconnect the charger DC plug. Wait 20 to 30 seconds and reconnect the DC
plug to restart the charger. After 5 minutes, use a multimeter to check and record the voltage of the battery set as
well as the individual batteries. Set the multimeter to 200 volts DC. Place the red (+) probe on the positive (+) post
of battery no. 1 and the black (–) probe on the negative (–) post of battery no. 8 (for 8 x 6 volt battery set). Record
reading. Then set multimeter to 20 volts DC and place the red (+) probe on the positive (+) post and the black (–) probe
at the negative (–) post of each battery. Record the readings.
The on-charge voltage for the set should be between 56.0 volts and 63.0 volts depending on the age and state of
charge of the batteries being tested.
For 6 volt batteries:
If individual batteries read above 7.0 volts and are within 0.5 volt of each other, go to the
hydrometer test or discharge test.
See Battery Testing – 6 Volt, Section 14, Page 14-3.
If any battery reads below
7.0 volts and not within 0.5 volts of those batteries above 7.0 volts, replace battery. If readings are below 7.0 volts
but within 0.5 volts of each other, the batteries are old.
2019 Transporter Maintenance and Service Manual
Page 15-11
Summary of Contents for TransPorter 4
Page 2: ......
Page 271: ...ELECTRIC MAIN HARNESS Wiring Diagrams Electric Main Harness 18 ...
Page 272: ... Page intentionally left blank ...
Page 273: ...ELECTRIC INSTRUMENT PANEL HARNESS Wiring Diagrams Electric Instrument Panel Harness 18 ...
Page 274: ... Page intentionally left blank ...
Page 275: ...ELECTRIC ACCESSORIES HARNESS Wiring Diagrams Electric Accessories Harness 18 ...
Page 276: ... Page intentionally left blank ...
Page 282: ...NOTES ...
Page 283: ...NOTES ...
Page 284: ...NOTES ...
Page 285: ......
Page 286: ......

