MEDIPULSE 2342se ERGONOMIC SUCTION BLAST CABINET
Page 12
© 2019
CLEMCO INDUSTRIES CORP.
www.clemcoindustries.com
Manual No. 24939, Rev. C, 03/19
4.7.3
Keep doors closed and exhauster running until
the cabinet is clear of all airborne dust.
4.7.4
Unload parts.
4.8
Pulsing (cleaning) Dust Collector Cartridge
4.8.1
The dust-collector filter cartridge is pulsed each
time the foot pedal is pressed or released. Prolonged
periods of blasting or dusty conditions may require the
cartridge to be pulsed during the blasting process, per
Section 6.2.4, or upgrade to an automatic pulse kit. See
Section 9.1.
4.9
Shutdown
4.9.1
Shut off the air-supply valve, bleed the air-
supply line, and drain the compressed-air filter and dust-
collector pulse reservoir.
4.9.2
Switch OFF the lights and exhauster.
5.0
ADJUSTMENTS
5.1
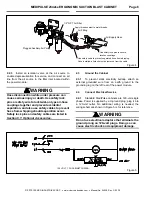
Blasting Pressure (pilot regulator) – Figure 14
5.1.1
The pilot regulator (located on the top-left side of
the cabinet), enables the user to adjust blasting pressure
while blasting, to suit the application. The suitable
pressure for most purposes is about 80 psi. Lower
pressures may be required on delicate substrates and will
reduce media breakdown. Higher pressure may be
required for difficult blasting jobs on durable substrates,
but it could increase media break down. If pressure is too
high, suction in media hose will decrease, and if high
enough can cause blow-back in the media hose. Optimal
production can only be achieved when pressure is
carefully monitored.
Figure 14
5.1.2
To adjust pressure, unlock the knob by pulling it
out, as shown in Figure 14, and turn it clockwise to
increase pressure or counterclockwise to decrease
pressure. Pressure may drop slightly from closed-line
pressure when blasting starts. Once operating pressure
is set, push the knob to lock it and maintain the setting.
5.2
Air Jet Adjustment ‒ Figure 15
5.2.1
Thread the air jet 4-1/2 to 5 full turns into the gun
body. Doing so leaves 3-1/2 to 4 threads exposed past the
lock nut. Tighten the lock nut to maintain the setting. Refer
to Section 9.2 for optional adjusting tool, which correctly
positions the jet. Instructions are provided with the tool.
Figure 15
5.3
Media-Air Mixture, Figure 16
5.3.1
Check the media stream for correct media-air
mixture; media flow should be smooth and appear as a
light mist coming from the nozzle.
Figure 16
5.3.2
If media does not flow smoothly, loosen the
locking nut, and adjust the metering screw until the
upper holes in the metering stem are closed off and the
lower holes are fully open, as shown in Figure 16. This
adjustment is a starting point.
5.3.3
If pulsation occurs in the media hose, either
media is damp and caked, or not enough air is
entering the media stream. While blasting, loosen the
lock nut and slowly turn the adjusting screw out
Adjusting Screw
Locking Nut
Lower holes fully open.
Upper holes
fully closed.
When viewed from the knob end,
turn clockwise to increase pressure;
turn counterclockwise to decrease pressure.
Adjustment Knob
Lock Nut
Air Jet Hex
Blast Pressure Regulator
Located on top-left
side of cabinet.
Push knob in to lock.
Pull knob out to unlock
and adjust pressure.
3-1/2 to 4 threads between
lock nut and air jet hex.

