MEDIPULSE 2342se ERGONOMIC SUCTION BLAST CABINET
Page 9
© 2019
CLEMCO INDUSTRIES CORP.
www.clemcoindustries.com
Manual No. 24939, Rev. C, 03/19
3.6
Dust-Collector Differential Pressure Gauge
3.6.1
The differential pressure gauge measures
pressure drop across the filter cartridge. The gauge is
the best way to monitor cleaning efficiency and dust
buildup on the cartridge.
3.6.2
The gauge panel, gauge, filter, and panel
fittings come fully assembled; the bushings, snubber
fittings, and tubing are loose. Mount the panel on the
cabinet or power module at a location where it can be
easily monitored. There is not enough room on a
MediPulse 2342se to mount it at the front of the cabinet,
choose another convenient location. A 20-foot length of
tubing is included with the kit, allowing the panel to be
mounted within 10 feet of the dust collector connections,
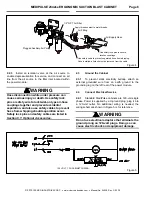
as shown in Figure 11.
3.6.3
Mounting holes are on left side and at the
bottom of the gauge panel. After selecting the location,
match drill holes, and use nuts and cap screws to secure
the panel. Note: Make sure the panel is close enough to
the dust collector for 10 feet of tubing to reach.
3.6.4
Remove 1/4" pipe plugs from the dust collector
body and install 1/4" x 1/8" bushings and snubber
fittings, as shown in Figure 11.
3.6.5
Connect the 1/4" tubing to the snubber fittings
and gauge, as shown by removing the fitting’s
compression nut, sliding it over the end of the tubing,
inserting the tubing into the fitting, and tightening the nut
onto the fitting.
3.6.6
Refer to the differential pressure gauge manual
provided for operation of the gauge.
3.7
Armrest ‒ Figure 12
3.7.1
Position the assembly so the armrest is about
even with the bottom of the arm port opening. Mark one
hole location on the front of the cabinet at each
mounting bracket.
3.7.2
Drill a 3/8" hole at both locations and mount the
armrest using 5/16 bolts, washers and nuts. Install the
bolts from inside the cabinet to protect the threads from
abrasion, should the armrest need to be removed later.
3.7.3
Match drill the remaining four bracket holes and
install the remaining fasteners.
3.7.4
Loosen the fasteners on the slotted bracket and
raise or lower the armrest to a comfortable position.
Figure 11
Inline Filter, arrow pointing toward the gauge.
To Hi (+) Port on Gauge
Tubing from the dust side of the collector
(lower snubber) connects to fitting with
the inline filter and Hi (+) port on the
differential-pressure gauge.
Upper Snubber
1/4" x 1/8" Bushing
Lower Snubber
Tubing from the clean side of the
collector (upper snubber) connects to
fitting leading to the Lo (-) port on the
differential-pressure gauge.
To Lo (-) Port on Gauge
Upper snubber is the clean side
of the collector, to Lo (-) port.
Lower snubber is the dust side of the
collector, to inline filter and Hi (+) port.
Differential
Pressure Gauge
Gauge Panel
Remove pipe plugs and install
bushings and snubber fittings.

