MEDIPULSE 2342se ERGONOMIC SUCTION BLAST CABINET
Page 22
© 2019
CLEMCO INDUSTRIES CORP.
www.clemcoindustries.com
Manual No. 24939, Rev. C, 03/19
Figure 29
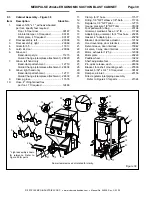
7.9.3
Tie off or otherwise seal the top of the liner and
remove it from the container. Dispose of the sealed liner
into a suitable disposal receptacle.
7.9.4
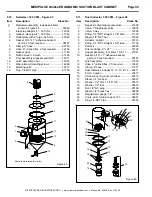
Refer to Figure 30 and unlatch the dust-collector
hopper bottom and remove it from under the collector.
7.9.5
Remove the cartridge retaining nut, washer, and
gasket from the support bracket.
Figure 30
7.9.6
Slide the cartridge straight down until it clears
the support bracket. A small amount of rocking may be
necessary to loosen the gasket seal from the sealing
surface.
7.9.7
Clean all reusable parts, especially around the
cartridge sealing area. Scrape off any residual gasket
material from the sealing surface.
7.9.8
Install the new cartridge. Tighten the retaining
nut until the cartridge cannot be moved by hand. Tighten
the nut one additional full turn.
7.9.9
Check the hopper gasket for any condition that
will prevent the gasket from sealing. Replace the gasket
as required.
7.9.10
Attach the hopper bottom and latch in place.
7.9.11
Refer to Figure 29 and place a new liner inside
the container and drape it over the top edge. Reattach
the container to the lid and latch the lock ring, making
sure the lid and clamp are secure. Replacement liners
are shown in Sections 9.11.
7.9.12
Season cartridge, per Section 7.10.
7.10
Seasoning Filter Cartridges
NOTICE
Do not pulse a new dust collector or
replacement filter cartridge until the cartridge is
properly seasoned. Pulsing unseasoned
cartridges can decrease the efficiency of dust
collectors and cause premature cartridge
failure.
7.10.1
New cartridges must be seasoned before
starting pulsing. The cartridge is seasoned by letting a
layer of dust (dust cake) develop on the outer surface of
the filter media. The dust cake protects the filter
cartridge and enhances the filtering efficiency; it is the
dust cake that actually does the filtering.
7.10.2
To prevent the cartridge from pulsing, turn the
pulse regulator OFF (to 0 psi). Refer to Section 5.6 to
adjust pulse pressure.
7.10.3
Operate the cabinet without pulsing for about
two hours or until visibility decreases, whichever comes
first. At that time turn the pulse regulator to 60 psi to start
the pulsing cycle.
Drum Liner
Latch Catch
Swing the catch
up to unlock the
lock-ring latch.
Latch
Pull the latch away
from the ring and
remove the ring.
Cartridge Sealing
Gasket
Flat Washer
Retaining Nut
Hopper Bottom
(access door)
Dust Container
Hopper Gasket
Lock Washer
Drain
Latch (4)


