Chapter 6 Navigation
NR1UB/NR1UW/NR1UR
91
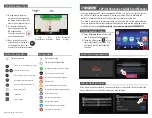
The following describes the function of the keys
on the screen.
2
Tap the search method you want.
Tapping [At a certain place] will display a
soft keyboard like the one shown below. If
you tap [Any place], [Nearby], or [At
destination], jump directly to step 4 of this
procedure.
3
Enter the country name or city name and
then tap
.
This displays the software keyboard shown
below.
4
Enter the keyword you want to search for
and then tap the [Google] key.
This accesses the Google Maps site and
displays a list of 20 POIs.
Tapping
will access the Google Maps
site again and display a list of next 20
items.
NOTE
Tapping the [Hide map] key will switch to a list
view without the map. To switch back to the list
view with the map, tap the [Display on map]
key.
5
On the list, tap the POI you want.
This displays detailed information about the
destination.
The detailed information includes the POI
name, star rating, distance (distance from
current location or distance from a
specified location, depending on
conditions), address, country code, postal
code, telephone number, POI website, and
more.
Any place
Tap to select a new destination.
This lets you search by specifying
a keyword like those used on
Google Maps.
Nearby
Tap to select a POI in the vicinity
of your current location.
At a certain
place
Tap to select a new destination. In
addition to keywords, you also can
specify the city to search.
At destination
Select a POI in the vicinity of the
currently selected destination.
This key is available only after a
route is set.