background image

Civemasa Implementos Agrícolas 

38

CRO 4.0

Maintenance

Maintenance of the row hubs

• When the existence of looseness is noticed, it is necessary to make the maintenance 

on the row hubs.

• Disassemble the hubs and remove its internal components.
• Clean all parts with diesel oil or kerosene.
• Verify the existence of looseness and the conditions of bearings, retainers and 

bushings. Replace the damaged components or the ones with excessive wearing.

• The bearing must be changed on a preventive manner to avoid that it breaks and the 

equipment unavailability, as well as a greater maintenance cost, as more parts of the set 

will be damaged when the bearing breaks up during the job.

• The hubs with grease fittings should be lubricated until the new grease is visible.
• The hubs with tapered roller bearings fastened by castle nut and cotter pin allow the 

adjustment of the inner clearance; excessive tightening should be avoided. The hubs should 

rotate with the hand applying a small effort.

Summary of Contents for CRO 4.0

Page 1: ...OPERATOR S MANUAL CRO 4 0 CRO 4 0 ...

Page 2: ... usage it is possible to use another products such as bagasse vinasse boiler ash chimney soot and others The compost turner is pulled by the tractor drawbar This equipment has two tires and the frame with finned rotor which is vertically lifted by a hydraulic cylinder This instructions manual contains the necessary information for the best performance of this equipment The operator must carefully ...

Page 3: ...and equipment 22 Cardan shaft working angle Lights activation 23 Frame articulation Working direction 24 Troubleshooting guide 25 Operations Important points 26 8 Optional 27 to 36 Furrower assembly 27 Assembly of the furrower hydraulic hose 28 Furrower opening adjustment 29 Sprayer assembly 30 Sprayer hydraulic hose assembly 30 Filling up the reservoir 31 Spray pressure adjustment 32 Flow rate ad...

Page 4: ...e Instructions manual Technical assistance by the dealer on equipment delivery However the owner must check the condition of the equipment on delivery as well as knowing the warranty terms Special attention should be given to the safety recommendations operation precautions and maintenance of the equipment The instructions in this manual indicates how to get the best performance and allow the oper...

Page 5: ...pects must be carefully observed to avoid accidents This symbol is a warning to prevent accidents The instructions under this symbol refers to the safety of the operator or third parties therefore they should be carefully read and observed When the safety instructions are not being followed a serious accident or even death may occur The CRO compost turner is simple to operate requiring however the...

Page 6: ...e driving on slopes Risk of overturn Prevent that chemical products i e fertilizers treated seeds make any contact with your skin or clothes Keep access and work places clean or free from oil and grease Risk of accidents Have extreme caution when driving under electrical power lines Any contact may result in severe shocks injuries or death For your protection and safety always wear adequate clothe...

Page 7: ...ing In case of emergency know how to stop the tractor and equipment quickly Always shut down the engine remove the key and use the handbrake before leaving the tractor seat Only pull the equipment using a tractor with appropriate power Carefully check the transport width on narrow locations Do not drive the equipment under the influence of alcohol or any soothing stimulating medicine as it may res...

Page 8: ...ent to the truck or trailer during the transport Make sure the SMV Slow Moving Vehicle sign and all the lights and reflectors that are required by the local highway and transport autorithies are in place are clean and can be seen clearly by all overtaking and oncoming traffic After 8 to 10 km transporting please inspect the load condition Repeat this procedure every 80 to 100 km Give more attentio...

Page 9: ...s essential to hitch the cables to these lifting points as shown above The lifting must be done separately in two steps Frame 01 Ballasts 02 one at a time 01 01 02 02 Use chains of at least 3 meters long to lift the equipment safely Use the adequate points for lifting and be sure that the equipment is safe Avoid accidents Always keep a safe distance from the equipment ...

Page 10: ...odillo aleteado o debajo del túnel 05 03 03 3166 A A T T E E N N Ç Ç Ã Ã O O A A T T T T E E N N T T I I O O N N A A T T E E N N C C I I Ó Ó N N 5 5 4 4 0 0 R R P P M M 05 03 03 2949 Este equipamento é fabricado para operar a 540 RPM na TDP Todas as c a p a s d e p r o t e ç ã o d o s c a r d a n s devem ser mantidas no local This equiment is designed to operate at 540 RPM maximum tractor PTO spee...

Page 11: ...r to avoid accidents keep away from the equipment when the same is folding or unfolding Mechanical or hydraulic failure can make the equipment to fall down quickly Para evitar accidentes quede lejos del equipo cuando el mismo esté articulando o desarticulando Fallas mecánicas o hidráulicas pueden hacer con que el equipo baje rapidamente Para evitar acidentes instale as travas dos cilindros antes d...

Page 12: ...to a short distance keep it assembled but retreat the cylinder and place the safety lock When transporting the equipment to greater distances unassemble and transport the equipment on an appropriate vehicle Data sheet 4450 4450 2056 2056 5100 5100 2030 2030 4800 4800 6860 6860 Working Working position position Transport Transport position position ...

Page 13: ...pacity m ha Average income Hour m 4 000 1 500 Undetermined 2 772 690 Groove features The groove dimensions described above are for when working with filter cake these dimensions may have to be redefined depending on the type of material for the equipment to work normally Data sheet IMPORTANT The capacities and incomes totally depend on the type of product that will be composted and conditions of t...

Page 14: ...arbox 04 Parking jack 05 Cardan shaft 06 Clutch 07 Rotor 08 Blades 09 Frame wheel 10 Spindle 11 Frame 12 Frame hydraulic circuit 13 Larger ballast 14 Lights 15 Cylinder lock 16 Locking bar 17 Tow 01 01 02 02 03 03 04 04 05 05 06 06 07 07 08 08 11 11 12 12 13 13 14 14 14 14 15 15 16 16 17 17 09 09 10 10 ...

Page 15: ...8 17 17 12 12 13 13 09 09 10 10 14 14 14 14 15 15 16 16 18 18 11 11 07 07 01 Wheel 02 Smaller ballast 03 Gearbox 04 Parking jack 05 Cardan shaft 06 Clutch 07 Rotor 08 Blades 09 Frame wheel 10 Spindle 11 Frame 12 Frame hydraulic circuit 13 Greater ballast 14 Lights 15 Cylinder lock 16 Locking bar 17 Furrower optional 18 Tow ...

Page 16: ... 07 08 08 11 11 17 17 14 14 12 12 13 13 09 09 10 10 16 16 18 18 19 19 01 Wheel 02 Smaller ballast 03 Gearbox 04 Parking jack 05 Cardan shaft 06 Clutch 07 Rotor 08 Blades 09 Frame wheel 10 Spindle 11 Frame 12 Frame hydraulic circuit 13 Greater ballast 14 Lights 15 Cylinder lock 16 Locking bar 17 Furrower optional 18 Sprayer optional 19 Tow ...

Page 17: ...er ones observing the equipment from behind according to the illustration Smaller stones Filling NBR 7212 and 12655 concrete Volume 0 293 m per stone Compression strength FCK 13 5 MPA Formula CAP 1 2 3 Water 20 27 liters cement bag Larger stones Filling NBR 7212 and 12655 concrete Volume 0 456 m per stone Compression strength FCK 13 5 MPA Formula CAP 1 2 3 Water 20 27 liters cement bag After filli...

Page 18: ...01 10 Nipple 3 4 UNF x 3 8 BSPT x 50 01 11 Hydraulic cylinder 01 12 Male quick coupler 1 2 NPT 02 When using the frame articulation turn the flow divider valve 09 carefully and assess the tractor control valve in order to avoid that the frame lifts or lowers quickly what could lead to damages to the equipment NOTE Cilindro do pórtico Tunnel cylinder Cilindro del pórtico Pressão Pressure Presión Re...

Page 19: ...PM on the PTO Hydraulic system with quick coupling Drawbar to couple the equipment For hitching choose a clean place and as flat as possible Hitch the equipment to the tractor drawbar using a hitch pin A and cotter pin B If necessary use the parking jack C that has an adjustment to lift or lower the drawbar thus facilitating hitching Detail for the Detail for the transportation transportation IMPO...

Page 20: ...0 hours of operation it is recommended to change the oil This is necessary because by this time the gearbox will get softened Afterwards the change can be made every 500 hours Verify the oil level in a flat place by loosening and removing the level plug E until the presence of oil is noticed In order to carry out the whole change drain all the oil by removing the drain plug F located in the lower ...

Page 21: ...roximately 70º Seventy degrees Being the cardan bars placed side by side check if there is a minimum clearance of 5 7 cm 5 a 7 cm 5 a 7 cm 5 a 7 cm 5 a 7 cm 70º 70º Reducing the cardan shaft length If necessary cut similar parts of the male and female shaft as well as the protective covers But before cutting check every possibility of using the cardan without reducing its length The length adjustm...

Page 22: ... length of the cardan shaft again The chains of the protective covers should be fastened to both equipment and tractor so that they will not get loose during maneuvers NOTE The contact surface between the hub and the bar must never be smaller than 1 3 of its total length Proper cardan assembly When assembling the cardan note the correct alignment at both ends The wrong assembly causes excessive vi...

Page 23: ...CC 2000 CC CI 2500 CC CI 5000 CC 6000 Torque kgf 70 90 90 and 120 120 and 150 Clean and grease the tractor and equipment PTO shaft A before mounting the cardan The figure that can be seen on the cover indicates the correct fixation side to the tractor Install the security devices always on the side of the equipment Couple the cardan to the PTO shaft of the tractor by pressing the pin introduce the...

Page 24: ...70º Do not make any type of maneuver being the homokinetic cardan off NOTE If the cardan works with an angle greater than 30º there will be a noise and immediate damage to it It is recommended to turn off the tractor PTO to perform maneuvers that exceeds the angle limit of 30º Resting position Resting position 30 30 30 30 Lights activation B B A A The equipment comes with rear and front lights A t...

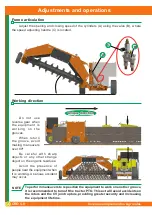
Page 25: ...ng greater security and increasing the equipment lifetime D o n o t u s e reverse gear when the equipment is w o r k i n g o n t h e grooves When return the groove avoid making maneuvers over 80º Be careful with sharp objects or any other strange object on the organic residues Avoid the presence of people near the equipment when it is working A serious accident may occur Frame articulation A A B B...

Page 26: ...the command through the relief valve with the help of a gauge Normal pressure 180 Kgf cm2 Hydraulic oil temperature excess Check the oil level on the tractor Quick couplers leaking Insufficient tightening Retighten carefully Lack of sealing material on the thread Use thread sealing tape and retighten carefully Damaged repairs Replace the repairs Tractor stalling Over sized groove Reduce the size o...

Page 27: ...lance the rotor Note the lubrication intervals carefully See lubrication section for instructions Regularly check the tractor hydraulic system The oil level on the gearbox must be checked weekly and filled up when necessary with SAE 90 mineral oil Grooves dimension 4 meters wide x 1 50 meters high The equipment tires must be calibrated according to the instructions on the tires inflation page The ...

Page 28: ...cts during the composting process To assemble the furrower the operator just need to fasten it to the rear part of the frame as shown on the illustration below Couple the arm support of the row marker A to the frame B using a bolt C spring washer and nut Lock the shock absorber D to the frame using a spring washer and bolt NOTE When transporting the CRO always use the transport lock E to assure th...

Page 29: ... that are from the same circuit Check the safety decals page Cilindro do pórtico Tunnel cylinder Cilindro del pórtico Pressão Pressure Presión Retorno Return Retorno Cilindro do sulcador Furrower cylinder Cilindro del surcador Motor hidráulico da bomba Hydraulic motor Motor hidráulico de la bomba 05 03 03 4820 Cilindro do pórtico Tunnel cylinder Cilindro del pórtico Pressão Pressure Presión Retorn...

Page 30: ...ccording to the need and amount of product to be incorporated during the composting process For opening or closing the furrow loosen up the bolt B and position the adjustment bar A on the desired holes With this adjustment the wing will open or close The furrower rods have depth adjustments when opening the grooves so it is possible to loosen up the bolt C spring washer and nut to move it to the d...

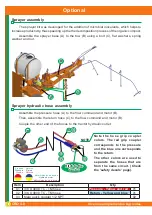
Page 31: ... bolt C flat washers spring washer and nut B B A A C C Hitch to the Hitch to the tractor tractor A A A A B B C C C C 02 02 03 03 01 01 Note the hose grip coupler colors The red grip coupler corresponds to the pressure and the blue one corresponds to the return The other colors are used to separate the hoses that are from the same circuit Check the safety decals page NOTE Cilindro do pórtico Tunnel...

Page 32: ...ough the level belt B found on the front part of the reservoir After filling up deposit pesticide through the same opening according to the instructions on the pack and also from an agronomist NOTE NOTE This procedure must be done on a flat place and being the jacks lowered Do not let the product deplete during working as this may result on damages to the pump This equipment is supplied with a non...

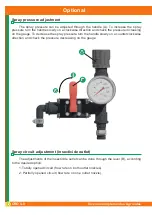
Page 33: ...ssure increasing on the gauge To decrease the spray pressure turn the handle slowly on a counterclockwise direction and check the pressure decreasing on the gauge Spray circuit adjustment insecticide outlet Optional The adjustments of the insecticide outlet can be done through the lever B according to the desired option 1 Totally opened circuit flow rate on both outlet nozzles 2 Partially opened c...

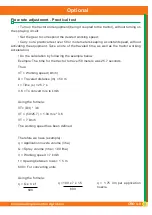
Page 34: ...or working acceleration Do the calculation by following the example below Example The time for the tractor to travel 50 meters was 25 7 seconds Thus VT Working speed km h D Traveled distance m 50 m t Time s 25 7 s 3 6 To convert m s to km h Using the formula VT D t 3 6 VT 50 25 7 1 94 m s 3 6 VT 7 km h The working speed has been defined Therefore we have example q Application nozzle volume l ha Q ...

Page 35: ...sidues Drain all the water from the reservoir Clean the exterior of the equipment using a dry cloth and store it on a closed and ventilated place F o l l o w t h e s e conservation instructions to let the equipment ready to use and to assure a greater lifetime Optional A A Cleaning the filters It is recommended to clean all filters B and C before filling up as shown below When working dirty the fi...

Page 36: ... pressure as shown on the table below After the adjustment it is not necessary to drain the fluid using a conventional compensatory chamber Pump working pressure bar PSI 2 29 5 72 10 145 20 290 Compensatory chamber pressure bar PSI 1 15 2 29 4 58 5 72 Before starting to carry out any maintenance on the pump B be sure that there is no mechanical or hydraulic connections on it thus assuring safety t...

Page 37: ...oiding the use of products contaminated by water earth and others Remove the remainder old grease around the articulations Clean up all grease fittings with a cloth before introducing the lubricant and substitute the defective ones Introduce an enough amount of new lithium soap grease with an extra pressure additive When starting the job and every day of the first week of use check the oil level o...

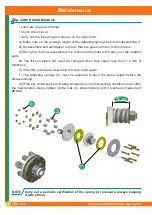
Page 38: ...ction plates must turn freely over the metallic parts D The friction plates B must be changed when they reach less than 1 5 mm of thickness E After this procedure assemble the slip clutch again F The adjusting springs A must be adjusted to have the same length before the disassembling G If the slip clutch keeps activating constantly on normal working conditions even after the maintenance steps tig...

Page 39: ...amaged components or the ones with excessive wearing The bearing must be changed on a preventive manner to avoid that it breaks and the equipment unavailability as well as a greater maintenance cost as more parts of the set will be damaged when the bearing breaks up during the job The hubs with grease fittings should be lubricated until the new grease is visible The hubs with tapered roller bearin...

Page 40: ...er inflate the tires beyond the recommended pressure Never weld or heat a wheel The heat can cause increase in pressure with a risk of tire explosion Welding can compromise the structure of the wheel or distort it When filling the tires make sure the hose is long enough for you to stand Also do this process in a safety cage 14 x 17 5 14 tire maximum pressure 80 PSI 11L 15 tire 10 ply maximum press...

Page 41: ...dness on the barrel or other problems consequently leading to internal leakages lack of power gripping damages to the cylinder rods etc Do not attempt any makeshift repairs to the hydraulic lines fittings or hoses by using tape clamps or cements The hydraulic system operates under extremely high pressure Such repairs will fall suddenly and create a hazardous and unsafe condition Wear proper hand a...

Page 42: ... maintenance procedures store the equipment on a proper place dry and cleaned Hydraulic system When changing the tractor oil check the recommendations on the tractor manual Storage For any maintenance process or when transporting the equipment proceed as follows Before carrying out any maintenance procedure check if the equipment is properly supported When closing the cylinder to lift the frame A ...

Page 43: ...Ft Lbs 480 Ft Lbs 530 Ft Lbs 675 Ft Lbs 750 Ft Lbs 1 1 8 265 Ft Lbs 300 Ft Lbs 600 Ft Lbs 670 Ft Lbs 960 Ft Lbs 1075 Ft Lbs 1 1 4 375 Ft Lbs 415 Ft Lbs 840 Ft Lbs 930 Ft Lbs 1360 Ft Lbs 1500 Ft Lbs 1 3 8 490 Ft Lbs 560 Ft Lbs 1100 Ft Lbs 1250 Ft Lbs 1780 Ft Lbs 2030 Ft Lbs 1 1 2 650 Ft Lbs 730 Ft Lbs 1450 Ft Lbs 1650 Ft Lbs 2307 Ft Lbs 2670 Ft Lbs Coarse Fine Coarse Fine Coarse Fine GRADE 2 No Mar...

Page 44: ... to make improvements in the design material or specifications of machinery equipment or parts without thereby becoming liable to make similar changes in machinery equipment or parts previously sold Images are for illustration purposes only Some illustrations in this manual appear without the safety devices removed to allow a better view and detailed instructions Never operate the equipment withou...

Page 45: ...Civemasa Implementos Agrícolas 44 CRO 4 0 Notes ...

Page 46: ...as o animales durante el trabajo 11 No efectuar regulajes con el equipo en funcionamiento 12 No permitir que niños jueguen sobre o próximo de los equipos en operación durante el transporte o almacenado 13 La velocidad de operación debe ser cuidadosamente controlada 14 En terreno inclinado mantenga la estabilidad ideal En inicio de desequilibrio baje la aceleración y no levante el implemento 15 Los...

Page 47: ...CIVEMASA IMPLEMENTOS AGRÍCOLAS LTDA CIVEMASA IMPLEMENTOS AGRÍCOLAS LTDA Marchesan Av 1979 CEP 15994 900 MATÃO SP BRAZIL Telephone 55 16 3382 8222 www civemasa com br ...

Reviews: