background image

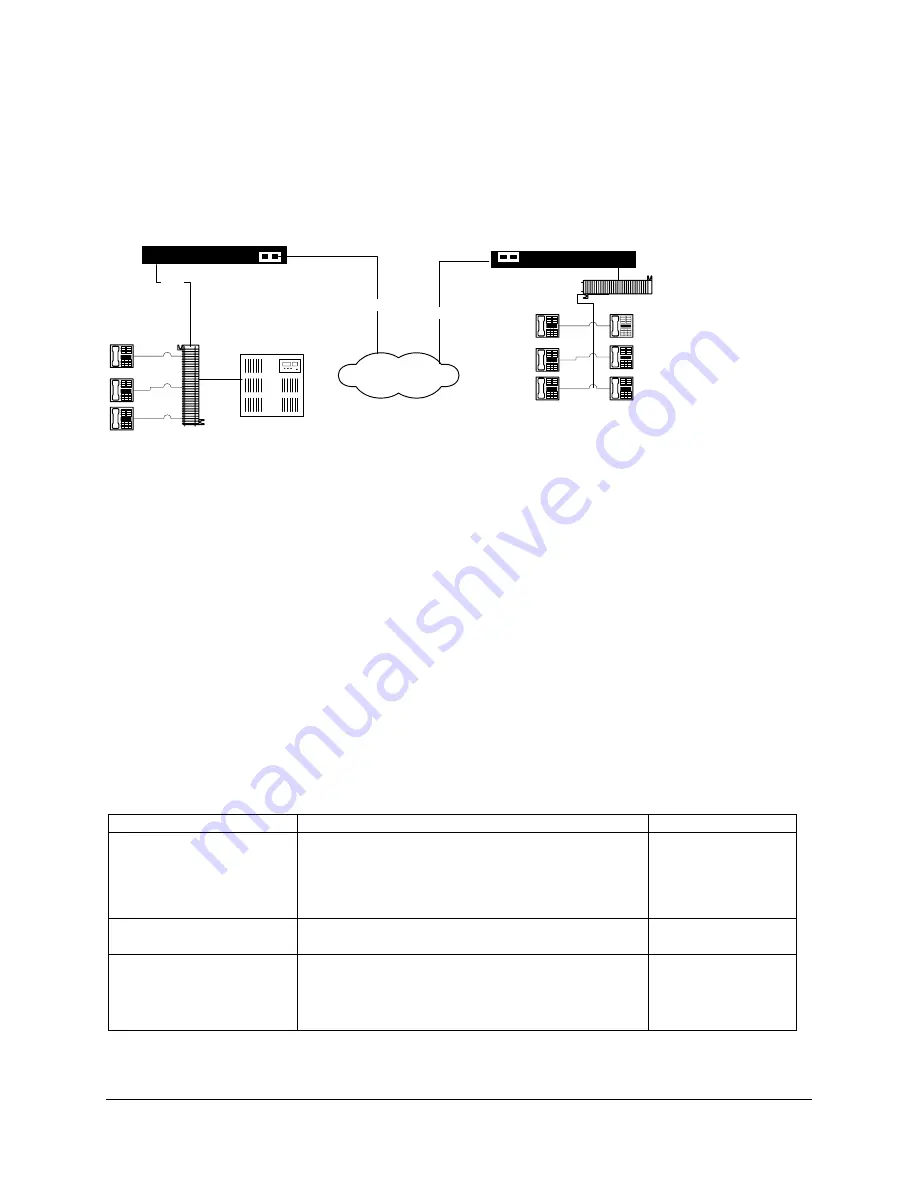
IP Network (RVP_Over_IP) 

This section of the manual provides the necessary information to configure the EXTender for connection 
within an IP network. 

Note: The units are programmed at the factory with RVP_Direct “default” settings. The Type parameter 
must be set to RVP_Over_IP


IP Network

Branch Office

Punch Block

EXTender IP6000

Punch Block

PBX

Corporate Office


PBXgateway 

Ethernet

RJ21

Ethernet


Figure 10:   RVP_IP Typical Installation 

Prerequisites for Configuration 


Both EXTender and Gateway must be installed properly and the network link between both devices 
must be operational. 


The network administrator must assign IP address information for both Gateway and Remote units. 


The network administrator must provide the remote users with User ID’s and Connect Passwords (if 
assigned). 

TCP/UDP Requirements 

Ensure that the correct TCP/UDP ports have been opened to allow the EXTender to connect to the 
Gateway through your company firewall. The following TCP/UDP port requirements must be met: 
The EXTender 6000 uses even numbered ports 12,288 to 12,544. The port numbers start at 12,288 and 
increment by 2 to the total number of ports used. For example, if you have an 8 port EXTender 6000 with 
3 telephones connected, ensure that ports 12,288, 12,290, and 12,292 are opened. 
The Gateway unit uses TCP/UDP port 2698. 

Basic Configuration 

Table 8:  

RVP_IP Basic Configuration Steps 

You must … 

to… 

Default Settings 

Set Connect Parameters.

 Type: 

RVP_Over_IP 

RVP_Direct 

IP Destination:

 Enter the IP address of the 

Gateway. 


10000000 

EXTender Port Bandwidth 

100


Set the Utilization: 

Disable WAN ports 

Disable WAN ports that are unnecessary for 
RVP_IP. 

WAN 1 – Enabled 
WAN 2 -Disabled 

Allow the Gateway to communicate over the IP 
network. 

Set IP parameters; 

9


IP Address 

9


Subnet 

9


Default Router 

EXTender™ IP6000 Quick Installation Guide

27 


Summary of Contents for EXTender IP6000

Page 1: ...THE VOIP MIGRATION COMPANY TM TM EXTender IP6000 Quick Installation Guide G IP6000 RUC Rev AC February 9 2007...

Page 2: ...stantial additional charges for your telecommunications services You and your system manager are responsible for the security of your system such as programming and configuring your equipment to preve...

Page 3: ...EXTender IP6000 Quick Installation Guide 3...

Page 4: ...EXTender IP6000 Quick Installation Guide 4...

Page 5: ...17 Typical Installation 17 Mounting the EXTender 6000 18 Connections Telephony Wiring RJ 21 19 20 VT 100 Setup Power Up 21 21 LED States 22 Basic Configuration 23 Installation Environment 24 Synchrono...

Page 6: ...Only 41 Procedure 42 Setting up Call Suspend 43 Procedure for Avaya and Meridian EXTender Configuration 44 Procedure for Avaya and Meridian Gateway Configuration 46 Procedure for Norstar EXTender Conf...

Page 7: ...ermined by turning the equipment off and on the user is encouraged to try to correct the interference by one or more of the following measures Reorient or relocate the receiving antenna Increase the s...

Page 8: ...or for repair or warranty information please contact Citel Technologies at 1 888 454 5828 If the equipment is causing harm to the telephone network the telephone company may request that you disconne...

Page 9: ...echniques relatives au mat riel terminal Le Minist re n assure toutefois pas que le mat riel fonctionnera la satisfaction de l utilisateur Avant d installer ce mat riel l utilisateur doit s assurer qu...

Page 10: ...f the Environment The WEEE Directive This equipment is marked according to the European directive 2002 96 EC on Waste Electrical and Electronic Equipment WEEE By ensuring this product is disposed of c...

Page 11: ...HDLC Interfaces Ethernet Single 10 100 megabit RJ 45 Serial WAN EIA TIA 232 EIA TIA 530 EIA TIA V35 Management Serial RS 232 DB9 PBX KSU Up to 8 digital line interfaces over a 25 pair RJ 21 cable Voic...

Page 12: ...ble 1 ISDN TAs MFG Model s see note TA s for Async Motorola Bitsurfr Pro Bitsurfr Pro EZ Adtran ISU 128 see note ISU 2X64 Express 3000 Express NTU 3Com ISDN TA 3Com U S Robotics Connect IQ 400 Series...

Page 13: ...you order your ISDN Line A call is defined as voice or data in the setup message Information for the System Administrator Once your ISDN line is installed you will be provided with two Service Profil...

Page 14: ...s digital display telephone is NOT recommended for administrative purposes Recommended if a set must be extended via the ConneX port Toshiba Magix Digital Telephones DKT2004 4424LD DKT2010 4424D DKT20...

Page 15: ...S 576 Panasonic DBS 576 HD Avaya IP Office PBX Type to Select 4406D Magix 4412D Magix 4424D Magix DSS 4450 add on module for 4424LD and 4424D 2402 Definity 2410 Definity 2420 Definity 6408 Definity 64...

Page 16: ...he punchdown block and the EXTender See Pin Out Assignments on page 19 Analog telephone line for local use if you purchased an analog line card Note The analog line card is not available outside North...

Page 17: ...Cross Connect Wires EXTender 6000 Punch Blocks Figure 1 Typical 6000 Installation Mounting the EXTender IP6000 You can mount the EXTender in a standard 19 inch communication rack using the brackets pr...

Page 18: ...Set the COM port as follows Baud rate 9600 Databits 8 Parity none Stopbits 1 Software flow control Xon Xoff B Fan Cools unit C Power Connect to a 120 VAC outlet D Power Switch Turns unit on and off E...

Page 19: ...BR RD 17 OR YL 28 WH GN 2 36 BK BL 6 44 YL BR 10 3 GN WH 11 BL BK 19 BR YL 30 WH SL 3 38 BK GN 7 46 VI BL 11 5 SL WH 13 GN BK 21 BL VI 32 RD OR 4 40 BK SL 8 48 VI GN 12 7 OR RD 15 SL BK 23 GN VI Wire...

Page 20: ...icon B When prompted for a name type gateway and click OK C Determine what port n you will connect to on your pxc At the Telephone Number dialog select Connect using Direct to COMn ignore other setti...

Page 21: ...ly configure the Ethernet mode to force 10 or 100 megabit Ethernet or power cycle the Remote Unit with the network cable connected in order to auto detect the 100 megabit Ethernet connection Once the...

Page 22: ...next page Basic Configuration Press Enter The MI Welcome Screen is displayed Figure 7 Welcome Screen IMPORTANT TERMINAL SETTINGS The MI requires a screen size of 24 lines X 80 columns Make sure the We...

Page 23: ...s To configure the EXTender with See page a Synchronous serial device via WAN Port s 1 or 2 RVP_Direct using one of the following protocols 24 V 35 RS 232 RS 530 an Asynchronous serial device via WAN...

Page 24: ...nch office must be installed properly and the network link between both devices must be operational The network administrator must assign an IP address for both units if you plan to configure and test...

Page 25: ...trator must assign IP address information for both Gateway and Remote units The network administrator must provide the remote users with User ID s and Connect Passwords if assigned Table 7 Basic Confi...

Page 26: ...DN 1 number assigned to the ISDN line which was provided when the ISDN line was installed Example 2881918 ISDN SPID 1 Enter SPID 1 assigned to the first ISDN B channel Example 40328819180101 Local Dia...

Page 27: ...sure that the correct TCP UDP ports have been opened to allow the EXTender to connect to the Gateway through your company firewall The following TCP UDP port requirements must be met The EXTender 6000...

Page 28: ...dditional country names for selection Select Y when the correct country name is displayed The EXTender provides a console setup wizard that guides you through many of the required programming configur...

Page 29: ...t included with unit Direct analog phone line for connection to the modem RS 232 DB25 to DB9 modem cable male male see table below for pinout information Properly installed PBXgateway unit DB25 Male D...

Page 30: ...ory defaults Loads generic template from read only memory ROM 8 DOWN Smart mode Enable recognition Smart mode Installing the Modem at the Remote Site Procedure 1 Connect the analog phone line to the m...

Page 31: ...sion can be established to a unit The PBXgateway I must be powered up and online see Power up procedure on page Error Bookmark not defined Procedure 1 On a computer running Windows open the Telnet app...

Page 32: ...the LAN port The EXTender must be powered up and online Procedure 1 Access the Management Interface MI using a Telnet session or via the Console Port 2 Access the Web Server parameter using the follow...

Page 33: ...A is connected and accepting commands but there is no link up in Call Suspend mode or have not dialed it yet Port LEDs Solid Green if connected properly to PBX Figure 14 HTML View 10 The Management In...

Page 34: ...nt refer to the System Administrator s Guide for trouble shooting steps Placing an 911 Analog Call if purchased Note This procedure applies only to the single analog telephone line connected to the EX...

Page 35: ...links Attempt to reconnect Connect Timeout The EXTender cannot connect to the Check WAN connection on the unit PBXgateway Network disabled The network device is not connected being used or is not act...

Page 36: ...MI by requiring a pass word for entry You must enter the Admin Password before you change any configuration parameters Note The Gateway and EXTender units have their own separate Admin Passwords Conne...

Page 37: ...ort connected to the EXTender Gateway Port Offset This parameter is used to allow the lower port numbers on Remote 2 access to the Gateway unit Example If the Gateway port offset is set to 8 when port...

Page 38: ...motes to the PBXgateway in the 2 to 1 configuration Figure 16 Remote 1 Figure 17 Remote 2 IMPORTANT NOTE The Remote Unit connected to WAN 1 of the Gateway MUST be Remote 1 5 Press the and key to the S...

Page 39: ...te Number Instead of using the Gateway Port Offset parameter to distinguish ports on each remote the Port User ID s can be used to determine what ports on the Remote will match up to what ports on the...

Page 40: ...ORTANT NOTES If power to the remote unit fails the Analog port is not available to the digital telephones If another telephone tries to use the analog line while it is busy it hears a Busy tone The se...

Page 41: ...ption Press Enter Setting the Make Set Busy Key Meridian Only The MSB Make Set Busy key sends a command from the Gateway to the PBX This command is used to log agents out of the ACD queue in the event...

Page 42: ...own it is possible to get busy signals from the ISDN IP network preventing the EXTenders from communicating and causing an interruption of telephone service to the branch office This assumption leads...

Page 43: ...enu using the following path Path Remote Configuration Connect RVP_Direct Call_Suspend Path Remote Configuration Connect RVP_Over_IP Default_Port Or for individual ports Path Remote Configuration Conn...

Page 44: ...de parameter This sub menu sets the Call Suspend mode for each port The choices are Ring or Lamp Note Use Ring mode for non ACD sets and use Lamp for ACD sets 9 If you have selected Lamp mode for any...

Page 45: ...emote unit a configurable number of times this is called Num Dials on Reboot assumes the network link and the remote unit are still functioning Gateway Configuration Connect RVP_Direct Call Suspend Fi...

Page 46: ...spend can be enabled on a port by port basis using individual port values or the Default values Path Remote Configuration Connect RVP_Direct Call_Suspend Path Remote Configuration Connect RVP_over_IP...

Page 47: ...o No disabled incoming calls can also cause wakeup from Call Suspend 7 Press the and key to the Remote Login Timeout parameter Enter a value in minutes 15 240 that the EXTender will be idle before Cal...

Page 48: ...D Analog Adjunct Meridian M2006 M2008 M2008HF M2616 M2216ACD M3905 M3904 M3903 ATA Analog Terminal Adapter Meridian If you have a B2 device running off your digital set ensure you enable the ATA menu...

Reviews: