background image

29

Your DVR has built-in video motion detector.  Video motion detector can be turned On or Off
for each camera.

Highlighting the box under the 

Sensitivity

 heading allows you to adjust the DVR’s sensitivity to

motion.  There are five settings with 

1

 being the least sensitive and 

5

 being the most sensitive.

You can adjust the minimum number of detection blocks that must be activated to trigger a
motion alarm.  Highlight a box under the 

Min Size

 heading and adjust the number.  The smaller

the number, fewer detection blocks must be activated and therefore more sensitive.

Turning the 

View

 setting 

On

 will allow you to observe how the DVR is reacting to motion.

When in the motion viewing mode, the detection zone of video will be displayed in green.  Any
detected motion within the zone will be displayed in red.

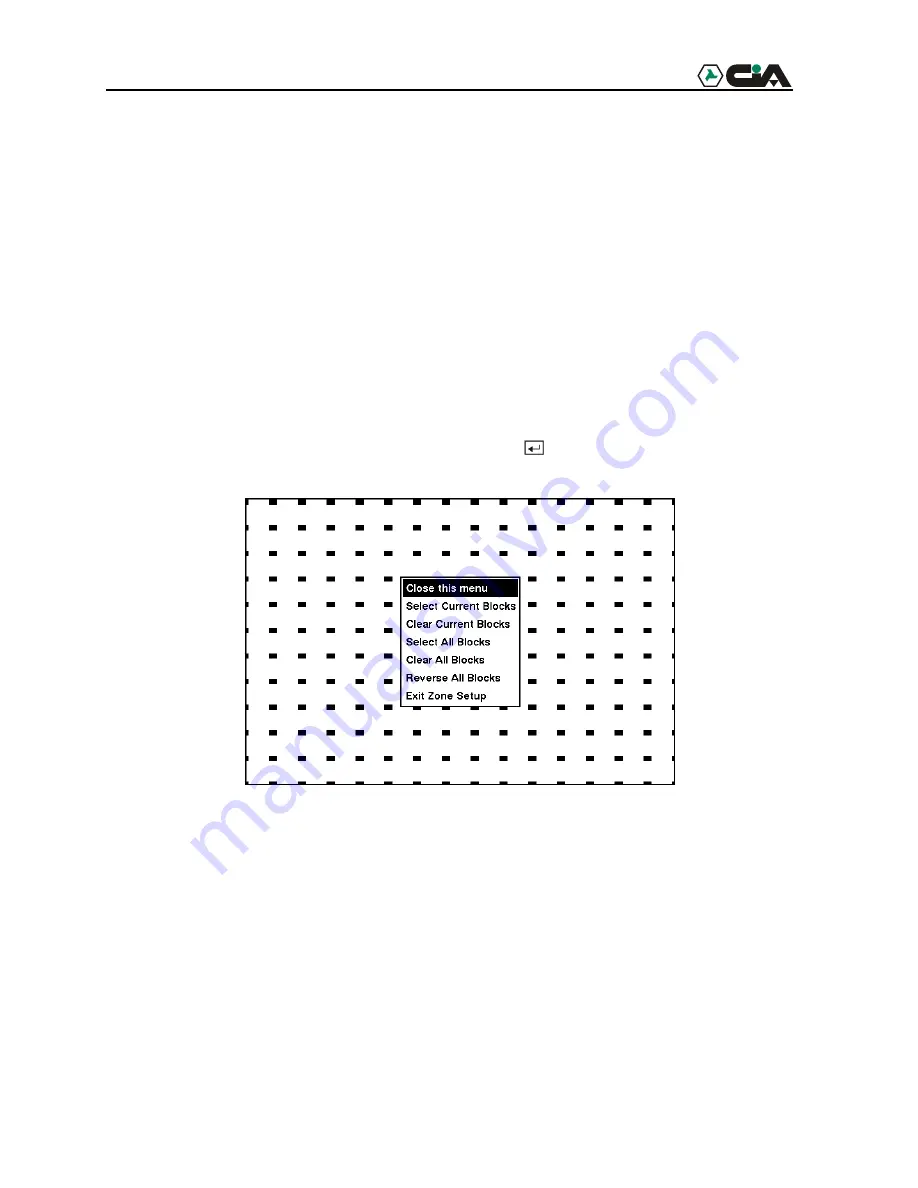
You can define the area of the image where you want to detect motion; e.g., a doorway.
Highlight the icon under the 

Zone

 heading, and press the   button.  The 

Motion Detection

Zone

 screen will display.

Figure 35 — Motion Detection Zone screen.

The 

Motion Detection Zone

 screen is laid over the video for the selected camera.  You can set

up motion detection zones by selecting or clearing blocks.  The menu on the setup screen has the
following functions:

NOTE:  Use the camera buttons to activate or deactivate individual cells.

Close this menu

 — Closes the menu so that you can see the entire screen.

Select Current Blocks

 — Activates highlighted blocks to detect motion.

Clear Current Blocks

 — Deactivates highlighted blocks so that they will not detect motion.

Summary of Contents for DIGITAL VIDEORECORDER WITH LAN MANAGEMENT 4 CH / 9 CH / 16 CH (NTSC/PAL)

Page 1: ...1 DIGITAL VIDEORECORDER WITH LAN MANAGEMENT 4 CH 9 CH 16 CH NTSC PAL USER S MANUAL Read with care before using thedevice Keep forfuture reference...

Page 2: ...SC Images per Second 50 PAL Images per Second Loop Through Video Connectors Continuous Recording in Disk Overwrite Mode Front Panel Displays Time Date Recording Mode and Remaining Storage Capacity and...

Page 3: ...instantly view video after selecting the time or event Your DVR can be set up for event or time lapse recording You can define times to record and the schedule can change for different days of the we...

Page 4: ...Document RAS Software Diskettes and User s Manual Premium Model Rack mount Kit Assembly Screws for Adding Hard Disk Drives Required Installation Tools No special tools are required to install the DVR...

Page 5: ...eset and Clear All Data If not it causes the DVR to perform wrong operations Connecting the Video Source Figure 4 Video input connectors Connect the coaxial cables from the video sources to the BNC Vi...

Page 6: ...itors for simultaneous operation Connecting Audio NOTE It is the user s responsibility to determine if local laws and regulations permit recording audio Figure 7 Audio In and Out connectors Your DVR c...

Page 7: ...E All the connectors marked GND are common Connect the ground side of the Alarm input and or alarm output to the GND connector AO 1 TO 4 Alarm Out Figure 9 Alarm Output connector strips The DVR can ac...

Page 8: ...he DVR can be networked using the 10 100Mb Ethernet connector Premium Model Only Connect a Cat5 cable with an RJ 45 jack to the DVR connector The DVR can be networked with a computer for remote monito...

Page 9: ...or information on printing images NOTE Only PostScript printers will work with the DVR NOTE The DVR is not supplied with a printer cable and many printers are not supplied with cables Make certain you...

Page 10: ...ff 2 Turn it on again 3 While the DVR is initializing poke the straightened paperclip in the unlabeled hole to the right of the RS232 connector 4 Hold the switch until all the LEDs and all the segment...

Page 11: ...URE DO NOT INSTALL POWER CORDS UNDER RUGS OR CARPET THE POWER CORD HAS A GROUNDING PIN IF YOUR POWER OUTLET DOES NOT HAVE A GROUNDING PIN RECEPTACLE DO NOT MODIFY THE PLUG DO NOT OVERLOAD THE CIRCUIT...

Page 12: ...You will use these to initially set up your DVR and for daily operations Enter Button The Enter button selects a highlighted item or completes an entry that you have made Up Down Left Right Arrow But...

Page 13: ...camera to display full screen They are also used to enter passwords DISPLAY Button Pressing the DISPLAY button toggles between different display formats The available formats are full 4x4 3x3 2x2 and...

Page 14: ...reen displays and respectively Used for near Focus in the PTZ mode Entering Fast Backward Playback mode from Live Monitoring mode can be password protected FF Fast Forward Button Pressing the FF butto...

Page 15: ...you play video backward image by image Turning on the Power Press the POWER button to turn on the DVR The unit will take approximately 60 seconds to initialize While it is initializing the DVR will d...

Page 16: ...video is being played backward at fast speed This icon displays when video is being played backward at regular speed This icon displays when video is paused This icon displays when video is being play...

Page 17: ...using various screens and dialog boxes Press the MENU button to enter the setup screens The Admin Password screen appears Figure 19 Admin Password screen Enter the password by pressing the appropriat...

Page 18: ...d Quality box and select from Very High High Standard and Low Highlight the box beside Audio Recording and select either On or Off NOTE It is the user s responsibility to determine if local laws and r...

Page 19: ...een Figure 21 Normal Setup screen Press the MENU button to enter the setup screen If the Quick Setup screen appears turn it off as described above The Normal Setup screen gives you access to all the D...

Page 20: ...n appears Figure 22 System Information screen In the System Information screen you can name the site location assign a unit ID number and select the language the screens are displayed in Highlight Cha...

Page 21: ...opdown menu displays the available languages Highlight the desired language and press the button Figure 24 Language dropdown menu Highlight the box beside Site Description and press the button A virtu...

Page 22: ...e Date Time setup screen appears Figure 26 Date Time setup screen CAUTION If you set a date and time that is older than some of your recorded images any images with dates and times later than the new...

Page 23: ...n NOTE Holidays that do not fall on the same date each year should be updated once the current year s holiday has passed Figure 27 Holiday Setup screen You can save your changes by highlighting OK and...

Page 24: ...The list shows the dates and times the system was turned ON and OFF power failed recording was started or stopped playback was started or stopped setup changes were made and data banks were cleared Th...

Page 25: ...if it does not detect any recording or if there is an alarm during the designated time Highlight the box under the Interval heading and press the button A slide bar appears allowing you to set the ch...

Page 26: ...can configure the video audio and remote control devices connected to the DVR Figure 30 Device menu screen Camera Setup Screen Highlight Camera in the Main menu and press the button The Camera setup...

Page 27: ...ign titles to each camera by highlighting the camera title box and pressing the button A virtual keyboard allows you to enter camera names Selecting the PTZ Device box causes a list of controllable ca...

Page 28: ...minal strip on the back of the DVR has inputs associated with each alarm You can set up each input on the Alarm In Setup screen The inputs are displayed in groups of four You can turn each input On or...

Page 29: ...on viewing mode the detection zone of video will be displayed in green Any detected motion within the zone will be displayed in red You can define the area of the image where you want to detect motion...

Page 30: ...evious screen Alarm Out Setup Screen The Alarm Out setup screen allows you to establish a schedule for each alarm output from the DVR Figure 36 Alarm Out setup screen Each alarm output can be given it...

Page 31: ...k or Holiday on the left of the screen Select an entire block of time by highlighting the time at the top of the screen Select the entire screen by highlighting the empty box in the upper left corner...

Page 32: ...light the box beside Mute and press the button This toggles between On and Off When it is On the DVR will NOT play live or recorded audio Highlight the box beside Audio In Pressing the button toggles...

Page 33: ...ces such as modems remote controls and dome cameras Figure 39 RS232 RS485 setup screen Highlight the field for the settings you wish to make Select the correct Baud Rate Parity Data Bits and Stop Bits...

Page 34: ...ull by recording over the oldest video or you can set it up to alert you when the hard disk is full and stop recording Record Mode Setup Screen Figure 40 Record Mode Setup screen Highlight the box bes...

Page 35: ...ill play back slower in the Duplex mode and will have poor quality audio Highlight the box beside Field Detect Pressing the button toggles between On and Off When set to On the Field Detection helps p...

Page 36: ...o The time lapse video is stored separate from Event video When Keep the continuous pictures is set to On you can set the time from 1 Hour to the maximum allowed by the storage capacity of your hard d...

Page 37: ...ssing the button to toggle the entire calendar On and Off NOTE The Holiday H schedule applies to the dates you established as holidays when setting Date Time You can save your changes by highlighting...

Page 38: ...ent Action Record Setup Screen The DVR can be set to react to events differently Each sensor can be assigned a schedule camera recording speed video quality and dwell time Figure 44 Alarm In Event Act...

Page 39: ...can be set to react to events differently by activating an internal buzzer or external alarms Figure 45 Alarm In Event Action Alarm Out setup screen Highlight the Sched box and press the button A sche...

Page 40: ...el Only Figure 46 Alarm In Event Action Notify setup screen Highlight the Sched box and press the button A schedule screen appears Set the schedule as described earlier Highlight the Notify box and pr...

Page 41: ...s described earlier Highlight the Camera box and press the button A camera selection screen appears Select the camera number you would like to associate with the camera NOTE You can associate multiple...

Page 42: ...Figure 48 Motion Detector Event Action Alarm Out setup screen Highlight the Sched box and press the button A schedule screen appears Set the schedule as described earlier Highlight the Alarm Out box...

Page 43: ...Only Figure 49 Motion Detector Event Action Notify setup screen Highlight the Sched box and press the button A schedule screen appears Set the schedule as described earlier Highlight the Notify box an...

Page 44: ...edule as described earlier Highlight the Camera box and press the button A camera selection screen appears Select the camera number you would like to associate with the camera that has lost video NOTE...

Page 45: ...buzzer or external alarms Figure 51 Video Loss Event Action Alarm Out setup screen Highlight the Sched box and press the button A schedule screen appears Set the schedule as described earlier Highlig...

Page 46: ...ure 52 Video Loss Event Action Notify setup screen Highlight the Sched box and press the button A schedule screen appears Set the schedule as described earlier Highlight the Notify box and press the b...

Page 47: ...d press the button to toggle the time display On and Off Highlight the box beside Title and press the button to toggle the camera title display On and Off Highlight the box beside Status and press the...

Page 48: ...ned screen layouts pages In the Cameo mode the bottom right window in a multi screen format sequences through all cameras NOTE The DVR does not sequence the camera having video loss in the Cameo mode...

Page 49: ...appears You will first be asked to enter the current password Then you can enter a new password you will be asked to confirm the new password before it is accepted Highlight the box beside User Passw...

Page 50: ...NOTE You will need to get the appropriate IP Address Gateway and Subnet Mask from your network administrator Change the numbers by highlighting them and using the Up and Down arrow buttons to increase...

Page 51: ...ars Highlight the box beside Parity of the RS232 field and press the button A drop down list appears You can select from None Odd or Even parity Highlight the box beside Data Bit of the RS232 field Pr...

Page 52: ...running RAS Remote Administration System on a LAN when an event occurs Highlight the box beside IP Address and enter the IP address of the computer you want contacted during an event Highlight the bo...

Page 53: ...hone number of the pager Enter the number as it must be dialed from your telephone system e g if you must dial 9 for an outside line enter 9 before the pager number Highlight the box beside Mailbox an...

Page 54: ...inistrator password cannot be turned On and Off You can change the Administrator password by first entering the current password entering a new password and finally confirming the new password To chan...

Page 55: ...the correct password to unlock the keys The Key Lock password is 4231 You can save your changes by highlighting OK and pressing button Selecting Cancel exits the screen without saving the changes Con...

Page 56: ...irtual keyboard appears allowing you to enter a file name Load Default Setup Highlighting and selecting Load Default Setup will bring up screen asking you if you really want to load default settings a...

Page 57: ...he unit will go through its self diagnostics The unit will take approximately 60 seconds to initialize While it is initializing the DVR will display HELLO Then the HELLO will start moving to the left...

Page 58: ...capabilities Press the PTZ button to enter the PTZ mode You can control the camera using front panel control buttons or by setting up presets To use the front panel buttons press the Left and Right a...

Page 59: ...op or Overwrite when the hard disk drive is full The factory default is Stop The DVR can be set to continue recording once the hard disk drive is full It does this by recording over the oldest video S...

Page 60: ...g Fast Backward Playback mode from Live Monitoring mode can be password protected FF Fast Forward Button Pressing the FF button plays video forward at high speed Pressing the button again toggles the...

Page 61: ...only functions when playback video has been paused By turning the jog dial clockwise you can play video forward image by image By turning the jog dial counterclockwise you play video backward image by...

Page 62: ...tton You can use the Left and Right arrow buttons to highlight the hour minutes and seconds Use the Up and Down arrow buttons to change to the time you want to search for video Once you have entered t...

Page 63: ...orded for the entire hour Once you have set the date and time you want to search highlight the GO button and press the button The selected date and time will display The PLAY PAUSE RW FF Jog and Shutt...

Page 64: ...last recorded images or you can set the start and stop times and dates When you select the Search by Camera select the target cameras and event options When you select the Search by Event select even...

Page 65: ...ter Pause the video on the desired image and press the SEARCH button Select Print from the menu and the Print screen appears The date and time of the paused images displays in the Last Played Image Ti...

Page 66: ...start and stop times and dates You can also select which camera you wish to archive Highlight the File Name box and press the button A virtual keyboard appears Enter a file name for the video you are...

Page 67: ...nagement in Storage and right click an unallocated region of the USB IDE hard disk drive Then click Create Partition 6 In the Create Partition wizard click Next then Primary Partition and follow the i...

Page 68: ...ve 8 Choose the appropriate letter corresponding to the USB IDE hard disk drive 9 In the FDISK Option menu choose 1 Create DOS partition or Logical DOS Drive 10 In the Create DOS Partition or Logical...

Page 69: ...CPU is slower than this minibank files recorded at maximum speed with very high image quality will be played back slowly Figure 73 Player screen The Monitoring Screen displays the backed up images Cl...

Page 70: ...nt image and Time displays the date and time the image was recorded The Backup File Information window displays information regarding the backup file Location displays the site description of the DVR...

Page 71: ...eo based on the parameters such as schedule and events defined during configuration Red REC LED indicates the DVR is ready to record DVR has stopped recording If hard disk drive is full you will eithe...

Page 72: ...or Pin Outs I O Connector Pin Outs AI 1 to 16 Alarm Inputs 1 to 16 GND Chassis Ground 4 connectors AO 1 to 4 Alarm Outputs 1 to 4 ARI Alarm Reset In RS485 Connector Pin Outs Master Unit Slave Unit RX...

Page 73: ...larm In Motion Detector Alarm Out Audio RS232 RS485 Record Record Mode Time Lapse Record Pre Event Record Event Action Alarm In Action Motion Action Video Loss Action Display OSD Sequence Display Netw...

Page 74: ...3V threshold Alarm Output 4 dry contact open collector 5mA 12V 30mA 5V Alarm Reset Input 1 dry contact 4 3V threshold Network Connectivity Premium Model only 10 100 Mbps Ethernet RS 232 for external m...

Page 75: ...24 1 lbs 10 95kg Shipping Dimensions W x H x D 21 5 x 11 2 x 19 7 547mm x 285mm x 500mm Operating Temperature 41 F to 104 F 5 C to 40 C Operating Humidity 0 to 90 Power 100 to 240 VAC 1 2 A 60 50Hz AP...

Reviews: