background image

44

Adjusting the image settings

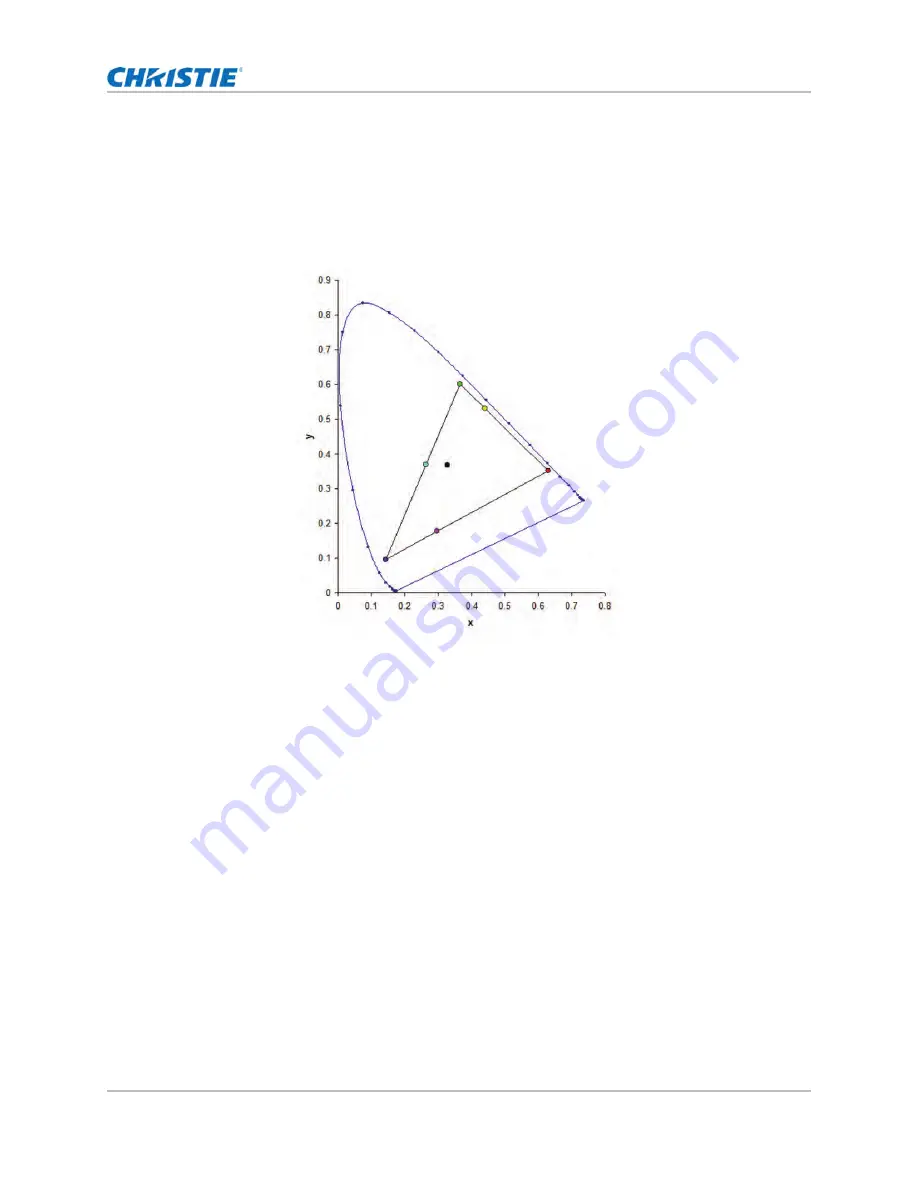
Adjusting primary colors

To achieve consistency use a color meter to measure the native primary colors-red, green, blue, 
and white, as they appear on the screen. Use hue, saturation and gain (HSG) to adjust each color 
component to essentially calibrate a projector to its surroundings, compensating for factors such as 
screen type, lamp and/or ambient lighting, and improves color accuracy and consistency in a group 
of projectors. It ensures a good starting point for further customizing and matching; however, is not 
critical for all installations.

1. Select 

Menu

 > 

Image Settings

 > 

Color Matching

 > 

HSG Adjustment

.

2. To view a specific color while adjusting, press 

ENTER

 to enable 

Auto Test Pattern

.

3. Select one primary color (red, green, blue, cyan, magenta, or yellow).

4. To edit hue of the primary color, adjust the slider or enter the color values of the primary color

component you selected until satisfied with the colors.

Hue values reflect the number of degrees of rotation around the wheel from the original color of
the pixel. Increasing the value indicates counterclockwise rotation and decreasing the value
indicates clockwise rotation.

5. To confirm the selection, press 

ENTER

.

6. To edit saturation of the primary color, adjust the slider or enter the color values of the primary

color component you selected until satisfied with the colors.

Saturation values reflect the color shifting away from the primary color or toward white.

7. To confirm the selection, press 

ENTER

.

8. To edit gain of the primary, adjust the slider or enter the color values of the primary color

component you selected until satisfied with the colors.

Increasing value indicates increasing the lightness, and decreasing the value indicates
decreasing it to black.

GS Series 2K User Manual - DWU880-GS, DWU880A-GS, DWU9200-GS, DWU1100-GS, DWU1100A-GS


020-001908-01 Rev. 1 (

02

-202

2

)

Copyright © 202

2

 Christie Digital Systems USA Inc. All rights reserved.

Summary of Contents for DWU1100-GS

Page 1: ...Christie GS Series 2K DWU880 GS DWU880A GS DWU9200 GS DWU1100 GS DWU1100A GS User Manual 020 001908 01...

Page 2: ...e dealer or Christie PREVENTATIVE MAINTENANCE Preventative maintenance is an important part of the continued and proper operation of your product Failure to perform maintenance as required and in acco...

Page 3: ...3 Contact your dealer 13 Key features 13 How the projector works 14 List of components 14 Product documentation 14 Related documentation 15 Technical support 15 Additional information 16 Installation...

Page 4: ...g geometry correction setting 33 Configuring warp and blend 33 Warping an image 33 Downloading a warp from the projector memory 34 Performing auto warp and blend 34 Adjusting the image settings 35 Adj...

Page 5: ...ure 46 Saving user settings for data recovery 46 Configuring system settings 48 Changing the language 48 Adjusting lens settings 48 Aligning the image with focus and zoom 48 Adjusting lens position 49...

Page 6: ...cho 57 Setting the projector address 57 Adjusting the back light settings 57 Setting the hot key 58 Configuring date and time settings 58 Scheduling events 59 Setting up a schedule 59 Configuring ligh...

Page 7: ...ing 69 Configuring the HDMI output 69 Signal connectivity specifications 70 HDMI1 HDMI2 video formats 70 DVI video formats 74 3G SDI video formats 78 HDBaseT video formats 83 Picture in picture pictur...

Page 8: ...beam of the projector TRIP OR FIRE HAZARD Position all cables where they cannot contact hot surfaces be pulled be tripped over or damaged by persons walking on or objects rolling over the cables SHOCK...

Page 9: ...AC supply is not within the specified voltage and current as specified on the license label SHOCK HAZARD The AC power cord must be inserted into an outlet with grounding SHOCK HAZARD Disconnect the pr...

Page 10: ...on The extremely high brightness can cause permanent eye damage Class 1 laser product of IEC EN 60825 1 2014 and Risk Group 2 according to IEC 62471 5 2015 Additional instructions to supervise childre...

Page 11: ...personal injury always disconnect all power sources before performing maintenance or service procedures Fire hazard To avoid personal injury and property damage follow the instructions provided in thi...

Page 12: ...directly into the lens The extreme high brightness can cause permanent eye damage Class 1 Laser Product Risk Group 2 according to Class 1 IEC 60825 1 2014 and IEC 62471 5 2015 Do not look into the pro...

Page 13: ...1200 resolution Projection lens compatibility Horizontal offset ranges with half image size 30 Vertical offset ranges with half image size 100 Measurements comply with industry standards where offset...

Page 14: ...y one Digital Micromirror Device DMD panel responding to incoming data streams of digitized red green and blue color information As these digital streams flow from the source light from the responding...

Page 15: ...port Americas christiedigital com Europe Middle East and Africa 44 0 1189 778111 or Support EMEA christiedigital com Asia Pacific support apac christiedigital com Australia 61 0 7 3624 4888 or tech Au...

Page 16: ...95 1 22 1 22 1 52 1 52 2 92 2 90 5 50 Projection Lens Ultra Short Throw Short Throw Short Throw Short Throw Wide Zoom Standard Long Zoom Ultra Long Zoom Zoom Ratio No Zoom 1 15X 1 26X No Zoom 1 28X 1...

Page 17: ...wer cord provided with the product or recommended by Christie Item Specification Ambient temperature operating 0 to 40 C 32 to 104 F for 0 to 762 meters 0 to 2500 feet 0 to 35 C 32 to 95 F for 762 to...

Page 18: ...ntrol and adjustment vertical and horizontal offsets zoom and focus 3 Adjustable feet Raises or lowers the feet to level the projector ID Part name Description 1 Rear IR sensor Receives signals from t...

Page 19: ...art name Description 1 Cooling air vents intake Provides cooling to the projector Keep these vents unobstructed to prevent the projector from overheating ID Part name Description 1 Cooling air vents e...

Page 20: ...setting up or down or navigate within a menu 8 Input Selects an input for the main or picture in picture picture by picture PIP PBP image 9 Focus Adjusts the focus 10 Lens Adjusts the lens vertical o...

Page 21: ...12V 8 RS232 2 HDBaseT 9 3D SYNC IN 3 HDMI OUT 10 3D SYNC OUT 4 HDMI 2 IN 11 USB 5 HDMI 1 IN 12 ETHERNET 6 DVI D 13 REMOTE IN 7 3G SDI IN 1 2 3 4 6 8 9 10 11 12 13 5 7 GS Series 2K User Manual DWU880...

Page 22: ...scription 1 SHUTTER Displays or blanks the video image 2 ON Turns the projector on 3 GAMMA Adjusts the mid range levels 4 BRIGHT Adjusts the amount of light in the image SHUTTER VGA HDMI2 DVI D BNC DP...

Page 23: ...ects your preset key quickly 19 SWAP Swaps the main and PIP PBP images 20 LAYOUT Adjusts the PIP PBP layout 21 FOCUS Adjusts the focus to improve image clarity as required 22 ZOOM Adjusts the zoom to...

Page 24: ...e lens of the projector to the screen the zoom setting and the video format determine the size of the projected image Determine the lens throw ratio For more information detailing the throw ratio for...

Page 25: ...ing the projector for the first time select a preferred language from the Main Menu after the startup screen is displayed Turning off the projector Power off the projector in preparation for inspectio...

Page 26: ...is damaged or a fan is operating at full speed due to over temperature of laser diode LD driver Yellow solid The end user is turning off the projector while it is in a warning state Red flashing An er...

Page 27: ...ys with the detected size Native Displays in its native resolution 4 3 Retains 4 3 aspect ratio Letterbox Makes the active content enlarge to the full screen Full Size Fills the screen regardless of t...

Page 28: ...ecting to Christie Twist and Mystique grays out the geometry correction settings on the projector Uploading warp and blend from Twist and Mystique overwrites the currently applied geometry correction...

Page 29: ...projector Applying blends from Twist and Mystique overwrites the blends directly set on the projectors 1 Select Menu Size Position Geometry Correction Blend Area 2 Choose a side to blend in with the o...

Page 30: ...ct Send Blend 6 Repeat step 2 to 5 for the remaining projectors For multiple projectors use Twist to identify the projectors 7 To save the warp file on the projector click File Save or Save As When re...

Page 31: ...or bottom edge 1 Select Menu Size Position Geometry Correction Keystone Vert Keystone 2 To adjust the vertical keystone adjust the slider by arrow keys or press ENTER to input the value you selected...

Page 32: ...1 Select Menu Size Position Geometry Correction 4 Corner 2 Select the corner and the direction to adjust 3 To move the corner adjust the slider by arrow keys or press ENTER to input the value 4 After...

Page 33: ...rface Warping an image Christie Twist offer various manual warping options to adjust the image shape with minimal performance impact Refer to the Christie website www christiedigital com for product i...

Page 34: ...lected warp setting click OK 6 To apply the warp setting to the projector on the canvas right click a projector window and select Send Warp Performing auto warp and blend Use Mystique sold seperately...

Page 35: ...ttings Contrast 2 Adjust the slider by arrow keys or press ENTER to input the value 3 After inputting the value press ENTER to apply Adjusting the color space Determine how the color components are de...

Page 36: ...ons in 3D Display menu to make the timing adjustment and environment necessary for displaying 3D images Setting 3D format Set up the 3D format according to the 3D input signal 1 Select Menu Image Sett...

Page 37: ...the external sync input If no external sync input is detected the projector uses the internal 3D sync to display the content Internal The projector generates the 3D sync internally and content is dis...

Page 38: ...ct Menu Image Settings Video Options Color 2 Adjust the slider by arrow keys or press ENTER to input the value 3 After inputting the value press ENTER to apply Adjusting the color balance Adjust the r...

Page 39: ...have an odd color on the screen These functions are used to adjust gain and offset error and correct the color Adjusting the color gain Set the color gain to correct the color intensity of the image...

Page 40: ...vivid color It is based on brightness mode REC709 Used for high definition television It sets the color temperature to 6500K with 80 of the maximum brightness DICOM SIM Used for high contrast content...

Page 41: ...ser 3D User 2D High Speed 3 To apply the specific picture setting select the required setting 4 To confirm the selection press ENTER Editing customized picture setting Edit the previously saved custom...

Page 42: ...ent gets lower than the set value The value ranges from 50 to 100 indicating 50 to 100 of the constant brightness The higher the value the larger the range to adjust the light source Real Black Turns...

Page 43: ...ideo content to improve image details HDR4 Strong HDR effect used to improve image details in dark scenes 3 To confirm the selection press ENTER Adjust the color of the image Calibrate the accuracy of...

Page 44: ...the primary color component you selected until satisfied with the colors Hue values reflect the number of degrees of rotation around the wheel from the original color of the pixel Increasing the valu...

Page 45: ...formance customized for the specific wall 1 Select Menu Image Settings Color Matching Wall Color 2 Select the preferred setting White Gray 130 Light Yellow 3 Press ENTER Adjusting advanced image setti...

Page 46: ...m Sets the color temperature to 6500K Cool Sets the color temperature to 7500K 3 Press ENTER Saving user settings for data recovery Create a recovery copy of all the user data This information can be...

Page 47: ...her function values are saved to the recovery copy except for the following Configuration Lens Settings Configuration Communications LAN WLAN Size Position Geometry Correction Configuration Menu Prefe...

Page 48: ...from the digital micromirror device DMD is parallel and centered with the lens and screen 1 Display an image or test pattern that can be used to analyze image focus and geometry 2 Press FOCUS on keyp...

Page 49: ...saved lens setting to the projector 1 Before applying the previous lens setting you need to save the lens setting See Saving lens setting on page 49 for further details 2 Select Menu Configuration Len...

Page 50: ...image orientation press ENTER 4 To do a rear projection select Menu Configuration Rear Projection 5 To swap press ENTER Adjusting on screen display menus Adjust various on screen display OSD settings...

Page 51: ...he value 3 After inputting the value press ENTER to apply Changing the splash screen Select splash screen which is the screen with no source is displayed 1 Select Menu Configuration Menu Preferences S...

Page 52: ...settings including the shutdown time sleep timer and standby mode Setting the standby mode Determine which standby mode the projector is in when AC power on 1 Select Menu Configuration Power Manageme...

Page 53: ...utomatically turn off the projector 3 To confirm the selection press ENTER Enabling high altitude setting Enable high altitude mode when altitudes 2000 m The fan operates at high speed to ensure suffi...

Page 54: ...sed for electrical projector screens The projector screen is automatically lowered or raised when the projector is switched on or off 1 Select Menu Configuration 12V Trigger 2 To toggle press ENTER GS...

Page 55: ...e Network Status Displays the network status LAN Interface Displays the LAN interface Select either RJ 45 or HDBaseT and press ENTER to save DHCP Enables or disables the DHCP to automatically get IP a...

Page 56: ...o re control the projector user must login in the control page with account and password again Adjusting WLAN setting Set up network configuration for wireless networking 1 Select Menu Configuration C...

Page 57: ...figuration Communications Projector Address 2 Select specific number for this projector from 0 to 9 The projector responds to the IR remote set to the same address as the projector or to the IR remote...

Page 58: ...t up the appropriate setting Clock Mode Sets the clock mode to Local or Network A NTP Server is required if the clock mode is set to Network Date Sets a date for the projector The date format is Year...

Page 59: ...uled day select Copy Events To and select these days of the week where you want to copy the full schedule Reset Schedule Resets all of the schedule settings to the factory defaults Setting up a schedu...

Page 60: ...at steps 2 to 7 to schedule more events for the selected day You can schedule up to 16 events per day To access the events on the next page press the arrow keys 9 To schedule events for other days pre...

Page 61: ...ttings This function can remain at current setting for longer period of time than Constant Power mode and is used for long term projecting or blending ECO 1 80 Set the projector to 80 constant brightn...

Page 62: ...0 brightness and color setting and the maximum is 100 brightness and color setting 1 Select Menu Light Source Constant Power 2 Adjust the slider by arrow keys or press ENTER to input the value you sel...

Page 63: ...the light source information such as total projector hours and laser diode LD hours select Menu Information Light Source Info 5 To view the firmware information such as firmware FW version F MCU versi...

Page 64: ...ect Factory Reset All customized settings are set to the default factory settings 4 At the confirmation prompt select OK To avoid warranty violation only Christie qualified technicians can reset facto...

Page 65: ...P PBP otherwise this item is disabled 1 Select Menu Input Switching PIP PIP PBP Input 2 To select another active input press ENTER Enabling second input source To activate the picture in picture PIP p...

Page 66: ...lection press ENTER Setting up the display layout with two input sources Set the display location for main input source and second input source on the screen Before this action make sure to enable PIP...

Page 67: ...verifies the integrity of it This ensures the optimal image quality but consumes more time 3 To confirm the selection press ENTER Setting the input searching method Set the most suited method for sea...

Page 68: ...When the selected source is activated the OSD menu displays the signal s Resolution Horz Refresh and Color Space Adjusting the sub image Adjust the image related settings for the sub source in PIP mo...

Page 69: ...HDMI 1 4 only disable the EDID for HDMI 2 0 to play the videos properly 1 Select Menu Input Switching PIP EDID 2 Select the HDMI 1 or HDMI 2 item where you want to enable EDID 3 Set 1 4 or 2 0 4 To co...

Page 70: ...12 bit 8 bit 10 bit 12 bit 8 bit PC VGA 640 x 350 85 V V V V V V V 640 x 400 16 10 85 V V V V V V V 640 x 480 1 33 4 3 60 V V V V V V V 72 V V V V V V V 75 V V V V V V V 85 V V V V V V V 720 x 400 1 8...

Page 71: ...10 60 V V V V V V V 75 V V V V V V V 85 V V V V V V V WXGA 1600 x 900 1 78 16 9 60 V V V V V V V UXGA 1600 x 1200 1 33 4 3 50 V V V V V V V 60 V V V V V V V WSXGA 1680 x 1050 1 6 16 10 V V V V V V V...

Page 72: ...50 V V V V V V V 59 94 V V V V V V V 60 V V V V V V V Side by Side 1080i 1920 x 1080 50 V V V V V V V 59 94 V V V V V V V 60 V V V V V V V Side by Side 1080p 24 V V V V V V V 50 V V V V V V V 59 9 V V...

Page 73: ...3840 x 2160 1 78 16 9 24 V V V V V V V 25 V V V V V V V 30 V V V V V V V 50 V X X V X X V 60 V X X V X X V 4096x2160 SMPTE 4096 x 2160 1 90 24 V V V V V V V 25 V V V V V V V 30 V V V V V V V 50 V X X...

Page 74: ...600 1 33 4 3 60 V V V V V V V 72 V V V V V V V 75 V V V V V V V 85 V V V V V V V 120 X X X X X X X 832 x 624 75 V V V V V V V 848 x 480 60 V V V V V V V XGA 1024 x 768 1 33 4 3 60 V V V V V V V 70 V V...

Page 75: ...V V V 60 V V V V V V V SDTV 480i 720 x 480 1 5 3 2 59 94 V V V V V V V 60 V V V V V V V SDTV 576i 720 x 576 1 25 5 4 50 V V V V V V V EDTV 480p 720 x 480 1 5 3 2 59 94 V V V V V V V 60 V V V V V V V...

Page 76: ...X X X X X X X 60 X X X X X X X Top and Bottom 720p 1280 x 720 50 X X X X X X X 59 94 X X X X X X X 60 X X X X X X X Top and Bottom 1080p 1920 x 1080 23 98 X X X X X X X 24 X X X X X X X 59 9 X X X X...

Page 77: ...x2160 SMPTE 4096 x 2160 1 90 24 X X X X X X X 25 X X X X X X X 30 X X X X X X X 50 X X X X X X X 60 X X X X X X X Signal Type Signal Format Resolution Aspect Ratio V Sync Hz RGB YCbCr 4 4 4 YCbCr 4 2...

Page 78: ...X 85 X 720 x 400 1 8 9 5 70 X 85 X SVGA 800 x 600 1 33 4 3 60 X 72 X 75 X 85 X 120 X 832 x 624 75 X 848 x 480 60 X XGA 1024 x 768 1 33 4 3 60 X 70 X 75 X 85 X 120 X SXGA 1152 x 864 75 X 1152 x 870 1...

Page 79: ...RB 1920 x 1200RB 50 X 60 X SDTV 480i 720 x 480 1 5 3 2 59 94 X 60 X SDTV 576i 720 x 576 1 25 5 4 50 X EDTV 480p 720 x 480 1 5 3 2 59 94 X 60 X EDTV 576p 720 x 576 1 25 5 4 50 X HDTV 1080i 1920 x 1080...

Page 80: ...78 16 9 50 V 59 94 V 60 V HDTV 1080i 1920 x 1080 50 V 59 94 V 60 V HDTV 1080p 23 98 V 24 V 25 V 29 97 V 30 V HDTV 1080sF 25 V 29 97 V 30 V 3GA SDI HDTV 1080p 50 V 59 94 V 60 V Signal Type Signal Forma...

Page 81: ...Top and Bottom 720p 1280 x 720 50 X 59 94 X 60 X Top and Bottom 1080p 1920 x 1080 23 98 X 24 X 59 9 X 60 X Frame Sequential 3D SVGA 800 x 600 1 33 4 3 120 X XGA 1024 x 768 X HDTV 1280 x 720 1 78 16 9...

Page 82: ...4 X 25 X 30 X 50 X 60 X 4096x2160 SMPTE 4096 x 2160 1 90 24 X 25 X 30 X 50 X 60 X Signal Type Signal Format Resolution Aspect Ratio V Sync Hz YCbCr 4 2 2 10 bit GS Series 2K User Manual DWU880 GS DWU8...

Page 83: ...0 x 600 1 33 4 3 60 V V V V V V V 72 V V V V V V V 75 V V V V V V V 85 V V V V V V V 120 V V V V V V V 832 x 624 75 V V V V V V V 848 x 480 60 V V V V V V V XGA 1024 x 768 1 33 4 3 60 V V V V V V V 70...

Page 84: ...V V V 60 V V V V V X V SDTV 480i 720 x 480 1 5 3 2 59 94 V V V V V V V 60 V V V V V V V SDTV 576i 720 x 576 1 25 5 4 50 V V V V V V V EDTV 480p 720 x 480 1 5 3 2 59 94 V V V V V V V 60 V V V V V V V...

Page 85: ...V V V V V V V 60 V V V V V V V Top and Bottom 720p 1280 x 720 50 V V V V V V V 59 94 V V V V V V V 60 V V V V V V V Top and Bottom 1080p 1920 x 1080 23 98 V V V V V V V 24 V V V V V V V 59 9 V V V V...

Page 86: ...V 50 X X X X X X X 60 X X X X X X X 4096x2160 SMPTE 4096 x 2160 1 90 24 V X X V X X V 25 V X X V X X V 30 V X X V X X V 50 X X X X X X X 60 X X X X X X X HDMI 1 HDMI 2 DVI HDBaseT 3G SDI HDMI 1 V V V...

Page 87: ...compatibility Emissions FCC CFR47 Part 15 Subpart B Class A B Unintentional Radiators CAN ICES 003 A NMB 003 A EN55032 2015 Information Technology Equipment Radio Disturbance Characteristics Limits a...

Page 88: ...erning the Registration Evaluation Authorization and Restriction of Chemicals REACH and the applicable official amendment s China Ministry of Information Industry Order No 39 02 2006 on the control of...

Page 89: ...ic of South Africa ph 27 0 11 510 0094 Korea Seoul ph 82 2 702 1601 Japan Tokyo ph 81 3 3599 7481 India ph 91 080 6708 9999 Germany ph 49 2161 664540 France ph 33 0 1 41 21 44 04 Russian Federation an...

Reviews: