background image

25

Getting Ready

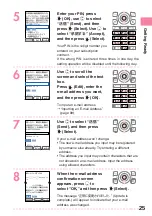
5

Enter your PIN, press

c

 (OK), use 

j

 to select

送信

” (Send), and then

press 

c

 (Select). Use 

d

 to

select “

承諾する

” (Accept),

and then press 

c

 (Select).

Your PIN is the 4-digit number you
entered on your subscription
contract.
If the wrong PIN is entered three times in one day, the
setting operation will be disabled until the following day.

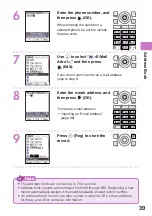
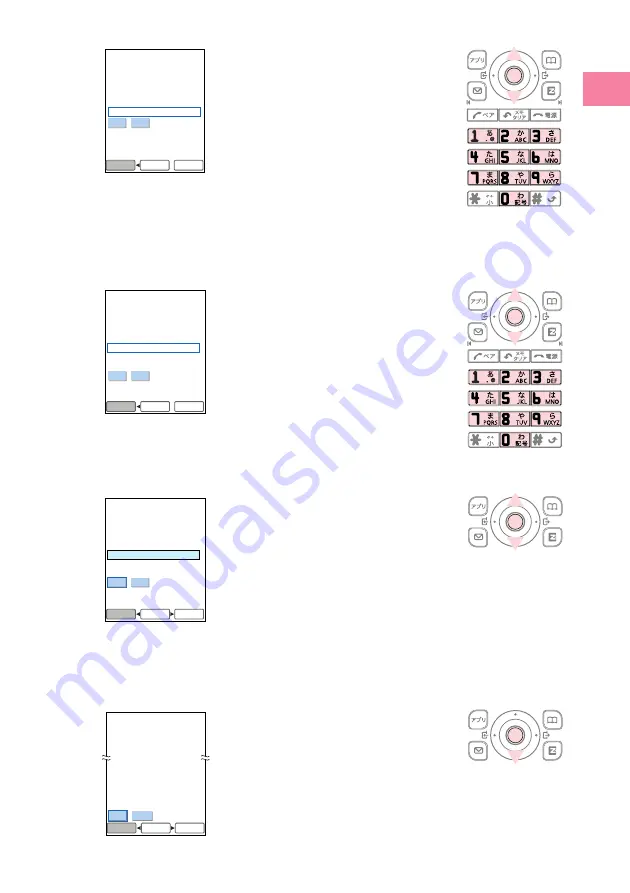
6

Use 

j

 to scroll the

screen and select the text
box.
Press 

c

 (Edit), enter the

e-mail address you want,
and then press 

c

 (OK).

To input an e-mail address

“Inputting an E-mail Address”

(page 99)

7

Use 

j

 to select “

送信

(Send), and then press

c

 (Select).

If your e-mail address won’t change:
• The new e-mail address you input may be registered

by someone else already. Try entering a different
address.

• The address you input may contain characters that are

not allowed in an e-mail address. Input the address
using allowed characters.

8

When the e-mail address
confirmation screen
appears, press 

d

 to

select “OK,” and then press 

c

 (Select).

The message “

正常に変更されました。

” (Update is

complete.) will appear to indicate that your e-mail
address was changed.

お客様の暗証番号を入力 
してください。下記の対 
象サービスで1日に合計3回間 
違えると、翌日までご利 
用できなくなりますので 
ご注意ください。 


<対象サービス> 

 • 

auオンラインカスタマーサービス 

 • 

各種申込サービス 

 • 

「Eメール設定」の「その 

送信 リセット 

Edit

BrowserMenu

送信 リセット 

Edit

BrowserMenu


{


前のへ゜ーシ゛へ 

用したり、最初と最後に 
は利用できません。最初 
に数字の「0」を使用するこ 
とはできません。 


@ezweb.ne.jp 

能です。「.

」は連続して利 

オフィシャる?au 

とはできません。 


@ezweb.ne.jp 

に数字の「0」を使用するこ 

オフィシャる?au 

用したり、最初と最後に 
は利用できません。最初 

能です。「.

」は連続して利 


{


前のへ゜ーシ゛へ 

△△△□□□□△△△□□□ 

Select

BrowserMenu

送信 リセット 

 OK   キャンセル 

Select

BrowserMenu

オフィシャる?au 

△△△□□□□△△△□□□@ezweb.ne. 
jp 


      ***ご注意***       
アト゛レスを変更した場合は変 
更前のアト゛レスを再度利用す 
ることはできません。 

新しいEメールアドレスは 

Summary of Contents for A5512CA

Page 1: ...r Function Teens Mode Mail Inputting Characters Making and Answering Calls Address Book Getting Ready Camera EZweb EZ Navi Smart Mode Troubleshooting Remote Auto Lock Other Functions Index by CASIO A5512CA ...

Page 2: ...mation is also available on the au website To download the Basic Manual or Instruction Manual http au pro kddi com phone torisetu index html To access a keyword searchable au online manual http www au kddi com manual index html You can also access the au online manual using EZweb EZweb Access EZトップメニュー EZ Top Menu 料金 申込 インフォ Charges Applications and Info auオンラインマニュアル au Online Manual For informati...

Page 3: ...locations Turn off the cellphone or use Manner Mode to ensure that the ring tone does not disturb others When in public move to a location where you will not be blocking traffic On the Shinkansen in a hotel lobby or in other similar locations move to a location where you will not disturb others Take care to avoid talking on the phone in a loud voice Before taking the picture of others be sure to o...

Page 4: ... Hot Key function EZ Navi EZ Navi Walk Position Search and Area Message are all built in Mail Send mail messages to other cellphones or to a computer EZweb Download Chaku Uta wallpaper and other data Teens Mode Limit the number of outgoing calls and mail messages incoming spam etc Smart Mode Limit functions to those you most often use for simplified operation 78 Page 44 Page Page 46 Page 84 Page 4...

Page 5: ...one second Normally leave the phone turned on The phone needs to be turned on to make and receive calls Hold down F for at least 1 5 seconds to turn on the phone Keep an eye on the battery level You cannot talk on the phone if it is unable to receive a signal The phone may not function properly if battery power is low indicates the current battery level Signal strength is low in some areas even if...

Page 6: ...ective November 1 2004 Reading mail or looking at the display Holding a cellphone in your hand to talk Turn off your cellphone or enter Drive Mode while driving Drive Mode In Drive Mode the phone will play the message ただいま車を運 転しています I am driving right now and then ask the caller to leave a message using Easy Voice Memo While the standby screen is on the display press and then press 1 ON Next press...

Page 7: ...d advertisement filter アドレスフィルター address filters 指定拒否設定 blocks specific mail 指定受信設定 receives specific mail Beware of one ring calls A one ring call wan giri in Japanese rings your phone only once in an attempt to make you call back to a service that automatically bills you very high charges The red icon at the head of an incoming record indicates that the call rang for only four seconds or less Th...

Page 8: ...p dengon ezweb ne jp Disaster Message Board information can be accessed by inputting the phone number of an individual over EZweb or the Internet Disaster Message Board information can be accessed from another type of cellphone excluding TU KA PHS or computer at http dengon ezweb ne jp Disaster Message Board The Disaster Message Board lets you use EZweb to register information about your well bein...

Page 9: ...さい 伝言板トップへ C KDDI TU KA Group C KDDI TU KA Group 0 9 0 災害用伝言板 確認 検索する Select BrowserMenu Select BrowserMenu Registration contents are retained for up to 72 hours You can register up to 10 entries per phone number Registering a new entry while there are already 10 registered overwrites the oldest current entry with the new one You can view a Disaster Message Board demonstration at EZ Top Menu 料金 申込...

Page 10: ...izing E mail and EZweb 21 Selecting English as the Display Language 22 Looking Up Your Current Phone Number and E mail Address 23 Changing Your E mail Address 24 Changing the Display Character Size 26 Personal Identification Numbers and Passwords 27 Making and Answering Calls 28 Making a Call 28 Answering a Call 29 Redialing Outgoing Records Incoming Records 30 One ring Calls 31 Changing the Ring ...

Page 11: ...Using EZweb 70 Displaying the EZ Top Menu 71 Viewing a Site 72 Bookmarking Sites You Frequently Access 73 Downloading Chaku Uta 74 Viewing a Bookmarked Site 76 Checking Charges 77 EZ Navi Features 78 EZ Navi Walk Menu 80 Registering Your Home Location 80 Return Home 83 Smart Mode 84 Entering Smart Mode 84 Exiting Smart Mode 85 Using the Smart Mode Main Menu 86 Adding Data to the Address Book in Sm...

Page 12: ... turn on power etc A5512CA Battery pack 5512UAA Desktop holder 5512PUA 目次 ご利用いただく前に 電話 文字入力 アドレス帳 ペア機能 スマー トモード ティーンズモード メモ帳 録音機能 カメ ラ データフォルダ エンジ ョイツール メール EZweb EZナビ EZアプリ BREW メニュー M 機能 便利な機能 auのネッ トワークサービス 付録 索引 クイ ックガイ ド by CASIO Extracted contract clauses Japanese Warranty Japanese Operating Precautions Japanese Instruction Manual Japanese Do you have everything Basic Manual Japanese Note An...

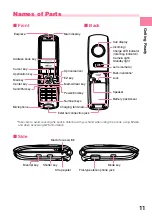
Page 13: ...r Address book key EZ key Power End key Cursor key Number keys Charging terminals External connection jack Mail key Center key Application key Send Pair key Microphone Take care to avoid covering the built in antenna with your hand when using the phone using EZweb and when accessing GPS information Speaker Built in antenna k Side Manner key Shutter key Macro focus switch Mode key Flat type stereo ...

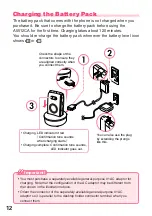
Page 14: ...Charging complete Confirmation tone sounds LED indicator goes out You can also use the plug by extending the prongs like this Check the shape of the connectors to ensure they are aligned correctly when you connect them Important You must purchase a separately available general purpose 01 AC adaptor for charging Note that the configuration of the AC adaptor may be different from that shown in the i...

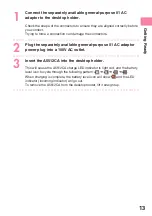
Page 15: ...rs 2 Plug the separately available general purpose 01 AC adaptor power plug into a 100V AC outlet 3 Insert the A5512CA into the desktop holder This will cause the A5512CA charge LED indicator to light red and the battery level icon to cycle through the following pattern When charging is complete the battery level icon will show and the LED indicator incoming indicator will go out To remove the A55...

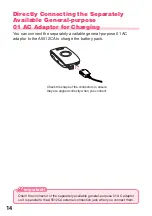
Page 16: ...le general purpose 01 AC adaptor to the A5512CA to charge the battery pack Check the shape of the connectors to ensure they are aligned correctly when you connect Important Orient the connector of the separately available general purpose 01 AC adaptor so it is parallel to the A5512CA external connection jack when you connect them ...

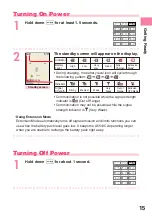
Page 17: ...hile the signal strength indicator is Very Weak Using Extension Mode Extension Mode automatically turns off signal emission and limits functions you can use when the battery pack level goes low It keeps the A5512CA operating longer when you are unable to recharge the battery pack right away Turning Off Power 1 Hold down F for about 1 second Standby screen Indicator Extension Mode Fully Charged Dea...

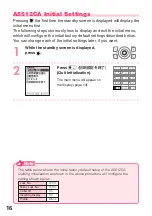
Page 18: ... Initial Settings Pressing c the first time the standby screen is displayed will display the initial menu first The following steps show only how to display and exit the initial menu which will configure the initial factory default settings described below You can change each of the initial settings later if you want 1 While the standby screen is displayed press c 2 Press 初期設定を終了 Quit Initializati...

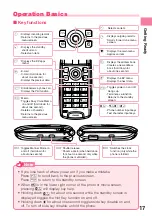
Page 19: ...nction Returns to the standby screen Displays the EZ menu Displays the next data L N C R F 0 9 Toggles Manner Mode on and off hold down for about one second Note If you lose track of where you are or if you make a mistake Press C to scroll back to the previous screen Press F to return to the standby screen When 7 is in the lower right corner of the photo or movie screen pressing 0 will display key...

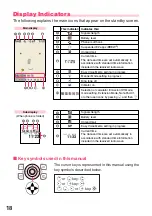
Page 20: ...te and time are set automatically in accordance with standard time information included in the received radio wave 5 Current time The date and time are set automatically in accordance with standard time information included in the received radio wave 7 Easy Voice Memo setting in progress 8 Manner Mode setting in progress 9 Ring tone off Vibrator on Selection of calculator Emission Off Mode mode se...

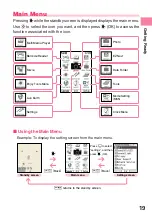
Page 21: ... associated with the icon Enjoy Tools Menu Data Folder Clock Menu EZ Navi Settings Barcode Reader Multi Media Player Movie Photo Tools Mode Setting M55 Live Earth k Using the Main Menu Example To display the setting screen from the main menu Standby screen Main menu Setting screen C Back c F returns to the standby screen C Back Press d to select settings and then press c OK ...

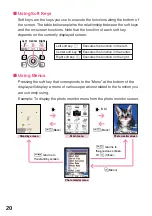
Page 22: ...tes the function in the center Right soft key Executes the function on the right k Using Menus Pressing the soft key that corresponds to the Menu at the bottom of the display will display a menu of various operations related to the function you are currently using Example To display the photo monitor menu from the photo monitor screen Left Left Left Center Center Center Right Right Right Standby s...

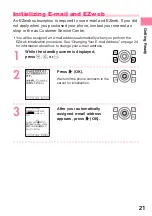
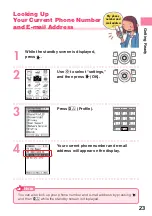
Page 23: ...ically when you perform the EZweb initialization procedure See Changing Your E mail Address on page 24 for information about how to change your e mail address 1 While the standby screen is displayed press L R or 2 Press c OK Wait until the phone connects to the server for initialization 3 After your automatically assigned e mail address appears press c OK ようこそEZwebへ お客様のEメールアドレスは ezweb ne jp です ヒ...
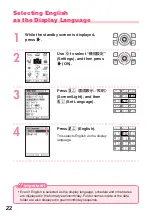
Page 24: ...r names inside of the data folder are also displayed in year month day sequence Selecting English as the Display Language 1 While the standby screen is displayed press c 2 Use a to select 機能設定 Settings and then press c OK 3 Press 3 画面表示 照明 Screen Light and then 5 Set Language 4 Press 2 English This selects English as the display language ...

Page 25: ...se a to select settings and then press c OK 3 Press 0 Profile 4 Your current phone number and e mail address will appear on the display ezweb ne jp 0 9 0 0 0 1 8 XXXX You can also look up your phone number and e mail address by pressing c and then 0 while the standby screen is displayed Note My phone number and mail address ...

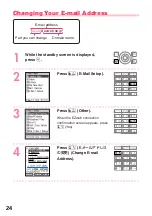
Page 26: ...the EZweb connection confirmation screen appears press 1 Yes 4 Press 1 Eメールアドレス の変更 Change E mail Address 1 Eメールアト レスの変更 2 自動転送先 3 メールフィルター 4 Eメールヘッタ 情報表示 通信 料有料 5 その他の設定の確認 ー ー ー ー ー ー ー auのメルマカ サーヒ ス設定 その他の設定 メルマカ の登録 設定変更 auの公式メルマカ です ぜ ひご登録ください Select BrowserMenu ezweb ne jp E mail address Part you can change Domain name ...

Page 27: ...ne else already Try entering a different address The address you input may contain characters that are not allowed in an e mail address Input the address using allowed characters 8 When the e mail address confirmation screen appears press d to select OK and then press c Select The message 正常に変更されました Update is complete will appear to indicate that your e mail address was changed お客様の暗証番号を入力 してください ...

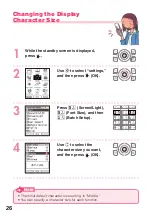
Page 28: ...ss c 2 Use a to select settings and then press c OK 3 Press 3 Screen Light 3 Font Size and then 1 Batch Setup 4 Use j to select the character size you want and then press c OK The initial default character size setting is Middle You can specify a character size for each function Note ...

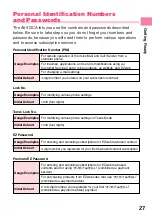
Page 29: ...umber you entered on your subscription contract Usage Examples Premium EZ Password Initial Default For entering and canceling subscriptions for EZweb fee based contents paid for using まとめてau支払い combined au payment service For purchasing products from EZweb sites that use まとめてau支払い combined au payment service 4 to 8 digit number you registered for your first まとめてau支払い combined au payment service pa...

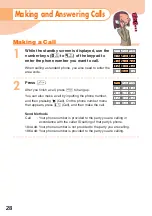
Page 30: ...a call by inputting the phone number and then pressing c Call On the phone number menu that appears press 1 Call and then make the call Send Methods Call Your phone number is provided to the party you are calling in accordance with the caller ID setting of that party s phone 184 Add Your phone number is not provided to the party you are calling 186 Add Your phone number is provided to the party yo...

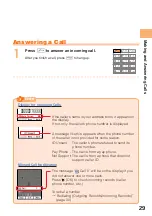
Page 31: ...end its phone number Pay Phone The call is from a pay phone Not Support The call is from a phone that does not support caller ID If the caller s name is your address book it appears on the display If not only the caller s phone number is displayed 0900007XXXX Missed Call Notification The message Call X will be on the display if you did not answer one or more calls Press c OK to check incoming reco...

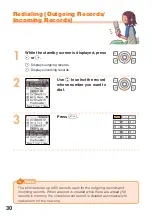
Page 32: ...ready 50 records in memory the oldest current record is deleted automatically to make room for the new one Redialing Outgoing Records Incoming Records 1 While the standby screen is displayed press l or r r Displays outgoing records l Displays incoming records 2 Use j to select the record whose number you want to dial 3 Press N XXXX XXXX ...

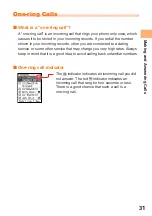
Page 33: ... incoming records often you are connected to a dating service or some other service that may charge you very high rates Always keep in mind that it is a good idea to avoid calling back unfamiliar numbers k One ring call indicator The indicator indicates an incoming call you did not answer The red indicator indicates an incoming call that rang for four seconds or less There is a good chance that su...

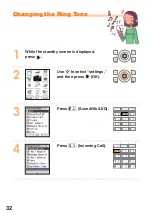
Page 34: ...32 Changing the Ring Tone 1 While the standby screen is displayed press c 2 Use a to select settings and then press c OK 3 Press 2 Sound Vib LED 4 Press 1 Incoming Call ...

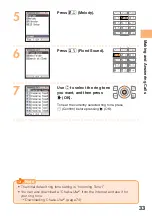
Page 35: ...he ring tone you want and then press c OK To hear the currently selected ring tone press Confirm before pressing c OK Note The initial default ring tone setting is Incoming Tone1 You can also download a Chaku Uta from the Internet and use it for your ring tone Downloading Chaku Uta page 74 ...

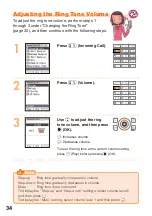
Page 36: ...d then press c OK u Increases volume d Decreases volume To hear the ring tone at the current volume setting press Play before pressing c OK Note Step up Ring tone gradually increases in volume Step down Ring tone gradually decreases in volume Mute Ring tone does not sound To display the Step up and Step down settings select volume level 5 and then press u To display the Mute setting select volume ...

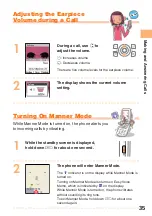
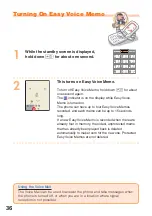
Page 37: ...ner Mode is turned on the phone alerts you to incoming calls by vibrating 1 While the standby screen is displayed hold down for about one second 2 The phone will enter Manner Mode The indicator is on the display while Manner Mode is turned on Turning on Manner Mode also turns on Easy Voice Memo which is indicated by on the display While Manner Mode is turned on the phone vibrates without sounding ...

Page 38: ...o four Easy Voice Memos recorded and each memo can be up to 15 seconds long If a new Easy Voice Memo is recorded when there are already four in memory the oldest unprotected memo that has already been played back is deleted automatically to make room for the new one Protected Easy Voice Memos are not deleted Using the Voice Mail The Voice Mail can be used to answer the phone and take messages when...

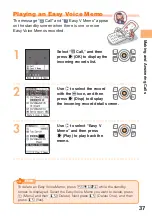
Page 39: ... incoming records list 2 Use j to select the record with the icon and then press c Disp to display the incoming record detail screen 3 Use j to select Easy V Memo and then press c Play to play back the memo XXXX XXXX To delete an Easy Voice Memo press C 4 2 while the standby screen is displayed Select the Easy Voice Memo you want to delete press Menu and then 1 Delete Next press 1 Delete One and t...

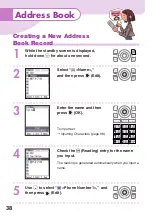
Page 40: ...e second 2 Select Name and then press c Edit 3 Enter the name and then press c OK To input text Inputting Characters page 98 4 Check the Reading entry for the name you input The reading is generated automatically when you input a name 5 Use d to select Phone Number1 and then press c Edit Address Book ...

Page 41: ...Enter the e mail address and then press c OK To input an e mail address Inputting an E mail Address page 99 9 Press Reg to store the record Note The address book can contain up to 700 records Address book records are numbered from 000 through 699 Registering a new record automatically assigns it the lowest available unused record number An address book record can also contain a website URL street ...

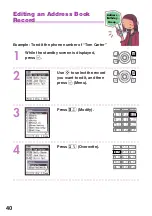
Page 42: ...k Record 1 While the standby screen is displayed press 2 Use a to select the record you want to edit and then press Menu 3 Press 3 Modify 4 Press 1 Overwrite Address Birthday Group Example To edit the phone number of Tom Carter ...

Page 43: ...41 Address Book 5 Use d to select 0900006XXXX and then press c Edit 6 Make the changes you want and then press c OK To delete characters press C 7 Press Reg XXXX XXXX 0 9 0 0 0 0 6XXXX ...

Page 44: ...ant to save and then press Menu r Displays outgoing records l Displays incoming records 2 Press 4 Reg Adrs Book 3 Press 1 New Reg 4 The address book editing screen will appear with the phone number of the selected record input automatically To enter the name use the procedure starting from step 2 under Creating a New Address Book Record page 38 XXXX XXXX ...

Page 45: ...ok 1 While the standby screen is displayed press and then use a to select the record whose phone number you want to dial 2 Press c Disp to display the details of the record 3 Use j to select the phone number and then press N XXXX XXXX XXXX Hello ...

Page 46: ...s N In response to the confirmation screen that appears press c OK 2 Use j to select Register Confirm and then press c OK Use s to select the 1 through 5 tab where you want to register the Pair partner 3 Press 1 Register 4 Use a to select the address book record for the person you want to register as a Pair partner and then press c Select 5 Press c Reg Pair Function Once you register a person as a...

Page 47: ...d E Mail and then pressing c OK will display a screen for composing and sending an e mail message Next continue from step 5 of the procedure under Creating and Sending E mail Messages page 50 Selecting Send C Mail and then pressing c OK will display a screen for composing and sending a C mail message Next continue from step 5 of the procedure under Creating and Sending C mail Messages page 56 X X ...

Page 48: ...ned in the body of the mail message can be used When the sender is a Pair partner When the sender is included in the address book E mail Only the sender name and subject are received Body text and attached data are not received C mail Not received When the sender is neither of the above Receipt is allowed Call time is restricted Further calling is not possible if the call time exceeds the Teens Re...

Page 49: ...hile the standby screen is displayed press c 2 Use a to select mode setting and then press c OK 3 Press 3 Teens Mode 4 Enter the lock number Note Input of the lock number is required when changing from Teens Mode to Normal Mode or Smart Mode ...

Page 50: ...kes it possible for you to exchange mail with a computer and with another cellphone that supports e mail You can send mail messages that contain up to 5 000 double byte characters and you can attach photos and movies to e mail messages You can send an e mail to up to five different addresses You can send up to 1 000 e mail messages each addressee counts as a separate message per day The send and r...

Page 51: ...ports C mail Phone numbers are used as C mail addresses au subscribers in the Kanto and Chubu areas do not need a separate subscription to use C mail Subscribers outside of Kanto and Chubu require a separate subscription C mail Security C mail security blocks C mail that contains any URLs http https or phone numbers in its body text C mail security is turned on by default the when you first start ...

Page 52: ...ess to which the e mail will be sent You can send an e mail to up to five different addresses 3 Press 1 Address Book use a to select an addressee and then press c Select You can select an addressee from sending records receiving records or My Address or you can enter an address 4 Use j to select the e mail address you want to enter and then press c OK ...

Page 53: ...f the e mail message 6 Enter the subject and then press c OK Use d to select and then press c Edit Body of the e mail message 7 Enter the body text and then press c OK 8 Press Send or N The message Sent appears on the display after the e mail message is sent ...

Page 54: ...ss c OK 2 Press c OK 3 Use j to select the unread e mail you want to view and then press c Disp Indicates an unread message Indicates a previously read message 4 This displays the received e mail message If all of the message cannot fit press d to scroll Use L and R to scroll between messages Press C to return to the e mail message list Received e mail icon ...

Page 55: ... Use j to select the or line Press d to scroll the screen and display the line at the end of the message text that contains the attached data 3 Press c Play Each photo or movie attached to an e mail message is displayed individually Note With some attached data c will be labeled Rcv in step 3 Pressing c Rcv will receive the data and then display it The send and receive operations may take longer w...

Page 56: ...m the following steps 1 Press Reply This will display the e mail composition screen You can also display the e mail composition screen by pressing Menu and then 1 Reply 2 Press c Edit and then input the body text For the remainder of this procedure Perform the procedure starting from step 7 under Creating and Sending E mail Messages page 50 Reply Reply Reply ...

Page 57: ... can also avoid spam by changing the part of your e mail address to the left of page 24 で変更する必要はありま せん 1 未承諾広告フィルター 2 アト レスフィルター 3 設定にあたって 戻る 自動的に変更されますの Mail filter setting screen Allows receipt of e mail from specified sources only You can configure Internet and cellphone domain options 一括指定先 batch settings and specify individual 個別指定 individual settings e mail addresses domains and account name...

Page 58: ...ess c Edit 3 Press 1 Address Book use a to select an addressee and then press c Select You can also select a phone number from sending records or receiving records or you can enter an address 4 Use j to select the phone number you want to enter and then press c OK Creating and Sending C mail Messages XXXX XXXX XXXX Hold down ...

Page 59: ...ds Reading Received C mail Messages C Mail and appear on the standby screen to indicate that a C mail message has been received 1 Select C Mail and then press c OK 2 Use j to select the unread C mail you want to view and then press c Disp Indicates an unread message 3 This displays the received C mail message Use L and R to scroll between messages Press C to return to the C mail message list Recei...

Page 60: ...ail Certain signal conditions can cause e mail send and receive to take longer than normal You can send a photo or movie excluding those recorded in Video Mode whose data is up to 500KB as an e mail attachment Attaching a Photo or Movie to an E mail Message page 68 Camera Features Your A5512CA comes with a built in 1 28 million effective pixel camera that you can use to record photos and movies Yo...

Page 61: ...lurred images When you press the shutter button remain still until your shutter tone finishes sounding This is especially important when shooting where lighting is dim A self timer is also provided for shooting photos With the self timer you do not need to press the shutter button to take a photo so there is less chance of a blurred image caused by accidental movement of the phone Taking care to a...

Page 62: ...nd then press c Shutter The phone will emit a shutter sound You can also press in place of c Note that the phone emits the shutter sound even if it is in Manner Mode 4 Press c Save The display will show the message Saved to data folder and then return to the photo monitor screen Photos you shoot are saved to the Photo Folder which is in the data folder ...

Page 63: ...dure Next repeat step 3 to re shoot Displaying Key Help While 7 key help icon is displayed in the lower right corner of the screen press 0 to display key help Press 0 again to exit key help Zoom Wide j Press u to zoom in Press d to zoom out Brightness s Press l to make the image darker Press r to make the image brighter Shot Light E Use this light when available lighting is dim Auto ON OFF Photo M...

Page 64: ...lder and then press c OK 3 Use j to select Photo Folder and then press c Detail 4 Use j to select a folder and then press c Detail Selecting All Data displays a list of all the photos in the Photo Folder Selecting a folder with a date displays a list of all photos that were shot on that date ...

Page 65: ...63 Camera 5 Use a to select the photo you want and then press c Disp 6 The photo will appear on the display ...

Page 66: ... at the subject and then press c Rec The phone will emit a shutter sound to signal the start of recording You can also start recording by pressing 3 To stop recording press c End If you do not press c End recording will stop automatically after about 15 seconds The phone emits a shutter sound when recording stops 4 Press c Save ...

Page 67: ...ress C or l and then 1 Cancel in step 4 of the above procedure Next repeat step 2 to re shoot Using Key Help While 7 key help icon is displayed in the lower right corner of the screen press 0 to display key help Press 0 again to exit key help Time 11 23 a m Date 2005 October 12 Serial number Zoom Wide j Press u to zoom in Press d to zoom out Press to pause recording Brightness Pause s Press l to m...

Page 68: ...s c OK 3 Use j to select Movie Folder and then press c Detail 4 Use j to select a folder and then press c Detail Selecting All Data displays a list of all the movies in the Movie Folder Selecting a folder with a date displays a list of all movies that were recorded on that date Viewing Movies Hi ...

Page 69: ...67 Camera 5 Use a to select the movie you want and then press c Play 6 This will play the movie To pause movie playback press c Playback will stop automatically when the end of the move is reached ...

Page 70: ... shoot are stored in the Photo Folder and movies are stored in the Movie Folder which are inside the data folder 3 Perform the procedure starting from step 2 under Creating and Sending E mail Messages page 50 to create the e mail message A movie attached to an e mail can be played on a cellphone that supports movie playback or on a computer Attaching a Photo or Movie to an E mail Message 3 7 KB 0 ...

Page 71: ...e mail using the auto address converter the e mail address will be converted automatically as shown below To use the auto address converter press Menu on the e mail composition screen and then press 1 Send フォ トメール便 Addressee Service DoCoMo Vodafone TU KA and au phone without movie mail support Converted Address d nepm jp vodafone nepm jp ezweb nepm jp E mail address docomo ne jp vodafone ne jp ezw...

Page 72: ...an initialization procedure before you can use EZweb If you have not performed initialization yet refer to Initializing E mail and EZweb page 21 EZweb provides you with access to Chaku Uta the latest news and other web based contents EZweb Wallpaper Games Latest news Weather reports Chaku Uta Traffic reports Standby screen R c OK Select BrowserMenu EZトップメニュー au style とくする情報 最新情報 カテゴリで探す エリア E 1 ...

Page 73: ...test news weather stock prices and other business information 6 エリア Area Weather maps and other area specific information 7 ホビー カルチャー Hobbies Culture Latest game fortunetelling and music information and information about the latest hobby and entertainment trends ショッピング オークション Shopping Auctions Cellphone shopping information and auction information 8 ライフ Life Information useful for everyday living ...

Page 74: ...u Select BrowserMenu Use j to select the site you want and then press c Select Use l or C to scroll back one screen Holding down these keys for about one second returns to the EZ top menu Note Main Key Operations when Viewing a Site j Selects items on the current display Also scrolls the screen one line up or down when all of the information does not fit on the display c Goes to the selected site ...

Page 75: ...king is complete Bookmarking Sites You Frequently Access 無料メルマカ つぶメル 旅行券5万円分 特集 今週のヒキタ シ ーーーーーーーーーーーーーーーーーーーーーー ーーーーーーーーーーーーーーーーーーーーーー W Select Close Save I tems Ta ke snapshot Re l oad Bookmar k s V i ew snapshots Go To URL Cu r r ent Certificate New bookmark 1 E R T Y U I O Note You can have up to 100 sites bookmarked in the Favorite Site list You may not be able to bookmark some sites Bookmark ...

Page 76: ... you originally subscribed to the fee based contents Premium EZ Password This is the four to eight digit number you registered for your first まとめてau支払い combined au payment service payment Input the required password in accordance with the instructions that appear on the display The first time you use a site register the password you want to use EZトップメニュー au style とくする情報 最新情報 カテゴリで探す エリア E 1 ビジ...

Page 77: ...Press 1 Call Tone The message Set will appear when setting is complete Note Perform the same procedure to download wallpaper and use it for the standby screen background Important In addition to call charges you will be charged in accordance with the pricing policy of each site to download Chaku Uta and other contents from a fee based site オフィシャる au Downloaded Saved to Data Folder 曲タイトル Play Back ...

Page 78: ... displayed press R 2 Use j to select Favorite Site and then press c OK 3 Use j to select a site or folder and then press c OK If you selected a folder use j to select a site and then press c OK Viewing a Bookmarked Site L et s go here ...

Page 79: ... use EZweb to check call charges and communication charges a list of fee based services to which you are currently subscribed and the charges for fee based services 料金お知らせサーヒ ス 1 2 3 4 5 6 通話料 通信料照会 説明 未払い料金照会 説明 料金のお支払 説明 累計ポイント照会 説明 ご請求金額照会 説明 料金照会 Select BrowserMenu Note Note that call charges and communication charges are rough approximations only ...

Page 80: ...essage to the other au phone to ask its location and いつで も位置確認 Auto Position Search fee based which lets you check the location of another au phone without requiring any operation on that phone Whenever an au phone enters a preset area during a specific time period Area Message automatically sounds an alarm and sends a message to another specified au phone Area Message 安心ナビエリア通知 Position Search 安心...

Page 81: ...c Information Setups membership registration etc 設定登録 Setups and Registrations オススメ New Going out Menu You can e mail a map of your current location to another phone which can then use the map to navigate to your location Map screen When you are in an area that is unfamiliar to you or if you lose your way simply select View My Map This will display a map showing your current location in real time ...

Page 82: ... of work your friends homes shops etc for quick and easy display of routes and maps when you need them Example Registering your current location as Home 1 While the standby screen is displayed press c 2 Use a to select EZnavi and then press c OK 3 Press 1 EZnaviwalk 4 Press 2 My Spot EZ Navi Walk Menu I live here ...

Page 83: ...me and then press Menu 6 Press 1 Edit 7 Use j to select No GPS Info and then press c Edit 8 Press 1 My Map 9 Press c OK Continued on next page Continued on next page 自宅 Getting GPS Info was comp leted Accu Leve l A Retry OK Map ...

Page 84: ...nd do not have the application installed follow the instructions that appear on the display to download the application Note that EZ Navi Walk has a menu you can use free of charge and a fee based menu that requires registration Since EZ Navi Walk is a positioning service that uses the GPS satellites correct GPS information may not be accessible when you are indoors If this happens move to a locat...

Page 85: ...s your destination home ヘルプ Navigation engine by NAVITIME JAPAN Map Shobunsha Publications Inc 昭文社 GPS情報を通知します よろしい ですか 本確認画面が不要な場合は電 話機本体のGPS情報通知設定を ON 確認画面なし にしてくださ い はい いいえ Return Home In order to use the following procedure to return home you first need to register your home position To perform the Return Home procedure perform steps 1 through 3 under Registering Your Home Location page 80 and...

Page 86: ...eration Entering Smart Mode 1 While the standby screen is displayed press c 2 Use a to select mode setting and then press c OK 3 Press 2 Smart Mode Note Input of the lock number is required when changing from Teens Mode to Smart Mode When you enter Smart Mode Smart Mode settings change automatically to those configured on the phone before you entered Smart Mode Beep Beep ...

Page 87: ... Exiting Smart Mode 1 While the standby screen is displayed press c 2 Use j to select SETTINGS and then press c Select 3 Use j to select SmartMode OFF and then press c Select 4 Press 1 Yes This returns to Usual Mode ...

Page 88: ...ecords Incoming Records AdrBookReg E Mail C Mail Photo2 Movie1 For using EZweb For using EZ Navi Movie2 Correction For selecting the photo or movie recording and the correction method For using the address book outgoing records and incoming records and for registering data in the address book For composing and reading E mail and C mail messages and for converting E mail addresses For viewing and d...

Page 89: ...Inquiry SmartMode OFF Calculator Alarm Clock Countdown Timer Stopwatch Menu Item Description For using the calendar calculator and other tools For changing the incoming tone wallpaper and character size for turning Manner Mode on and off and for turning Smart Mode off For displaying your current phone number and e mail address ...

Page 90: ...yed press 2 Press 2 Register and then press c Fix 3 Enter the name and then press c OK To input text Inputting Characters page 98 4 Check the reading of the name you input and then press c OK Adding Data to the Address Book in Smart Mode Tom ...

Page 91: ...cords and outgoing records 7 Enter the phone number and then press c OK When entering the number of a standard phone be sure to include the area code 8 Press 1 Yes If you do not want to input an e mail address press 2 No and then advance to step 11 9 Press 3 Input By Myself You can also select data in sending records and receiving records ...

Page 92: ...rt Mode you can input Name Reading Phone Number1 E mail Address1 and Image data only into an address book record You could press 1 Yes in step 11 to select a photo in the data folder and assign it to the address book record if you want Pressing Reedit in step 12 and then pressing 1 Yes returns to step 3 from which you can edit the contents of the record XXXX ...

Page 93: ...eate an e mail message Perform the procedure starting from step 7 under Creating and Sending E mail Messages in Smart Mode page 92 4 Delete Data Deletes the selected address book record 5 Data Edit Select to edit the selected address book record 4 The address book record will appear on the display Use j to select the phone number and then press c CALL To send an e mail message use j to select the ...

Page 94: ...is displayed press L 2 Press 1 E Mail 3 Press 1 Create Mail 4 Press 1 Address Book You can also input data with Sending Records Receiving Records and Input By Myself Creating and Sending E mail Messages in Smart Mode Beep Beep Beep ...

Page 95: ...f an address book record has more than one e mail address only the address that is specified as the usual e mail address is displayed in the Smart Mode 7 Press 1 Yes 8 Enter the subject and then press c OK To input text Inputting Characters page 98 9 Press 1 Yes Continued on next page Continued on next page ...

Page 96: ... 1 Yes to select a photo in the data folder and attach it to the e mail message In Smart Mode an e mail message can have only one attachment 12 After checking the content of the e mail press c Send Note Pressing Reedit instead of c Send in step 12 returns to step 4 from which you can edit the contents of the e mail message ...

Page 97: ...ou can also press in place of c 4 Press c Menu and then 1 Save Note Pressing c Menu in step 4 and then pressing 2 Send Mail will display a screen for composing an e mail message with attached photo To create an e mail message Perform the procedure starting from step 4 under Creating and Sending E mail Messages in Smart Mode page 92 Shooting a Photo in the Smart Mode Clic k Photo 1 Wallpaper 240 32...

Page 98: ...elect 2 Use j to select Photo Folder and then press c Select 3 Use j to select a folder and then press c Select Selecting All Data displays a list of all the photos in the Photo Folder Selecting a folder with a date displays a list of all photos that were shot on that date 4 Use a to select the photo you want and then press c Menu ...

Page 99: ...ttach E Mail Displays a screen for composing an e mail message with an attachment To create an e mail message Perform the procedure starting from step 4 under Creating and Sending E mail Messages in Smart Mode page 92 6 The photo will appear on the display ...

Page 100: ...U V 8 w x y z W X Y Z 9 0 Space Toggles between upper case and lower case Example a A Returns to the previous character Important Allowable Characters in Your E mail Address Your e mail address the part to the left of can contain up to 20 characters including single byte English lower case letters hyphens and periods Two periods are not allowed in succession and a period cannot be used as the firs...

Page 101: ... 7 under Creating a New Address Book Record page 38 and then perform the following steps 1 Input mark To input m Press 6 once To input a Press 2 once To input r Press 7 three times To input k Press 5 twice 2 Press Menu 3 Press 2 Sentence 4 Use j to select ezweb ne jp and then press c OK to input mark ezweb ne jp You could also input ezweb ne jp by pressing 02 XXXX mark mark mark mark mark ...

Page 102: ...n the text input screen 1 Press Char and then 6 Image You can also select a pictograph by pressing 2 Use a to select the pictograph you want and then press c Select Use L and R to scroll through the various categories of pictographs To input consecutive pictographs press Serial 3 Press Menu and then 3 Sentence ...

Page 103: ...ouble byte symbol menu Emoticon Input In step 3 of the above procedure press 2 Emoticon in place of 3 Sentence to display the emoticon menu You can also display the emoticon menu by pressing in place of Menu in step 3 4 Use j to select the preset phrase you want and then press c OK Here we will select Happy birthday You can also input Happy birthday by pressing 17 5 The resulting input is Happy bi...

Page 104: ... macro switch on the side of the phone lets you move in to about 13 cm for intimate close ups of food flowers and other subjects Serial Shot Photo You can shoot up to nine consecutive images and store all of them or only selected images in memory Post Recording Telop Movie After recording a movie you can add audio or text You can select from among 24 colors for the text and 169 colors for the back...

Page 105: ...e volume level too low What to do Correctly install the battery pack Charge the battery pack Hold down F for at least 1 5 seconds to turn on the phone Wait until you are in a location where is not displayed before trying to make a call When making a call to a standard phone you need to input the area code and then the phone number Hold down F for at least 1 5 seconds to turn on the phone After inp...

Page 106: ...2CA if the specified number of calls is placed to it without being answered from the specified phone number during the specified time frame 1 While the standby screen is displayed press c442 2 Press 1 ON OFF Setup input the lock number and then press 1 ON 3 Press 2 Specified Time input the lock number input the period you want to specify and then press c OK This will set the period during which th...

Page 107: ...Menu before inputting a phone number and select the number from the address book outgoing records or incoming records or you can specify a pay phone Press F to complete the setup procedure and return to the standby screen k Triggering Remote Auto Lock 1 Within the preset period call your A5512CA the specified number of times Remote auto lock is triggered and you will hear an announcement about aut...

Page 108: ...mber k To turn on Hot Dial While the standby screen is displayed press c591 and input the lock number Next input the phone number you want to preset and then press c Reg Hot Buzzer With Hot Buzzer holding down 0 for about one second will sound a loud volume buzzer kTo turn on Hot Buzzer While the standby screen is displayed press c592 and input the lock number kTo stop the Hot Buzzer To stop the H...

Page 109: ... low Extension Mode automatically turns off signal emission and limits the functions you can use in order to conserve remaining power It keeps the A5512CA operating longer when you are unable to recharge the battery pack right away To turn on Extension Mode press c561 ...

Page 110: ...eading received C mail messages 57 Using C mail 49 D Desktop holder 10 12 Disaster Message Board Service 6 Display indicators 18 Display language 22 Domain name 24 E Earpiece volume 35 Easy Voice Memo Delete 37 Playback 37 Turning on 36 E mail 48 Create New 50 Creating and sending e mail messages 50 E mail address 21 23 24 E Mail Setup 55 Initial settings 21 Reading an e mail message with an attac...

Page 111: ... 24 Viewing 23 P Pair Function 44 Making a phone call or sending mail to a Pair partner 45 Registering a Pair partner 44 Personal identification numbers and passwords 27 Photo Photo Folder 61 Reshooting a photo 61 Sending a photo by e mail 68 Shooting a photo 60 Viewing photos 62 Playback Easy Voice Memo 37 Movie 66 Photo 62 R Redial From incoming records 30 From outgoing records 30 Remote Auto Lo...

Page 112: ...hargers at stores bearing the logo regardless of brand and manufacturer to protect the environment and reuse valuable resources For inquiries call From regular phones toll free toll free From au cellphones 157 area code not required au Customer Service Center General Information 0077 7 111 Pressing zero will connect you to an operator after calling 157 on your au cellphone 古紙配合率100 再生紙を使用しています auオ...

Reviews: