background image

8

EN

G

LI

S

H

4b


•  

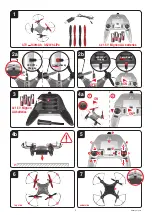
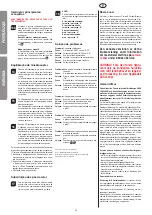
WARNING! Immediately after switching it on, 

place  the  Quadrocopter  on  a  flat  and  level 

surface. The gyro-system will then set itself 

automatically.

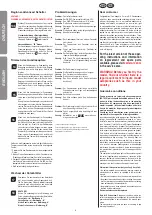
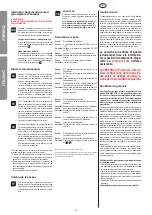
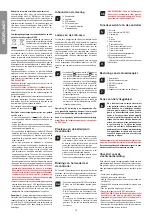
Range of functions of the 

remote control 

5

  1.  Aerial


2.  Power switch (ON/OFF)


3.   Control LED


4.  Gas


  Circling


5.  Forwards / backwards


  right / left banking


6.  Trimmer for right / left banking


7.  Trimmer for forwards / backwards 


8.  Trimmer for rotation


9.  Shoulder button for looping function 


10. Shoulder button for LED


11. Beginner/Advanced switch (to switch, press  

  the top of the right-hand joystick)

3

  12. Battery compartment 

Description of the Quadrocopter

6

  1.  Rotor system


2. Rotor protection cage


3. ON-/OFF switch


4. Red LED


5. Blue LED


7

  6. Charging socket for the Li-Po battery 

Choosing the flight area

8

  When  being  prepared  for  the  first  flight  you 

should  choose  a  closed  room  which  is  as 

large  as  possible  without  any  persons  or 

 obstacles.  Due  to  its  size  and  controllabil-

ity, experienced pilots may be able to fly the 

Quadrocopter  in  relatively  small  rooms.  For 

your first flights we strongly recommend you 

choose a room with a minimum floor space of 

3 x 3 metres and 2.40 metres in height. After 

having trimmed your Quadrocopter for flight 

and  made  yourself  familiar  with  the  control-

ler  and  its  functions  you  may  start  flying  in 

smaller and less open environments. 

The Quadrocopter has been developed exclusively for 

use  in  enclosed  rooms  without  direct  sunlight  or  any 

strong spotlighting. 

There must be no persons or ob-

jects  such  as  pillars  between  the  controller  and  the 

Quadrocopter to obstruct direct connection.

Checklist for flight preparation

This checklist is not a substitute for the contents of the oper-

ating instructions. Although it can be used as a quick-start-

guide, we strongly recommend you first to read the operating 

instructions in detail before you proceed.

•  Check the contents of the package.

•  Connect the charging unit to the source of power.

•  Charge  the  lipo-battery  as  described  in  the  section  

“Recharging the LiPo rechargeable battery”.

•  Fit  four  AA  batteries  in  the  controller,  making  sure  their 

polarity is correct.

•  Look for a suitable environment for flying.

 •  Switch on the model at the ON/OFF switch.

•  

WARNING! Immediately after switching it on, place the 

Quadrocopter  on  a  flat  and  level  surface.  The  gyro-

system will then set itself automatically.

•  The LEDs on the Quadrocopter now light up continuously.

•  Switch on the controller at the power switch.


Push the left-

hand joystick, i.e. the throttle lever, right to the top, then 

fully downwards into the zero position.

•  Allow the Quadrocopter a few moments until the system is 

correctly initialised and is ready for operation. The LED in 

the Quadrocopter now lights continuously. The LED on the 

controller now lights continuously.

•  Repeat the above points as required, if you wish to fly more 

Quadrocopters at the same time.

•  For the “Advanced Mode” 

(WARNING! ONLY FOR EXPE-

RIENCED  PILOTS!)

  press  the  top  of  the  right-hand  joy-

stick. There will be a double signal tone (see  

13b

).

•  Check the control system.

•  Make yourself familiar with the control system.

•  Trim the Quadrocopter as necessary as described under 

14

15

, so that when hovering it no longer moves from 

the spot without a command from the controller.

•  The Quadrocopter is now ready to be flown.

•  If the Quadrocopter displays no functions, retry the above 

binding procedure.

•  Fly the model.

•  Land the model.

•  

Switch the model off at the power switch

•  Always switch off the remote control last.

Flying the 4-channel Quadrocopter

NOTE! 

Take care particularly in the first few flights  to move 

the  lever  on  the  controller  very  gently  and  not  over-

hurriedly. As a rule, only very small movements of the 

respective levers are necessary to carry out the desired 

control commands!

If you notice that the Quadrocopter moves forwards or to the 

side without your touching the respective lever, please adjust 

the trim of the Quadrocopter as described in (

16

14

15

). 

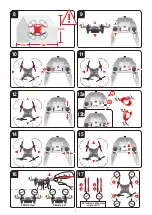
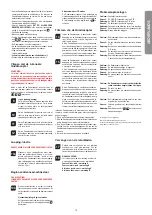
9

  +/- Gas (up / down) 


To start or to fly higher, push the gas lever on the 

left cautiously forwards. To land or fly lower, push 

the gas lever on the left cautiously backwards.

10

  To make the Quadrocopter circle to the left or the 

right on the spot, move the lever on the left cau-

tiously to the left or the right.

11

  To  fly  the  Quadrocopter  to  the  left  or  the  right, 

push the lever on the right cautiously  to the left or 

the right.

12

  To fly the Quadrocopter forwards or backwards, 

push the lever on the right cautiously forwards or 

backwards.

Looping function

WARNING! ONLY FOR EXPERIENCED PILOTS!

13a

  When  you  press  the  looping  button,  an  audi-

ble signal sounds until you move the right-hand 

joystick  either  up  or  down,  or  right  or  left.  The 

Quadrocopter then carries out the loop or roll in 

the respective direction. Before you do this, make 

sure  you  have  ample  room  on  all  sides  (about  

2.5 m – 8‘).

Beginner/Advanced switch


WARNING! "ADVANCED" FLYING MODE IS ONLY FOR 

EXPERIENCED PILOTS!

13b

  Press  down  vertically  on  the  right-hand  joystick 

to switch between beginner and advanced mode. 

Standard setting when switching on is the begin-

ner mode.


Standard setting = beginner mode 


Signal  sounds  once  on  switching  over.  Looping 

the loop and rollovers are possible as explained 

in 

13a

.


Advanced mode = 3D mode


The Quadrocopter reacts much more sensitively 

to control movements in “advanced” than in “be-

ginner” mode. Signal sounds twicw on switching 

over. Looping the loop and rollovers are possible 

as explained in 

13a

.

Trimming the Quadrocopter

14

  When hovering, if the Quadrocopter flies to the left 

or right without you moving the lever for left / right 

movement, please proceed as follows: 


If the Quadrocopter moves on its own fast or slow 

sideways to the left, press the lower right trimmer 

for right / left tilt in steps to the right. If the Quad-

rocopter moves right, press the trimmer for right / 

left tilt in steps to the left.

15

  When hovering, if the Quadrocopter flies forwards 

or backwards without you moving the lever for for-

wards or backwards movement, please proceed 

as follows:


If  the  Quadrocopter  moves  on  its  own  fast  or 

slow forwards, press the upper right trimmer for 

forwards / backwards in steps downwards. If the 

Quadrocopter moves backwards, press the trim-

mer for forwards / backwards in steps upwards.

16

  When hovering and without you moving the lever 

for circling on the spot, if the quadrocopter rotates 

to left or right, proceed as follows: If the quadro-

copter rotates quickly or slowly to the left around 

its own axis, press the trimmer for rotation below 

left in steps to the right. If the quadrocopter rotates 

to the right, press the trimmer for rotation in steps 

to the left. 

If the Quadrocopter can no longer be set to 'neutral' by press-

ing the trimmer, please carry out the following instructions:

1.  Place the Quadrocopter on a flat horizontal surface.

2.  Bind the Quadrocopter and the Controller as described in 

"Binding the model with the Controller".

3.  Simultaneously press the gas lever and the forwards/re-

verse lever to the lower right-hand corner. The LED on the 

Quadrocopter flashes briefly and then lights continuously.

4.  The neutral setting is now completed.

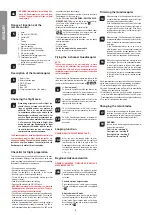
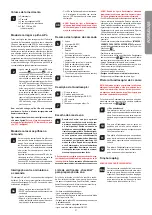
Changing the rotor blades

17

  Use a smooth narrow object to help draw off a ro-

tor blade if necessary. Make sure that you draw 

the rotor blade with great care vertically upwards, 

and hold the motor from below to stabilise it. 

18

  WARNING! 


Be sure to note the marking and colour, also the tilt 

angle of the rotor blades!


Front left: red – marking “A”


Front right: red – marking “B”


Rear right: black – marking “A”


Rear left: black – marking “B”

Summary of Contents for Micro Quadrocopter II

Page 1: ...struzioni per il montaggio e l uso Montage en gebruiksaanwijzing Instru es de montagem e modo de utiliza o Monterings och bruksanvisning Asennus ja k ytt ohje Instrukcja monta u i obs ugi Szerel si s...

Page 2: ...N 4 3 1 2 5 6 7 9 8 10 11 R L R L LED OFF Charging Green Ready ON OFF 2a 2b 6 7 underside top side 4 4 5 5 1 1 1 2 2 3 2 2 1 12 4x 1 5 V Mignon AA batteries 0 1 2 ON LED OFF Charging Green Ready 5 4b...

Page 3: ...3 3m 3m 2 4m 10 11 8 9 12 14 16 13a 15 17 R L R R L L R L 13b 1 2 B A B A A A B B Rotorblade Sideview angle of tilt REAR View FRONT View...

Page 4: ...s Es ist unabdingbar diese Anleitung vor der ersten Inbetriebnahme komplett zu lesen und zu verstehen Nur so k nnen Unf lle mit Verletzungen und Besch digungen vermieden werden Fliegen Sie nur in gesc...

Page 5: ...en geschlossenen Raum w h len der ohne Personen und ohne Hindernisse sowie m glichst gro ist Aufgrund der Gr e und Steuerbarkeit des Quadrocopters ist es f r erfahrene Piloten m glich auch in relativ...

Page 6: ...liert ohne ersichtlichen Grund w hrend des Flugs an Geschwindigkeit und sinkt ab Ursache Der Akku ist zu schwach L sung Den Akku aufladen siehe Kap Aufladen des Akkus Problem Der Quadrocopter dreht si...

Page 7: ...and 2 this device must accept any interference received in cluding interference that may cause undesired operation Changes or modifications not expressly approved by the party responsible for complian...

Page 8: ...nts of the respective levers are necessary to carry out the desired control commands If you notice that the Quadrocopter moves forwards or to the side without your touching the respective lever please...

Page 9: ...ommages et int r ts vis vis du vendeur correspondant droits existant si le produit n tait pas exempt de vices lors du transfert du risque ne sont pas concern s par cette garantie Les droits issus de c...

Page 10: ...chargeable Chargement de l accu LiPo Veillez ce que l accu LiPo fourni soit charg uniquement avec l appareil de charge LiPo fourni c ble USB Le charge ment de l accu avec l appareil de charge d un aut...

Page 11: ...13a Mode avanc mode 3D Le Quadrocopter r agit de mani re beaucoup plus sensible aux mouvements de contr le dans le mode Advanced que dans le mode d bu tant Un signal sonore se fait entendre deux fois...

Page 12: ...anos los cabellos y la ropa suelta incluidos otros objetos como l pices y destornilladores deben mantenerse alejados de la h lice rotor No tocar el rotor rotativo Pro cure especialmente que las manos...

Page 13: ...el Quadrocopter los pilotos experimentados pue den volar incluso en espacios cerrados relati vamente peque os Para sus primeros vuelos recomendamos absolutamente un espacio con unas dimensiones m nima...

Page 14: ...aspas del rotor se mueven excesivamente despacio Soluci n Desplace hacia arriba la palanca del acelerador Causa La potencia de la bater a es insuficiente Soluci n Cargue la bater a v ase el cap tulo...

Page 15: ...te dell utente comporta l appli cazione delle sanzioni amministrative di cui al D Lgs n De creto Legislativo N 49 del 14 Marzo 2014 Non usare contemporaneamente tipi di batterie diversi o bat terie nu...

Page 16: ...drocopter pronto per l uso Se il Quadrocopter non mostra funzioni ripetere il suddetto processo di collegamento Far volare il modellino Fare atterrare il modellino Spegnere il modellino con l interrut...

Page 17: ...behandeling of onjuist gebruik of bij in grepen door derden Andere claims van de klant met name voor schadevergoeding tegen de producent zijn uitgesloten De contractuele of wettelijke rechten van de k...

Page 18: ...opgeladen Laders en adapters mogen niet worden kortgesloten U kunt de in de Quadrocopter geplaatste accu met behulp van de bijbehorende USB laadkabel ofwel aan een USB poort van een computer ofwel di...

Page 19: ...ocopter naar rechts beweegt drukt u de trimmer voor de bewe ging naar rechts links stapsgewijze naar links 15 Indien de Quadrocopter in zweefvlucht zonder beweging van de besturingshendel naar voren o...

Page 20: ...as que proporcionam espa o suficiente e siga todas as instru es tal como s o recomendadas neste manual Manter as m os cabelo e vestu rio solto bem como outros obst cu los tais como canetas e chaves de...

Page 21: ...r poss vel Devido ao tamanho do helic ptero e boa usabilidade pilotos expe rientes conseguem pilotar o Quadrocopter em salas fechadas relativamente pequenas Para os seus primeiros voos aconselhamos lh...

Page 22: ...suficiente Solu o Carregar a pilha ver cap tulo Modo de carregar a pilha Problema O Quadrocopter perde velocidade durante o voo sem motivo aparente e desce Causa A pilha est demasiado fraca Solu o Car...

Page 23: ...as Om batteriet skall laddas efter en flygtur m ste det f rst ha f tt svalna till omgivningstemperatur Endast tillh rande LiPo laddare USB kabel kontroll f r anv ndas Om detta villkor inte uppfylls fi...

Page 24: ...ckligt med plats p alla sidor i rummet ca 2 5 m Beginner Advanced l ge VARNING FLYGL GE ADVANCED ENDAST F R ERFARNA PILOTER 13b Tryck p h ger joystick lodr tt uppifr n f r att v xla mellan l gena Beg...

Page 25: ...i vain kodin alu eella VAROITUS l k ynnist Quadrocopter kun ihmisi el imi tai muita esteit on Quadrocopter lentoalueella Noudata tarkasti t m n tuotteen ja mahdollisten lis varus teiden laturien akkuj...

Page 26: ...aussauvaa varovasti ylh lt p in Kuuluu 2 x merkki ni katso 13b Tarkasta ohjaus Tutustu ohjaukseen S d Quadrocopteria tarvittaessa kuten kohdissa 14 15 on kuvattu niin ettei Quadrocopter en liitolen no...

Page 27: ...a Kupuj cego szczeg lnie roszczenia odszkodowawcze wobec producenta s wykluczone Gwarancja nie narusza praw Kupuj cego wobec sprzedawcy wynikaj cych z zawartych um w lub obowi zuj cych przepis w prawa...

Page 28: ...t odpowiednim momentem dla zako czenia lotu Zakres dostawy 1 1x Quadrocopter 1x Kontroler 1x Kabel do adowania USB 1x Zestaw zapasowych wirnik w 4x Baterie 1 5 V Micro AAA nie przeznaczone do ponowneg...

Page 29: ...lewo porusza si w lewo lub w prawo prosimy post powa w nast puj cy spos b Je eli quadrokopter samodzielnie porusza si wolno lub szybko w lewo przesuwajcie Pa stwo stopniowo w prawo dolny prawy trymer...

Page 30: ...tanak s tartsa be a haszn lati utas t s min den rendelkez s t A propellert l rotor t vol kell tartani a kezeket a hajat s a l g ruh zatot valamint az egy b olyan t rgyakat mint ceruz k tollak s csavar...

Page 31: ...ut n mer szelhet kisebb s kev sb szabad helyeken is rep lni A quadrocopter kiz r lag z rt terekben t rt n haszn latra rendeltetett amelyekben nincs k zvetlen napsu g rz s vagy f nysz r b l sz rmaz er...

Page 32: ...t rotorlap tok Megold s A rotorlap tokat a 17 18 l p sekben le rtak nak megfelel en felszerelj k kicser lj k A t ved sek s a m dos t sok joga fenntartva Sz nek v gleges design A m dos t sok joga fennt...

Page 33: ...laditi na temperaturo okolice Uporabljajte lahko le pripadajo LiPo polnilnik USB kabel upravljalnik Pri neupo tevanju teh navodil obstaja nevar nost po ara in s tem gro nja zdravju in ali nastanek ma...

Page 34: ...eh smereh ca 2 5 m Stikalo za etni ki napredni na in OPOZORILO NA IN LETENJA ADVANCED LE ZA IZKU ENE PI LOTE 13b Pravokotno z zgornje strani pritisnite mehki gumb za preklapljanje med na inoma Einstei...

Page 35: ...c ho se rotoru Dbejte zejm na na to aby se va e ruce NEDOSTALY do bl zkosti list rotoru UPOZORN N Nebezpe poran n o Nenechejte Quadrocopter l tat v bl zkosti obli eje aby nemohlo doj t ke zran n Jako...

Page 36: ...m n voln m prost ed n Quadrocopter byl vyvinut v hradn pro pou v n v kryt ch prostor ch bez p m ho slune n ho z en nebo siln ho sv tla reflektor Mezi ovlada em a Quadroco pter se nesm j nach zet dn p...

Page 37: ...iktogramy fotky symbol V en z kazn k blaho el me v m k zak peniu modelu Quadrocoptera Carrera RC ktor bol vyroben pod a s asn ho stavu techniky Preto e sa svoje produkty neust le sna me vy v ja a zlep...

Page 38: ...a na pr stroje s triedou ochrany II Smernice a varovn upozornenia na pou vanie LiPo akumul torov Prilo en LiPo akumul tor 3 7 V 85 mAh mus te na b ja na bezpe nom mieste na ktorom sa nenach dzaj z pal...

Page 39: ...er pohybuje dopredu alebo do strany bez toho aby ste zatla ili na p ku vyv te Quadrocopter tak ako je to op san v asti 14 15 16 9 Plyn hore dole Ak chcete na tartova alebo letie vy ie posu te plynov p...

Page 40: ...d isklju ivo kori ten sa opremom koju je odobrio proizvo a Jamstvena kartica se ne mo e nadoknaditi Upute za zemlje lanice EU Upu uje se na zakonsku du nost davanja jamstva prodava a da ovo pravo na d...

Page 41: ...terije u upravlja Pazite ispravno postavlje ne polove Nakon to pretinac zatvorite pomo u sklopke Power na prednjoj strani mo ete provjeriti funkcionalnost upravlja a Kod polo aja sklopke u polo aju ON...

Page 42: ...stavite na ON Uzrok Upravlja u danom slu aju nije ispravno spojen sa prijemnikom Quadrocoptera Rje enje Molimo Vas provesti postupak spajanja kao to je opisano pod Kontrolni popis za pripremu leta Pr...

Page 43: ...eapparat USB kabel kontroller Ved ignorering av disse henvisningene er det fare for brann og dermed helsefare og eller materiell skade Bruk ALDRI et annet ladeapparat Hvis akkumulatoren bl ses opp ell...

Page 44: ...yre joystick for skifte mellom Nybegynner Advanced modus Under innkopling er nybegynner modus aktiv som stan dardinnstilling Standardinnstilling begynner modus Signaltone ved omkopling h res en gang...

Page 45: ...s ledes at hverken du eller andre personer eller deres ejendom tager skade eller uds t tes for fare Brug aldrig din model hvis styreenheden har svage bat terier Dette leget j er kun beregnet til brug...

Page 46: ...t LED erne p quadrocopteren blinker nu rytmisk LED en p controlleren lyser nu permanent Gentag om n dvendigt ovenn vnte punkter hvis du n sker at flyve med flere quadrocopterer samtidigt Til Advanced...

Page 47: ...ya yenisi ile de i tirme anla madan geri ekilme indirim zarar tazminat bu garantiden etkilenmemektedir Bu zel imalat garantisinden haklar ancak e er talep edilen hatalar kullanma talimat ndaki veriler...

Page 48: ...USB arj kablosundaki LED lambas ye il renkte ya nar ve arj biriminin bilgisayar veya Controller ile d zg n ba lanm oldu unu g sterir E er ak s bo alm bir Quadrocopter i takacak olursan z o zaman USB...

Page 49: ...cek olursa Sa a Sola e im ayarlay c s n ad m ad m sola do ru bast r n z 15 E er Quadrocopter s z lme u u unda leri Geri pedal hareket ettirilmeden ne veya geriye do ru u acak olursa l tfen a a da a kl...

Page 50: ...Quadrocopter Stadlbauer EG 108 2004 48 2009 TTE R EG 5 1999 carrera rc com 10 LiPo LiPo LiPo WEEE II LiPo 3 7 140 USB LiPo 15 20 2 3 50 5 Quadrocopter 3 Quadrocopter x1 1 x1 USB x1 x1 AA 1 5 x4 LiPo U...

Page 51: ...51 4a 4b 8 5 LED 3 6 7 LED 15 14 13b 16 15 14 9 10 11 12 13a 14 15 16 13b 13a 13a 17 18...

Page 52: ...52 18 17...

Page 53: ...53...

Page 54: ...54...

Page 55: ...55...

Page 56: ...ic Phone 420 284 000 111 Fax 420 284 000 101 Email radim kalo conquest cz Internet www cqe cz DENMARK SWEDEN NORWAY FINLAND ICELAND Tactic Games OY Raumanjuovantie 2 P O Box 4444 28101 Pori Finland Ph...

Reviews: