6
D
EU
TS
C
H
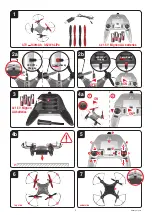
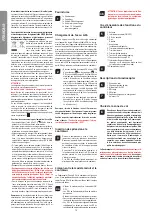
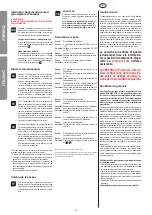
Beginner-Advanced Schalter
ACHTUNG!
FLUGMODUS „ADVANCED“ NUR FÜR GEÜBTE PILOTEN!
13b
Drücken Sie senkrecht von oben auf den rechten
Joystick um zwischen dem Einsteiger & Advanced
Modus umzuschalten. Beim Einschalten ist als
Standardeinstellung der Einsteiger Modus aktiv.
Standardeinstellung = Einsteiger Modus
Signalton beim Umschalten ertönt einmal. Es sind
Looping & Rollen wie in
13a
erklärt moglich.
Advanced Modus = “3D” Modus
Der Quadrocopter reagiert viel empfindlicher auf
Steuerbewegungen als im „Einsteiger Modus“.
Signalton beim Umschalten ertönt 2x. Es sind
Looping & Rollen wie in
13a
erklärt möglich.
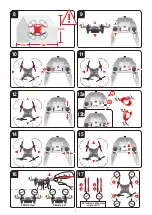
Trimmen des Quadrocopters
14
Wenn der Quadrocopter im Schwebeflug, ohne
Bewegung des Hebels für Rechts-/Links-Neigung
nach links bzw. rechts fliegt gehen Sie bitte wie
folgt vor:
Bewegt sich der Quadrocopter von selbst schnell
oder langsam seitwärts nach links, drücken Sie
den unteren rechten Trimmer für Rechts-/Links-
Neigung schrittweise nach rechts. Wenn sich der
Quadrocopter nach rechts bewegt, drücken Sie
den Trimmer Rechts-/Links-Neigung schrittweise
nach links.
15
Wenn sich der Quadrocopter im Schwebeflug,
ohne Bewegung des Hebels für Vor-/Zurück nach
vorne bzw. hinten fliegt gehen Sie bitte wie folgt
vor:
Bewegt sich der Quadrocopter von selbst schnell
oder langsam nach vorn, drücken Sie den oberen
rechten Trimmer für Vor-/Zurück schrittweise nach
unten. Wenn sich der Quadrocopter nach hinten
bewegt, drücken Sie den Trimmer für Vor-/Zurück
schrittweise nach oben.
16
Wenn sich der Quadrocopter im Schwebeflug,
ohne Bewegung des Hebels für Kreisdrehung auf
der Stelle nach links bzw. rechts dreht, gehen Sie
bitte wie folgt vor: Dreht sich der Quadrocopter
von selbst schnell oder langsam um seine eigene
Achse nach links, drücken Sie den unteren linken
Trimmer für Kreisdrehung schrittweise nach rechts.
Wenn sich der Quadrocopter nach rechts dreht,
drücken Sie den Trimmer für Kreisdrehung schritt-
weise nach links.
Sollte sich der Quadrocopter nicht mehr durch drücken der
Trimmer neutral stellen lassen, beachten Sie bitte folgende
Punkte:
1. Platzieren Sie den Quadrocopter auf einer waagerechten
Fläche.
2. Binden Sie den Quadrocopter mit dem Controller wie in
"Bindung des Modells mit dem Controller" beschrieben.
3. Schieben Sie gleichzeitig den Gashebel und den Hebel für
Vor-/Zurück in die rechte untere Ecke. Die LED am Qua-
drocopter blinkt kurz auf und leuchtet dann durchgehend.
4. Die Neutralstellung ist abgeschlossen.
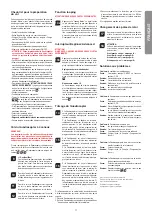
Wechsel der Rotorblätter
17
Verwenden Sie zum abziehen eines Rotorblatts
ggf. einen schmalen glatten Gegenstand. Ach-
ten Sie darauf dass Sie das Rotorblatt vorsichtig
senkrecht nach oben abziehen und dabei den
Motor von unten stabilisierend festhalten.
18
ACHTUNG!
Achten Sie unbendingt auf die Markierung und
Farbe, sowie den Neigungswinkel der Rotorblätter!
Vorne Links: rot – Markierung „A“
Vorne Rechts: rot – Markierung „B“
Hinten Rechts: schwarz – Markierung „A“
Hinten Links: schwarz – Markierung „B“
Problemlösungen
Problem:
Controller funktioniert nicht.
Ursache:
Der ON/OFF-Powerschalter steht auf „OFF“.
Lösung:
Den ON/OFF-Powerschalter auf „ON“ stellen.
Ursache:
Die Batterien wurden falsch eingelegt.
Lösung:
Überprüfen Sie, ob die Batterien korrekt einge-
legt sind.
Ursache:
Die Batterien haben nicht mehr genug Energie.
Lösung:
Neue Batterien einlegen
Problem:
Der Quadrocopter lässt sich mit dem Controller
nicht steuern.
Ursache:
Der Powerschalter des Controller steht auf
„OFF“.
Lösung:
Zuerst den Powerschalter am Controller auf
„ON“ stellen.
Ursache:
Der Controller ist ggf. nicht richtig mit dem Emp-
fänger im Quadrocopter gebunden.
Lösung:
Bitte führen Sie den Bindevorgang wie unter
„Checkliste für die Flugvorbereitung“ beschrie-
ben durch.
Problem:
Der Quadrocopter steigt nicht auf.
Ursache:
Die Rotorblätter bewegen sich zu langsam.
Lösung:
Den Gashebel nach oben ziehen.
Ursache:
Die Akku-Leistung reicht nicht aus.
Lösung:
Den Akku aufladen (siehe Kapitel „Aufladen
des Akkus“).
Problem:
Der Quadrocopter verliert ohne ersichtlichen
Grund während des Flugs an Geschwindigkeit
und sinkt ab.
Ursache:
Der Akku ist zu schwach.
Lösung:
Den Akku aufladen (siehe Kap. „Aufladen des
Akkus“).
Problem:
Der Quadrocopter dreht sich nur noch im Kreis
oder überschlägt sich beim Start.
Ursache:
Falsch angeordnete oder beschädigte Rotor-
blätter
Lösung:
Rotorblätter wie in
17
18
beschrieben an-
bringen/austauschen.
Irrtum und Änderungen vorbehalten
Farben / endgültiges Design – Änderungen vorbehalten
Technische und designbedingte Änderungen vorbehalten
Piktogramme = Symbolfotos
Dear customer
Congratulation! You bought a Carrera RC Quadrocopter
which has been manufactured according to today´s state-
of-the-art technology. As it is our constant endeavour to
develop and improve our products, we reserve the right
to make modifications, either of a technical nature or with
respect to features, materials and design, at any time, and
without prior notice. For this reason, no claims will be ac-
cepted for any slight deviations in your product from the
data and illustrations contained in these instructions. These
operating and assembly instructions are an integral part of
the product. Non-observance of these operating instructions
and the safety instructions they contain will render the guar-
antee null and void. These instructions are to be kept for
future reference and in the event that the product is passed
on to a third party.
For the latest version of these oper-
ating instructions and information
on replacement and spare parts
available, please visit
carrera-rc.com
in the service area.
WARNING! Before you first fly the
model, find out whether there is a
legal requirement to insure model
aeroplanes such as this in your
country.
Guarantee conditions
Carrera products are technically advanced products
(NO TOYS) which should be handled with care. It is im-
portant to follow the directions given in the operating
instructions. All components have been subjected to
careful inspection (technical modifications and altera-
tions to the model for the purpose of product improve-
ment are reserved).
Should any faults nevertheless occur, guarantee is as-
sumed within the scope of the following conditions:
In accordance with the following provisions, Stadlbauer Mar-
Vertrieb GmbH (hereinafter referred to as “manu-
facturer”) warrants to the endconsumer (hereinafter referred
to as “customer”) that the Carrera RC-model-Quadrocopter
(hereinafter referred to as “product”) delivered to the cus-
tomer shall be free from defects in material or workmanship
for two years from the date of purchase (guarantee period).
Such defects will, at the manufacturer´s option, either be
repaired by the manufacturer or fixed by delivering new or
refurbished parts free of charge. The warranty does not
cover failure due to normal wear and tear, (e.g. to batteries,
rotor blades, cabin covering, gear wheels etc.), or damage
as a result of improper handling/misuse or unauthorised
interference. Any other customer´s claims asserted against
the manufacturer, especially action for damages, shall be
excluded.
The contractual and statutory rights of the customer against
the seller (supplementary performance, rescission of the
contract, abatement, compensation) which exist with the
product not having been free from defects at the time of the
passing of risk, shall remain unaffected by this warranty.
Claims from this special warranty shall only be valid if:
• the defect reported has not arisen by damage caused by
unintended use or misuse as specified in the instruction
manual,
• the failure of the product is not due to normal wear and tear
• the product does not show any signs resulting from repairs
or other interferences carried out by workshops not having
been authorised by the manufacturer,
• the product has only been operated with accessories au-
thorised by the manufacturer.
Guarantee cards cannot be replaced.
Note for EU countries:
Reference is hereby made to the
seller’s statutory guarantee obligation, to the extent that this
guarantee obligation is not restricted by the product guar-
antee.
The manufacturer shall bear the costs for sending in and
returning the product.
EN
G
LI
S
H
Summary of Contents for Micro Quadrocopter II
Page 51: ...51 4a 4b 8 5 LED 3 6 7 LED 15 14 13b 16 15 14 9 10 11 12 13a 14 15 16 13b 13a 13a 17 18...
Page 52: ...52 18 17...
Page 53: ...53...
Page 54: ...54...
Page 55: ...55...


