Chapter 14
14-3
<if you are initializing the RAM of the reader controller without replacing
the PCB>
- Using the SST, upload the reader controller backup data; after initializing
the RAM, download the data, thus eliminating the need for the following
adjustment.
1. Reader Unit-Related Adjustment
1) Using the SST, download the latest system software (R-CON).
2) Make the following selections in service mode:
COPIER>FUNCTION>CLEAR>R-CON; then, press the OK key to
initialize the RAM. Thereafter, turn off and then on the main power.
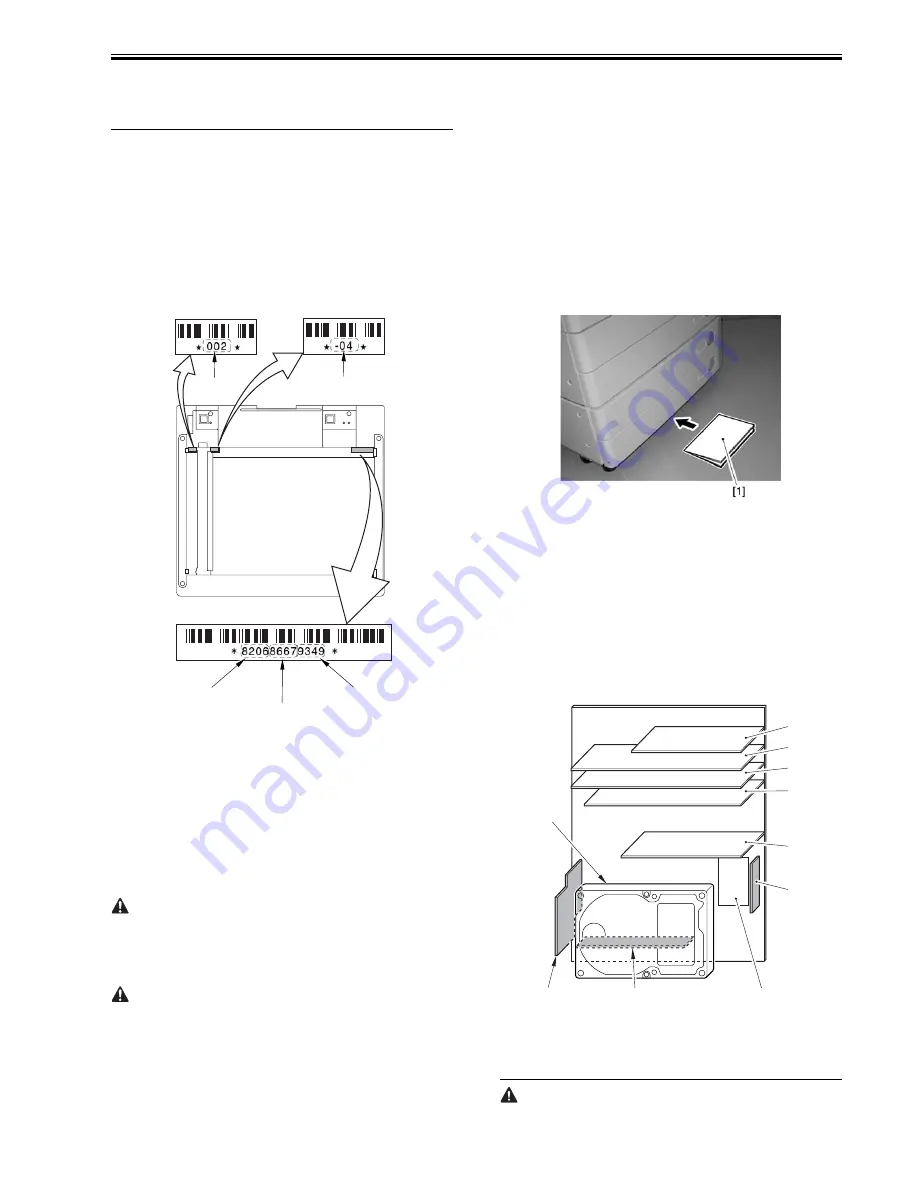
3) Enter the appropriate values using the following service mode items:
a. standard white plate white level data
COPIER>ADJUST>CCD>W-PLT-X,Y,Z
b. offset value against color displacement for copyboard glass (copyboard
cover)
COPIER>ADJUST>CCD>BOOK-RG
c. offset value against color displacement for copyboard glass (ADF)
COPIER>ADJUST>CCD>DF-RG
F-14-7
d. service label (behind reader unit left cover) values
d-1. CIS read position adjustment (fixed reading)
COPIER>ADJUST>ADJ-XY>ADJ-X
d-2. main scanning direction position adjustment (fixed reading)
COPIER>ADJUST>ADJ-XY>ADJ-Y
d-3. shading position adjustment (fixed reading)
COPIER>ADJUST>ADJ-XY>ADJ-S
d-4. sub scanning direction color displacement correction
COPIER>ADJUST>CCD>CCDU-RG
d-5. main/sub scanning direction MTF value
COPIER>ADJUST>CCD>MTF-MG,SG
d-6. auto gradation correction target value
COPIER>ADJUST>PASCAL>OFST-P-Y,M,C,K
If the value of the following was not 0 before the replacement of the
reader controller PCB: COPIER>OPTION>BODY>CCD-LUT.
Set a value other than '0' once again, and make the following adjustments
using the D-10 Chart.
COPIER>FUNCTION>CCD>LUT-ADJ2
2. ADF-Related Adjustment
The machine keeps ADF-related service mode data in the RAM of the
reader controller; as such, you will have to make the appropriate
adjustments if you have replaced the reader controller or initialized the
RAM.
1) Enter the values indicated in the P-PRINT printout you have previously
generated for the following:
a. main scanning direction position adjustment (stream reading)
COPIER>ADJSUT>ADJ-XY>ADJ-Y-DF
b. original stop position adjustment
FEEDER>ADJSUT>DOCST
c. original feed speed (magnification) adjustment
FEEDER>ADUST>LA-SPEED
2) Make adjustments using the following items:
a. tray width adjustment
FEEDER>FUNCTION>TRY-A4
FEEDER>FUNCTION>TRY-A5R
FEEDER>FUNCTION>TRY-LTR
FEEDER>FUNCTION>TRY-LTRR
b. CIS read position adjustment (stream reading)
COPIER>FUNCTION>INSTALL>STRD-POS
c. white level adjustment
COPIER>FUNCTION>CCD>DF-WLVL1
COPIER>FUNCTION>CCD>DF-WLVL2
When you have finished the foregoing adjustments, put the P-PRINT print-
out [1] you have previously generated in the service book cassette to replace
the old P-PRINT printout.
F-14-8
14.5.2 Replacing Main Controller PCB
0014-3119
/ / / / iR C3380i / iR C3380 / iR C2880i / iR C2880
After mounting the main controller PCB (main), mount each PCB that is re-
moved before the replacement.
[1] Main Controller PCB (Sub R-A)
[2] Main Controller PCB (Sub PDEM-EF-A)
[3] Main Controller PCB (Sub SJ-A)
[4] Main Controller PCB (Sub LANBAR-C)
[5] Storage of program for BOOT ROM BOOT
[6] SRAM PCB
[7] DDR-SDRAM
[8] Main Controller PCB (Sub RB-A)
[9] HDD
F-14-9
14.5.3 When Replacing the SRAM PCB
0014-3121
/ / / / iR C3380i / iR C3380 / iR C2880i / iR C2880
W- P LT- X
W- P LT- Y
W- P LT- Z
D F - R G
B O O K - R G
[8]
[1]
[2]
[2]
[3]
[4]
[5]
[6]
[7]
[9]
Summary of Contents for iR C2880 series
Page 1: ...Aug 29 2006 Service Manual iR C3380 2880 Series ...
Page 2: ......
Page 6: ......
Page 23: ...Chapter 1 Introduction ...
Page 24: ......
Page 26: ......
Page 52: ......
Page 53: ...Chapter 2 Installation ...
Page 54: ......
Page 127: ...Chapter 3 Basic Operation ...
Page 128: ......
Page 130: ......
Page 136: ......
Page 137: ...Chapter 4 Main Controller ...
Page 138: ......
Page 160: ......
Page 161: ...Chapter 5 Original Exposure System ...
Page 162: ......
Page 188: ...Chapter 5 5 24 F 5 68 4 Remove the original sensor 2 hook 1 F 5 69 ...
Page 189: ...Chapter 6 Laser Exposure ...
Page 190: ......
Page 192: ......
Page 206: ......
Page 207: ...Chapter 7 Image Formation ...
Page 208: ......
Page 256: ......
Page 257: ...Chapter 8 Pickup Feeding System ...
Page 258: ......
Page 262: ......
Page 303: ...Chapter 9 Fixing System ...
Page 304: ......
Page 306: ......
Page 321: ...Chapter 10 Externals and Controls ...
Page 322: ......
Page 326: ......
Page 336: ...Chapter 10 10 10 F 10 10 2 Remove the check mark from SNMP Status Enabled ...
Page 337: ...Chapter 10 10 11 F 10 11 ...
Page 359: ...Chapter 11 MEAP ...
Page 360: ......
Page 362: ......
Page 401: ...Chapter 12 RDS ...
Page 402: ......
Page 404: ......
Page 411: ...Chapter 13 Maintenance and Inspection ...
Page 412: ......
Page 414: ......
Page 416: ...Chapter 13 13 2 F 13 1 8 9 1 2 3 3 5 6 7 10 11 12 13 14 4 ...
Page 421: ...Chapter 14 Standards and Adjustments ...
Page 422: ......
Page 424: ......
Page 431: ...Chapter 15 Correcting Faulty Images ...
Page 432: ......
Page 434: ......
Page 459: ...Chapter 16 Self Diagnosis ...
Page 460: ......
Page 462: ......
Page 481: ...Chapter 17 Service Mode ...
Page 482: ......
Page 484: ......
Page 571: ...Chapter 18 Upgrading ...
Page 572: ......
Page 574: ......
Page 603: ...Chapter 19 Service Tools ...
Page 604: ......
Page 606: ......
Page 609: ...Aug 29 2006 ...
Page 610: ......


