


Chapter 11
11-33
To back up the HDD of the iR, the PC must have approx 300 MB of free space at maximum.
Making a Backup and Formatting Hard Disk Drive with Service Support Tool
1) If SDL or SSO is used for the login service, switch to default authentication before backing up the user information. Although SST will back up SDL user
information, it is recommended to export the user information just in case. For SDL user information backup, go to User Management page of Simple Device
Login site and export the data. (The SDL login page opens with the URL
"http://<device IP address>:8000/sdl/"
).
If a hard disk of a system that uses SDL or SSO is formatted without changing the login service to the default authentication, the error message "The login service
must be set again with SMS" appears and the system cannot start up when you attempt to restart the system after formatting. If this problem occurs, change the
login service to SDL or SSO with SMS. If you cannot access to SMS since you do not have the IP address of the device, start the system with FIXIP mode -
hold down the numeric keys 1 and 7 and turn the power switch on. The IP address "172.16.1.100" will be automatically assigned for the device. Then log in to
SMS specifying the address.
2) While holding down the 2 and 8 buttons, start up the device in download mode.
As in the case of Sramimg.bin, the function is available only when the device is in Download Mode.
3) Connect the PC to the device and start the Service Support Tool.
4) In Download/Upload session of SST, select the appropriate device model, System in the tree view, and take necessary steps to connect to the device.
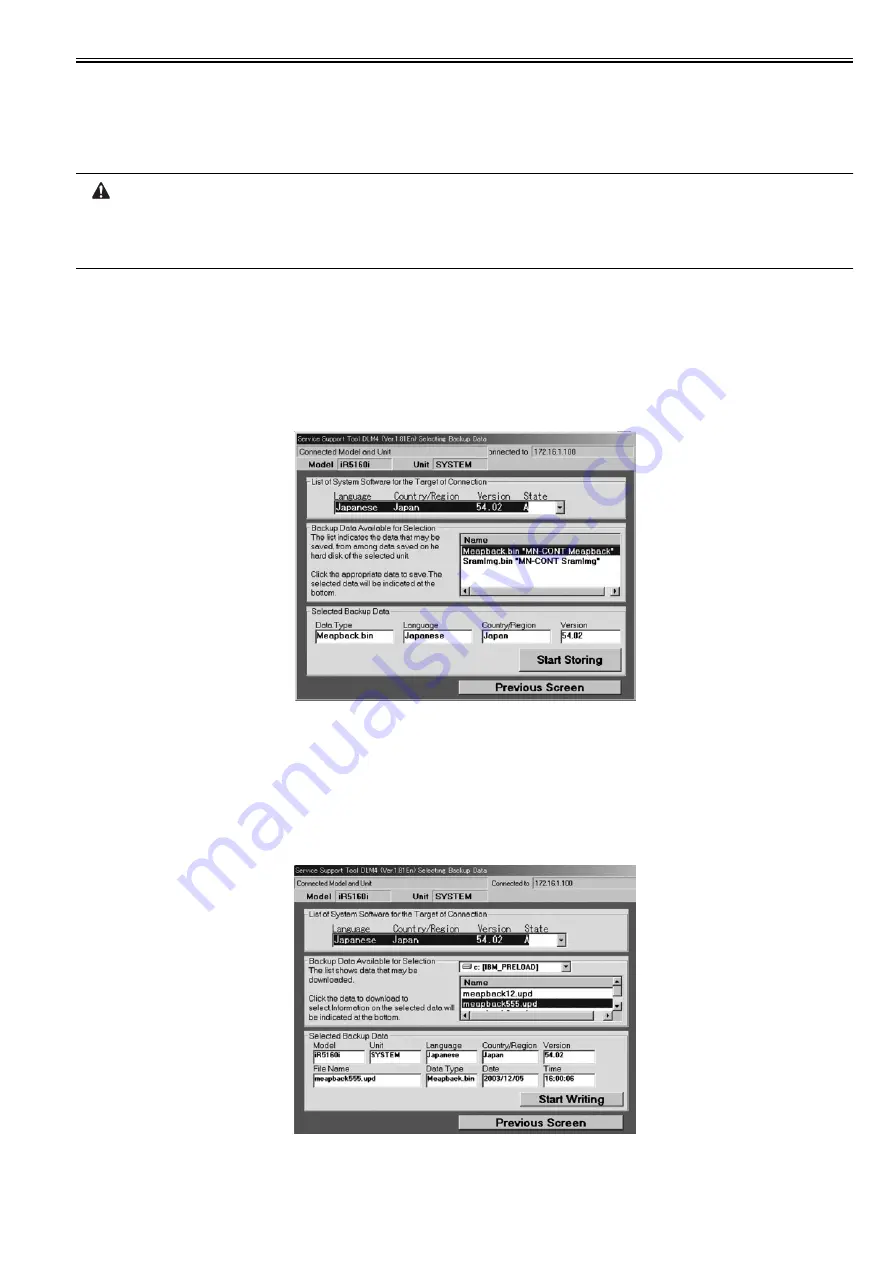
5) Click Upload the Backup Data button.
6) Click the option "Meapback.bin" from
Name
list of
Backup Data Available for Selection
, and click
Start Storing
button.
Selecting Meapback.bin
F-11-57
7) When the data has been generated, enter an appropriate name in
File name
field and click
Save
button; then, click
OK
button to end the backup session.
8) In
Selecting Model/Unit
screen, select
HDFormat
and start formatting. All the partitions in the hard disk drive will be formatted.
Restoring the Backup Data
1) After formatting the hard disk drive with SST, install the System, MEAP Contents, Language, and Remote UI files.
2) To restore the backup "Meapback.bin," click
Download the Backup Data
button.
3) Select the backup data file and click
Start Writing
button to download the backup data. Note that SST cannot restore backup data created with a different version.
Selecting Backup Data
F-11-58
4) When the screen with OK button appears, the restoration of backup data finishes. Click
OK
button.
Summary of Contents for imageRUNNER 5055 series
Page 1: ...Feb 26 2007 Service Manual iR5075 5065 5055 Series ...
Page 2: ......
Page 6: ......
Page 27: ...Chapter 1 Introduction ...
Page 28: ......
Page 30: ......
Page 52: ......
Page 53: ...Chapter 2 Installation ...
Page 54: ......
Page 98: ...Chapter 2 2 42 ...
Page 99: ...Chapter 3 Basic Operation ...
Page 100: ......
Page 102: ......
Page 108: ......
Page 109: ...Chapter 4 Main Controller ...
Page 110: ......
Page 112: ......
Page 129: ...Chapter 5 Original Exposure System ...
Page 130: ......
Page 162: ......
Page 163: ...Chapter 6 Laser Exposure ...
Page 164: ......
Page 166: ......
Page 172: ......
Page 173: ...Chapter 7 Image Formation ...
Page 174: ......
Page 178: ......
Page 210: ......
Page 211: ...Chapter 8 Pickup Feeding System ...
Page 212: ......
Page 263: ...Chapter 9 Fixing System ...
Page 264: ......
Page 268: ......
Page 307: ...Chapter 10 External and Controls ...
Page 308: ......
Page 312: ......
Page 321: ...Chapter 10 10 9 F 10 8 ...
Page 345: ...Chapter 11 MEAP ...
Page 346: ......
Page 348: ......
Page 389: ...Chapter 12 RDS ...
Page 390: ......
Page 392: ......
Page 399: ...Chapter 13 Maintenance and Inspection ...
Page 400: ......
Page 402: ......
Page 411: ...Chapter 14 Standards and Adjustments ...
Page 412: ......
Page 440: ......
Page 441: ...Chapter 15 Correcting Faulty Images ...
Page 442: ......
Page 444: ......
Page 470: ......
Page 471: ...Chapter 16 Self Diagnosis ...
Page 472: ......
Page 474: ......
Page 493: ...Chapter 17 Service Mode ...
Page 494: ......
Page 496: ......
Page 552: ......
Page 553: ...Chapter 18 Upgrading ...
Page 554: ......
Page 556: ......
Page 572: ...Chapter 18 18 16 F 18 29 2 Click Start F 18 30 3 When the session has ended click OK ...
Page 587: ...Chapter 18 18 31 F 18 59 2 Select the data to download F 18 60 3 Click Start ...
Page 589: ...Chapter 19 Service Tools ...
Page 590: ......
Page 592: ......
Page 595: ...Feb 26 2007 ...
Page 596: ......


