COPYRIGHT© 2000 CANON INC.
2000 2000 2000
ColorPASS-Z40e/Z20e REV.0 AUG. 2000
CHAPTER 4 DISASSEMBLY/ASSEMBLY
4-7
4 Checking ColorPASS Internal Connections
The most common causes of hardware problems are faulty and loose connections.
Before you conclude that any board or component has failed, remove, inspect, and reseat
all appropriate connections, and then verify that the problem still occurs.
4.1 To Check Board and Cable Connections
Before you touch any parts inside the ColorPASS, attach a grounding wrist
strap. Touching the metal part of the power supply case inside the
ColorPASS also discharges static electricity.
1. Inspect the ColorPASS boards for secure insertion into the motherboard. Press down
firmly on each board to make sure it is securely installed.
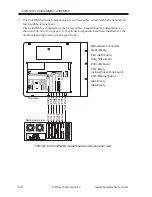
Looking into the tray from the top, the standard board configuration includes the follow-
ing (from right to left):
Connector AGP1—Empty
Connector PCI1—SCSI board
Connector PCI2—Video board
Connector PCI3—UIB board
Connector PCI4—Empty (optional Token Ring board)
Connector PCI5—Ethernet board
Connector ISA1—Empty
Connector ISA2—Empty
2. Inspect ribbon cables to see if they are intact.
Faulty ribbon cables are easily overlooked. Check the contact point between the cable
and the connector to ensure that they have not separated. If a ribbon cable is suspect,
substitute it with a tested cable.
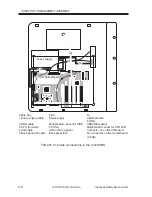
3. Make sure that all ColorPASS ribbon cables and power cables are seated on connectors.
See F04-401-01 on page 4-8.
Cable connectors are keyed to fit only when properly oriented.
4. Check the back panel fan cable connection to the motherboard.
5. After tightening connections, if one or more ColorPASS components are still not getting
power, see “Checking voltages” on page 4-31.

