34
A 8
1
2
3
4
5
6
5
6
7
8
9
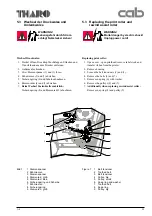
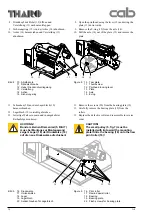
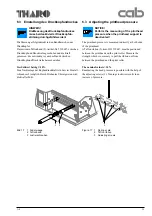
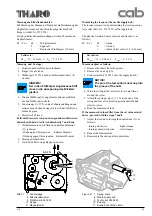
Bild 12
1 Anschlag
2 Kupplung Transferbandabwickler
3 3 Schrauben
4 Sicherungsring
5 Lager
6 Rändelmutter
7 6 Federn
8 2 Gewindestifte
9 Riemenrad
Figure 12
1
Ribbon backfeed lever
2
Slipping clutch ribbon supply hub
3
3 Screws
4
Snap ring
5
Bearing
6
Knurled nut
7
6 Springs
8
2 Bolts
9
Pulley
Vorarbeiten für den Wechsel der Kupplungen des
Etikettenaufwicklers und des Transferbandaufwicklers:
Die Vorbereitungen für den Wechsel dieser Kupplungen
erfolgen in analoger Weise. Im Bild 12 ist die Vorgehens-
weise für den Transferbandaufwickler dargestellt.
1. Deckel öffnen, Druckkopf hochklappen, Etiketten und
Transferband aus dem Drucker entfernen.
2. Gehäuse abschrauben.
3. Drei Schrauben (3) herausschrauben.
4. Sicherungsring (4) demontieren.
5. Lager (5) abziehen.
6. Weiter im Abschnitt Wechsel der Rutschkupplungen.
Vorarbeiten für den Wechsel der Kupplung des Trans-
ferbandabwicklers :
1. Deckel öffnen, Druckkopf hochklappen, Etiketten und
Transferband aus dem Drucker entfernen.
2. Gehäuse abschrauben.
3. Weiter im Abschnitt Wechsel der Rutschkupplungen.
Preparation for the replacement of the slipping clutches
at the label take up hub and the ribbon take up hub:
The preparation for the replacements of these two clutches
is made in the same way. Fig. 12 shows the preparation at
the ribbon take up hub.
1. Open cover, open printhead, remove label stock and
transfer ribbon from the printer.
2. Remove housing.
3. Remove three screws (3).
4. Remove the snap ring (4).
5. Take off the bearing (5).
6. Continue with the actual clutch replacement.
Preparation for the replacement of the slipping clutch at
the ribbon supply hub:
1. Open cover, open printhead, remove label stock and
transfer ribbon from the printer.
2. Remove housing.
3. Continue with the actual clutch replacement.


