35
A 8
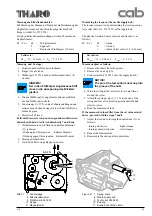
Wechsel der Rutschkupplungen:
1. Rändelmutter (1) abschrauben und dabei auf die
6 Federn (3) achten. Federn aufnehmen und ablegen.
2. Zwei Gewindestifte (2) lösen und
Nabe mit Kupplungsscheiben (4) abziehen.
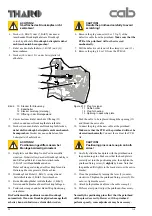
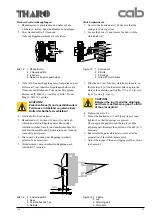
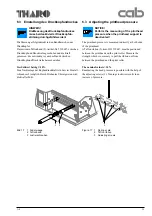
Bild 13
1 Rändelmutter
2 2 Gewindestifte
3 6 Federn
4 Nabe mit Kupplungsscheiben
Figure 13
1
Knurled nut
2
2 Bolts
3
6 Springs
4
Hub with clutch disks
3. Nabe (4) der neuen Kupplung soweit aufschieben, dass
die Nasen (5) der innersten Kupplungsscheibe in die
Nuten des anschließenden Teils (je nach Kupplung :
Riemenrad [9, Bild 12], Anschlag [1, Bild 12] oder
Ring [3, Bild 11]) greifen.
ACHTUNG!
Zwischen Nase (5) und anschließendem
Teil muss ein Abstand von etwa einem
Drittel der Nuttiefe A verbleiben!
4. Gewindestifte (2) anziehen.
5. Rändelmutter (1) mit den 6 Federn (3) soweit auf-
schrauben, dass die Kupplung unter Druck steht.
Abstand zwischen Nase (5) und anschließendem Teil
nochmals überprüfen und Positionierung der Nabe (4)
wenn nötig korrigieren.
6. Die in der Vorbereitung des Kupplungswechsels
gelösten Teile montieren.
7. Wickelmoment der gewechselten Kupplung nach
Abschnitt 6.5 justieren.
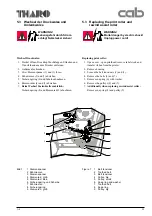
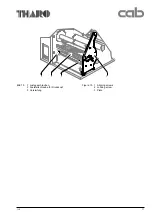
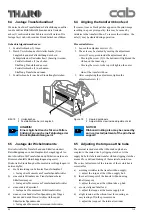
Bild 14
2 2 Gewindestifte
5 Nase
6 Anschließendes Teil
A Nuttiefe
Figure 14 2 2 Bolts
5 Lug
6 Adjoining part
A Slot depth
1
2
3
4
1/3A
A
2
5
6
Clutch replacement :
1. Unscrew the knurled nut (1). Make sure that the
springs (3) do not get lost.
2. Loosen the bolts (2) and remove the hub with the
clutch disks (4).
3. Slide the hub (4) of the new clutch onto the axle, so
that the lugs (5) of the innermost disk snap into the
slots of the adjoining part (pulley [9, fig.12], lever [1,
fig.12] or ring [3, fig.11]).
CAUTION!
Between the lug (5) and the adjoining
part there must remain a gap of a third
of the slot depth A!
4. Tighten the bolts (2).
5. Mount the knurled nut (1) with the springs (3) and
tighten it, so that the springs are pressed.
Check again the gap between the lug (5) and the
adjoining part. Readjust the position of the hub (4) if
necessary.
6. Reassemble the parts which were removed at the
preparation of the clutch replacement.
7. Adjust the torque of the new slipping clutch as shown
in chapter 6.5.


