27
A 8
Wechsel Druckkopfkabel:
WARNUNG!
Lebensgefahr durch Strom-
schlag! Netzstecker ziehen!
ACHTUNG!
Sachschäden durch elektrostatische
Aufladung! Erden Sie sich vor dem
Entfernen oder dem Einbau des Druck-
kopfes am Gehäuse. Dadurch wird der
Druckkopf vor einer statischen Entla-
dung Ihres Körpers geschützt.
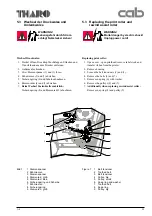
1. Drucker ausschalten, Deckel öffnen. Gehäuse
abschrauben.
2. Druckkopf hochklappen, Etiketten und Transferband
aus dem Drucker entfernen und Druckkopf wieder
herunterklappen.
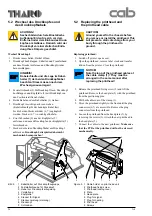
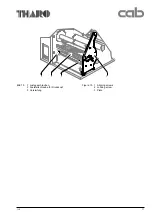
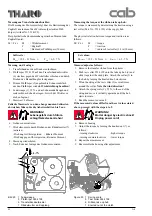
3. Feststellschraube (2) für Druckkopf lösen, Druckkopf
hochklappen und Kopfplatte (5) mit Druckkopf von
den Positionierstiften abziehen.
HINWEIS!
Kabelschlaufe und die Lage im Kabel-
halter (1) der beiden Druckkopf-Kabel
beachten! Diese müssen nach dem
Wechsel genauso liegen!
4. Beide Kabel aus dem Kabelhalter (1) ziehen.
5. Druckkopf vorsichtig nach vorn ziehen
(Kabelschlaufe gibt das benötigte Kabel frei) ,
bis die beiden Steckverbinder (6, 7) zugänglich
werden.
Replacing printhead cable:
WARNING!
Mortal danger by electric shock!
Unplug power cord!
CAUTION!
Ground yourself to the chassis before
you remove or install the printhead. This
will prevent a static discharge
from your body through the printhead to
ground.
1. Switch off printer, open front cover and cover
electronics.
2. Open the printhead, remove label stock and transfer
ribbon from the printer. Close the printhead.
3. Release the printhead fixing screw (2) and lift the
printhead. Remove the head plate (5) with the printhead
from the positioning pins.
NOTICE!
Note the loop of the printhead cables at
the cable clamp (1)! They must be
arranged in the same manner after
replacing the printhead!
4. Pull both cables out of the clamp (1).
5. Move the printhead slightly to the front until the plug
connectors (6,7) are accessible.
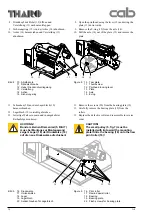
ACHTUNG!
Oberfläche des Druckkopfes nicht
zerkratzen! Positionierungsstifte
müssen bei Montage beidseitig
einrasten!
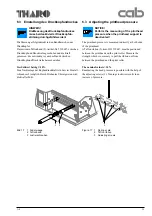
8. Kopfplatte mit Druckkopf in die Positionierstifte
einsetzen. Sicherstellen, dass der Druckkopf richtig in
den Stiften geführt ist, dann Feststellschraube
(2) mit Hand leicht anziehen. Dabei auf eine gute
Anlage des Druckkopfes an die Halterung über die
gesamte Fläche achten.
9. Druckkopf mit Hebel (3) verriegeln und Feststell-
schraube (2) festschrauben.
10. Beide Druckkopfkabel im Kabelhalter (1) fixieren
und Schlaufe auf dem Druckkopf ablegen.
11. Testdruck erzeugen und bei Bedarf Kopfjustierung
vornehmen.
Die Positionierstifte positionieren den Druckkopf
automatisch. Wenn der neue Druckkopf jedoch mangel-
haft arbeitet, kann ein Justieren erforderlich werden.
CAUTION!
Handle new printhead carefully to avoid
scratching! Positioning pins must snap
in on both sides !
8. Carefully slide the head plate with the printhead onto
the positioning pins. Make sure that the head plate is
correctly set into the positioning pins, then tighten the
printhead fixing screw (2) slightly by hand. Note that
the printhead fits tightly in the bracket across the entire
bracket.
9. Close the printhead by turning the lever (3) counter-
clockwise. Thighten the printhead fixing screw (2). Do
not over-tighten the screw.
10. Attach both printhead cables at the cable clamp (1).
11. Perform a test print. Adjust the printhead if necessary.
Normally the positioning pins effect that the new
printhead will be placed correctly. However, if the new
printhead performs poorly, some adjustment may be
necessary.

