After a USB drive is recognized, the LinkStation adds “usbdisk
x
” to the shared folder list, where “x” is the USB port to
which the drive is connected.
Compatibility
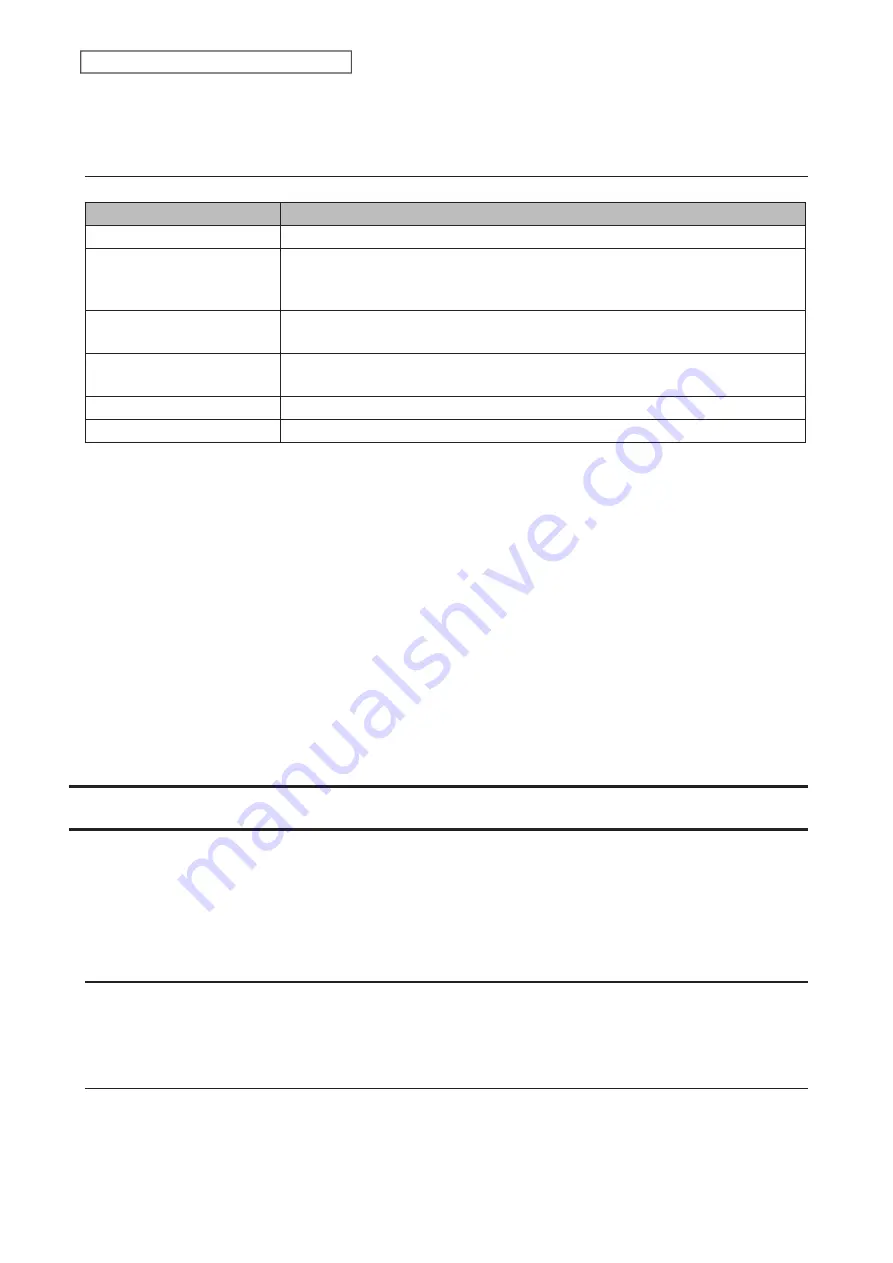
Supported file systems for external USB drives are below:
File Systems
Recommended Situation
XFS
*4
Connecting to another Buffalo NAS device.
Ext3
*1
Connecting to another Buffalo NAS device. XFS is recommended because the
more files stored in one folder, the slower the performance. The available capacity
will be less than the area formatted to XFS.
NTFS
*2
Connecting to Windows computers. The NTFS-formatted drive can use many
more functions of the operating system than an exFAT drive.
HFS Plus
*2, *3
Connecting to macOS computers. The HFS Plus-formatted drive can use many
more functions of the operating system than an exFAT drive.
exFAT
*1
Connecting to both Windows and macOS computers.
FAT32
Connecting to both Windows and macOS computers.
*1 The available USB drive size is up to 16 TB.
*2 This cannot be formatted from Settings.
*3 This is read-only from the LinkStation. Files on the USB drive can be copied to the LinkStation.
*4 To format using XFS on this LinkStation, the LinkStation should be updated to firmware version 1.02 or later. If
the LinkStation is running a firmware version earlier than 1.02, the XFS-formatted USB drive cannot be shared with
another Buffalo NAS device other than the following LinkStation models: LS710D, LS720D, and LS720DB.
Make sure only one device is connected to a USB port on the LinkStation. Note that only the first partition of a
connected USB drive is mounted. Additional partitions are not recognized.
Notes:
• When copying a file that is over 100 MB to a FAT32-formatted USB drive using File Explorer, an error message may
appear. In such a case, use an FTP connection to copy the file.
• When copying files from a shared folder to a FAT32-formatted USB drive, the progress bar may not be displayed
or the file copying may fail. Using a file system other than FAT32 is recommended for the USB drive.
• After connecting an RDX drive to the LinkStation, click
Redetect Drive
anytime.
Dismounting Drives
If the LinkStation is powered on, dismount a USB drive before unplugging it. You may dismount external drives
using the function button or from Settings. If the LinkStation is off, then a USB drive is already dismounted and may
be unplugged safely.
Note:
To dismount an RDX cartridge from an RDX dock, first perform the dismount process either using the function
button or from Settings, then press the eject button on the dock to disconnect the cartridge.
Using the Function Button
When you press the function button, the LinkStation will beep once. Press and hold down the button until the
LinkStation beeps again and the function LED starts blinking white. When the LED stops blinking and returns to
glowing, the dismount is finished. You may now unplug any USB drives safely.
Using Settings
You can dismount a USB drive from a computer or a mobile device. Follow the appropriate procedure below to
dismount a USB drive.
52
Chapter 3 RAID Modes and Drive Management
Summary of Contents for Link Station LS710D
Page 24: ...3 Click Create Folder 23 Chapter 2 File Sharing...
Page 31: ...2 Tap Create User 30 Chapter 2 File Sharing...
Page 34: ...3 Click Add Group 33 Chapter 2 File Sharing...
Page 73: ...5 Click Add 72 Chapter 4 Backup...
Page 79: ...3 Click Edit 4 Click Browse 5 Select the shared folder and click OK 78 Chapter 4 Backup...
Page 81: ...2 Click Time Machine 80 Chapter 4 Backup...
Page 82: ...3 Click Select Backup Disk 4 Select the shared folder then click Use Disk 81 Chapter 4 Backup...
Page 93: ...4 Click the Options tab 5 Click Edit 92 Chapter 5 Cloud Services and Remote Access...
Page 97: ...7 Enter the desired job name and click Next 96 Chapter 5 Cloud Services and Remote Access...
Page 98: ...8 Select Backup and click Next 97 Chapter 5 Cloud Services and Remote Access...
Page 100: ...10Specify the sync period and click Next 99 Chapter 5 Cloud Services and Remote Access...
Page 106: ...7 Enter the desired job name and click Next 105 Chapter 5 Cloud Services and Remote Access...
Page 107: ...8 Select Restore and click Next 106 Chapter 5 Cloud Services and Remote Access...
Page 112: ...6 Enter the desired job name and click Next 111 Chapter 5 Cloud Services and Remote Access...
Page 115: ...9 Specify the sync period and click Next 114 Chapter 5 Cloud Services and Remote Access...
Page 122: ...4 Click the Options tab 5 Click Edit 121 Chapter 5 Cloud Services and Remote Access...
Page 127: ...3 Tap NAS Setup 126 Chapter 5 Cloud Services and Remote Access...
Page 130: ...129 Chapter 5 Cloud Services and Remote Access...
Page 147: ...6 Select a file to move and click Action 7 Click Move 146 Chapter 6 Multimedia...
Page 152: ...7 Click Delete 8 Click Delete again 151 Chapter 6 Multimedia...


