


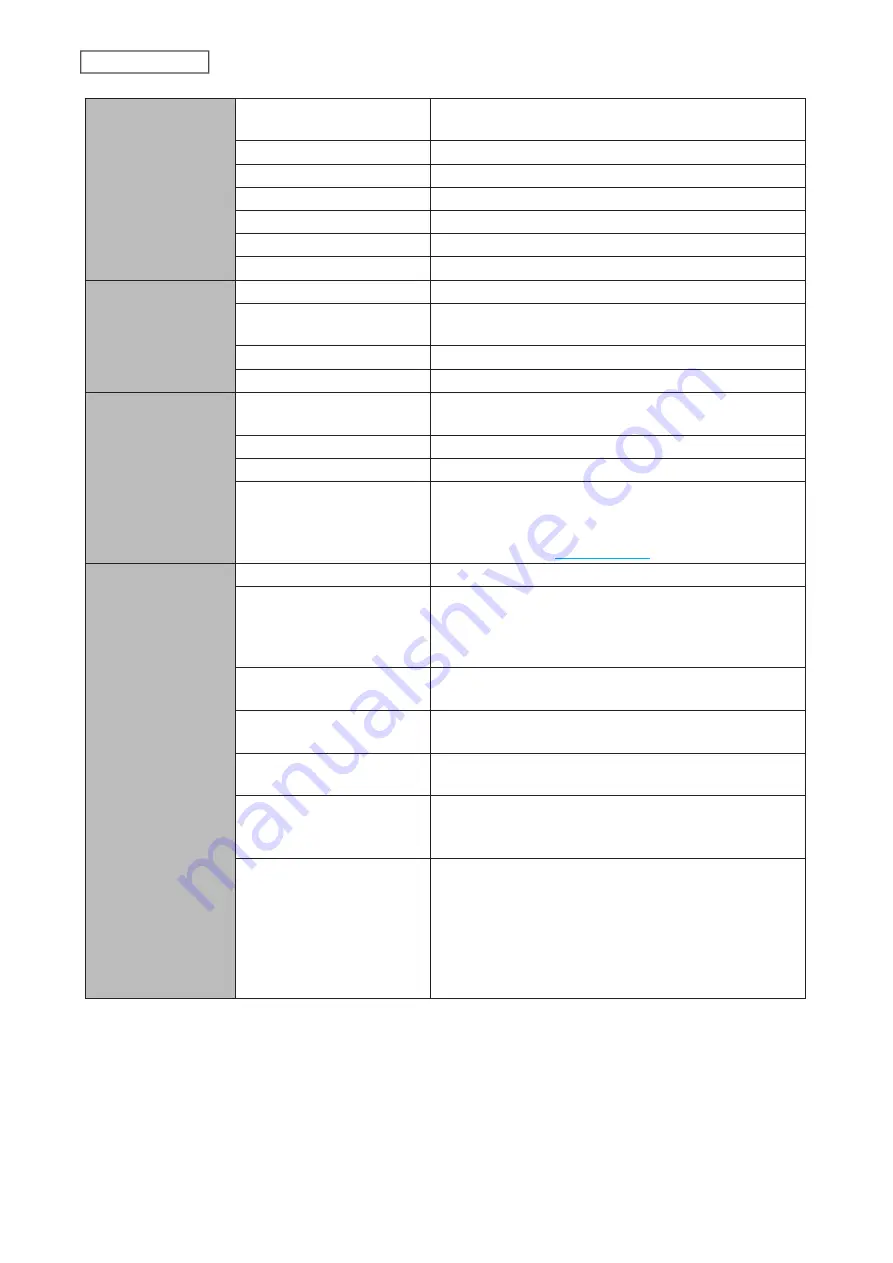
LAN Interface
Standards Compliance
IEEE 802.3bz (2.5GBASE-T), IEEE 802.3ab (1000BASE-T),
IEEE 802.3u (100BASE-TX), IEEE 802.3 (10BASE-T)
Data Transfer Rates
2.5 Gbps, 10/100/1000 Mbps (auto sensing)
Number of Ports
1
Connector Type
RJ-45 8-pin (auto MDI-X)
Supported Protocols
TCP/IP
Network File Services
SMB/CIFS, FTP/FTPS, NFS, HTTP/HTTPS, SNMP
MTU Sizes
1,500–9,219 bytes
USB Interface
Standards Compliance
USB 3.2 Gen 1/2.0
Data Transfer Rates
USB 3.2 Gen 1: max. 5 Gbps
USB 2.0: max. 480 Mbps
Number of Ports
2 × USB 3.2 Gen 1, 1 × USB 2.0
Connector Type
Type A
Internal Drive
Number of Drive Bays
LS710D: 1
LS720D: 2
Drive Interface
SATA 6 Gbps
Supported RAID
LS720D: 0, 1, JBOD (individual drives)
Replacement Drive
LS720D: Buffalo OP-HDBST series drive
Note:
The replacement drive should be the same
capacity as the original drive. The drives listed above are
available from the
.
Others
Power Supply
AC 100–240 V, 50/60 Hz
Power Consumption
LS710D (4 TB or smaller model): max. 24 W
LS710D (8 TB model), LS720D (8 TB or smaller model):
max. 36 W
LS720D (16 TB): max. 48 W
Dimensions (W × H × D,
excluding protruding parts)
LS710D: 60 × 128 × 207 mm; 2.4 × 5.0 × 8.1 in.
LS720D: 92 × 128 × 207 mm; 3.6 × 5.0 × 8.1 in.
Weight
LS710D: approx. 1.3 kg; 2.9 lbs
LS720D: approx. 2.4 kg; 5.3 lbs
Operating Environment
Temperature: 5–40°C; 41–104°F
Humidity: 20–80% non-condensing
Compatible Devices
Windows PCs, Intel Mac computers, iOS devices,
and Android devices with wired or wireless Ethernet
connection.
Supported OS
Windows 10, 8.1
Windows Server 2019, 2016, 2012 R2, 2012
Windows Server IoT 2019 for Storage, Windows Storage
Server 2016, 2012 R2, 2012
macOS 10.15, 10.14, 10.13
iOS 10 or later
Android 7.0 or later
203
Chapter 11 Appendix
Summary of Contents for Link Station LS710D
Page 24: ...3 Click Create Folder 23 Chapter 2 File Sharing...
Page 31: ...2 Tap Create User 30 Chapter 2 File Sharing...
Page 34: ...3 Click Add Group 33 Chapter 2 File Sharing...
Page 73: ...5 Click Add 72 Chapter 4 Backup...
Page 79: ...3 Click Edit 4 Click Browse 5 Select the shared folder and click OK 78 Chapter 4 Backup...
Page 81: ...2 Click Time Machine 80 Chapter 4 Backup...
Page 82: ...3 Click Select Backup Disk 4 Select the shared folder then click Use Disk 81 Chapter 4 Backup...
Page 93: ...4 Click the Options tab 5 Click Edit 92 Chapter 5 Cloud Services and Remote Access...
Page 97: ...7 Enter the desired job name and click Next 96 Chapter 5 Cloud Services and Remote Access...
Page 98: ...8 Select Backup and click Next 97 Chapter 5 Cloud Services and Remote Access...
Page 100: ...10Specify the sync period and click Next 99 Chapter 5 Cloud Services and Remote Access...
Page 106: ...7 Enter the desired job name and click Next 105 Chapter 5 Cloud Services and Remote Access...
Page 107: ...8 Select Restore and click Next 106 Chapter 5 Cloud Services and Remote Access...
Page 112: ...6 Enter the desired job name and click Next 111 Chapter 5 Cloud Services and Remote Access...
Page 115: ...9 Specify the sync period and click Next 114 Chapter 5 Cloud Services and Remote Access...
Page 122: ...4 Click the Options tab 5 Click Edit 121 Chapter 5 Cloud Services and Remote Access...
Page 127: ...3 Tap NAS Setup 126 Chapter 5 Cloud Services and Remote Access...
Page 130: ...129 Chapter 5 Cloud Services and Remote Access...
Page 147: ...6 Select a file to move and click Action 7 Click Move 146 Chapter 6 Multimedia...
Page 152: ...7 Click Delete 8 Click Delete again 151 Chapter 6 Multimedia...


