
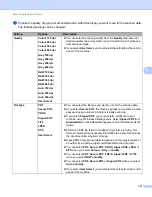


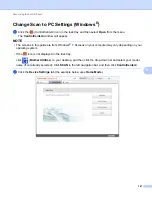


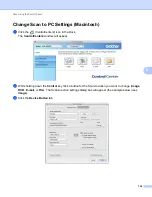

Scan Using the Control Panel
140
6
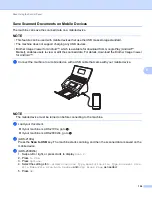
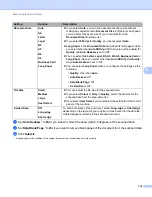
Send Scanned Documents Directly to an Email Address
(ADS-2600We only)
6
1
Load your document.
2
Swipe left or right, or press
d
or
c
to display
Scan 2
.
3
Press
to E-mail Server
.
4
Select the E-mail address you want to send to by doing one of the following:
If you want to select an E-mail address from the Address Book, see
If you want to enter an E-mail address manually, see
Enter an E-mail Address Manually
NOTE
You can select up to 300 E-mail addresses from the Address Book and enter up to 50 E-mail addresses
manually. The scanned data will be sent to all of the addresses at the same time.
5
Press
OK
and then do one of the following:
If you want to use the default settings, go to
If you want to change the default settings, go to
.
6
Press
Options
.
7
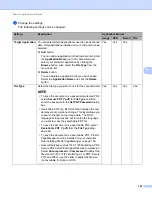
Select the settings for
2-sided Scan
,
Scan Type
,
Resolution
,
File Type
,
Document Size
,
Auto Deskew
and
Skip Blank Page
as needed. Press
OK
.
NOTE
• If you want to save the settings as a new default, press
Set New Default
.
• If you want to restore all settings to the factory settings, press
Factory Reset
.
8
Press
Start
.
The machine starts scanning and then sends the scanned document to the E-mail address directly.
NOTE
If you want to save the settings as a shortcut, press
Save as Shortcut
. For more information, see
Up Shortcuts (ADS-2600We only)
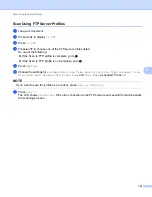
Select an E-mail Address from the Address Book
6
1
Swipe left or right, or press
d
or
c
to display
Scan 2
.
2
Press
to E-mail Server
.
3
Press
Address Book
.


