background image

44


W

EB
 

C

ON
FI

GUR

A

TOR


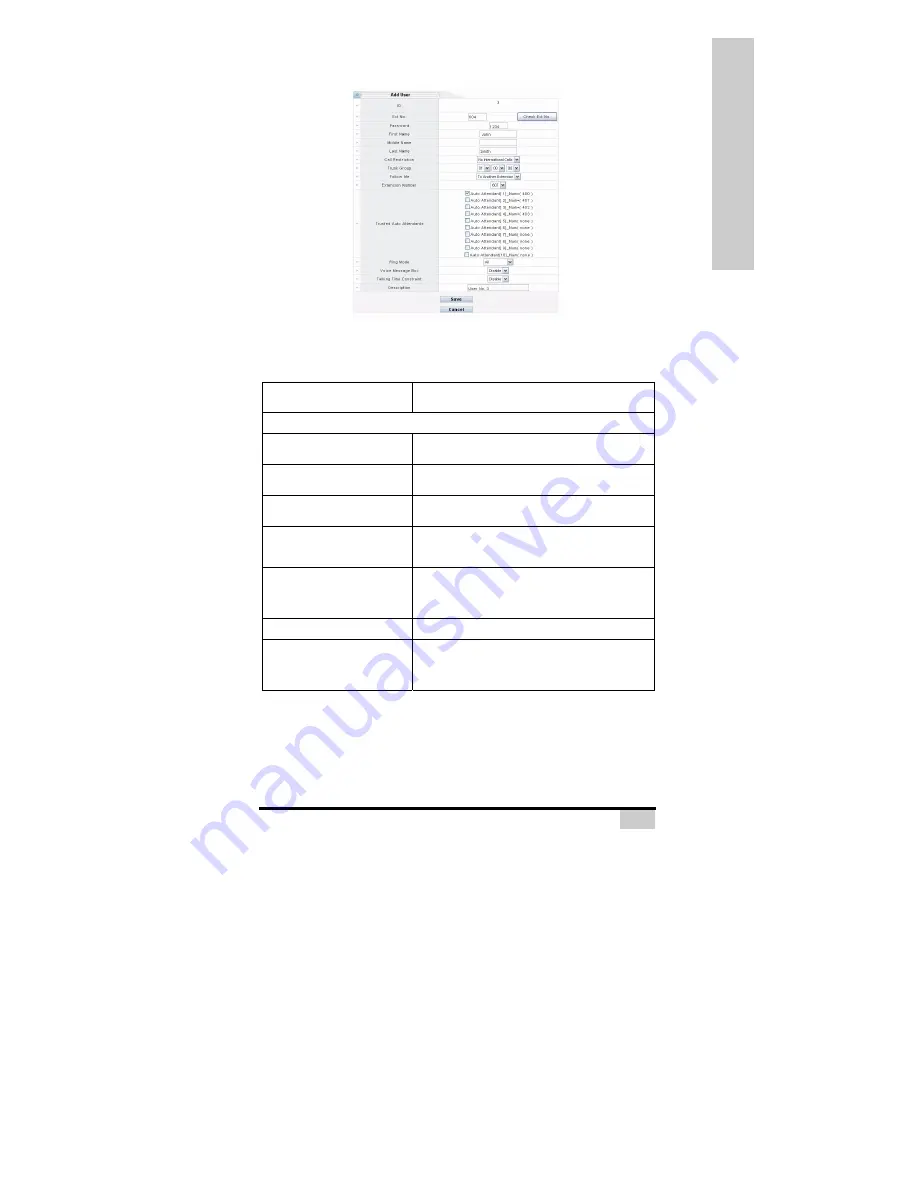
Add/Edit User Screen


Use this screen to add or edit users. 


The following table lists the fields in this screen. 

Table 19: Add/Edit User Screen


Field


Description


Add/Edit User


ID This field displays BOSST101-assigned identifier for 

this user.


EXT No. Enter a 3 or 4 digit extension (see 

PBX Global


Configuration on page 26

) for this user.


Check Ext No.

Click this button to test for duplicate extension 

numbers.


Password

Enter a numeric password in the range 0000~9999 for 

this  user  to  log  in  to  BOSST101.  If  no  password  is 

supplied, the default password is 

1234

.


First Name

Enter this user’s first name (up to 16 characters). This 

field is used for the 

Dial By Name 

service where you 

can place a call using the letters on the handset to 

spell a name.


Middle Name Enter this user’s middle name (up to 16 characters).


Last Name

Enter this user’s surname (up to 16 characters). This 

field is used for the 

Dial By Name 

service where you 

can place a call using the letters on the handset to 

spell a name.


Summary of Contents for BOSST101

Page 1: ...BOSSLAN BOSST101 IP PBX User s Guide V 1 01 Firmware V 1 00 January 2008 ...

Page 2: ...E This device complies with Part 15 of the FCC Rules Operation is subject to the following two conditions 1 This device may not cause harmful interference and 2 This device must accept any interference received including interference that may cause undesired operation Any changes or modifications not expressly approved by the party responsible for compliance could void the authority to operate equ...

Page 3: ... Increase the separation between the equipment and the receiver Connect the equipment to an outlet on a circuit different from that to which the receiver is connected Consult the dealer or an experienced radio TV technician for help This equipment conforms with the USA technical criteria in PART 68 TIA EIA 968 A and AP15B D O C INDUSTRY CANADA CS 03 PART 1 The Industry Canada label identifies cert...

Page 4: ...may be particularly important in rural areas Users should not attempt to make electrical ground connections themselves but should contact the appropriate electric inspection authority or electrician as appropriate CE COMPLIANCE This product complies with the following standard of the Directive 1999 5 EC of the European Parliament and of the Council of 9 March 1999 on Radio Equipment and Telecommun...

Page 5: ...14 Web Configurator Web Configurator Overview 16 Accessing BOSST101 16 Navigating the Web Configurator 17 Navigation Panel 18 Quick Configuration 18 Status 19 System Status 19 Trunk Status 21 Handsets Status 22 Users 23 Voice Mail Status 25 Global Settings 26 PBX Global Configuration 26 SIP Global Configuration 29 Telephony Services 31 Voice Settings 31 Trunks 32 Auto Attendants 39 Users List 43 H...

Page 6: ... NAT Settings 61 Firewall Settings 65 QoS Settings 67 Wireless Settings 69 System Maintenance 71 Administrator 71 System Time 73 Backup and Recovery 73 Voice Upload 75 Firmware Upgrade 75 Tools 76 System Restart 76 Appendices Appendix A Troubleshooting 78 Appendix B Handset Commands 80 Index 82 ...

Page 7: ...6 I NTRODUCING BOSSLAN BOSST101 Introducing BOSSLAN BOSST101 IP PBX This chapter introduces the main features of your BOSSLAN BOSST101 ...

Page 8: ... are missing or broken please contact your dealer for a replacement BOSST101 Manual CD x1 External Antenna x1 Phone line 26 AWG cable used for RJ 11 connection RJ45 Ethernet Cable x1 RJ11 Telephone Cable x2 Power Supply x1 Power Cord x1 Wall Mounting Template x1 Screws with Screw Plugs x2 WARNING Only use the supplied power adapter ...

Page 9: ...to initiate voice calls within an office or even between remote locations without the charges of the traditional Public Switched Telephone Network PSTN In addition to IP VoIP uses the Real Time Protocol RTP and Quality of Service QoS to ensure calls are smooth and clear Use the Web Configurator to set up firewall DMZ NAT LAN WAN Bridge and telephony services such as Auto Attendants IP Phones analo...

Page 10: ...TN FXO Line in use LINE 2 On PSTN FXO Line in use PBX On Analog Extension Phone Power Ready INTERNET On Internet Status Ready VoIP On VoIP Trunk Registration Ready Wi Fi On Wireless Lan is enabled WAN On Ethernet link is synchronized with ADSL modem cable modem switch and hub Blinking Transmitting Receiving Data LAN 1 2 3 On Ethernet link is synchronized with switch and hub Blinking Transmitting R...

Page 11: ...service downtime or disruption it is recommended that you first configure BOSST101 before connecting your telephone lines LAN 1 2 3 WAN DC12V LINE1 LINE2 1 2 POWER The following table describes the rear panel connections Table 2 Rear Panel Connections Connection Description 3x 10 100 Mbps LAN Ports Ethernet switch with auto MDIX Media Dependent Interface Crossover 1x 10 100 Mbps WAN Ports Ethernet...

Page 12: ...101 to a wall First place the mounting template over the part of the wall you wish to install BOSST101 1 Now mark the wall through the holes in the template 2 Drill two sets of holes in to the wall 3 Insert the supplied screw plugs and then insert the mount ing screws leaving the screw heads sticking out see Pack age Contents on page 7 4 Mount BOSST101 on to the screwheads as shown in the followin...

Page 13: ...01 s LAN ports are compatible with standard category 5 RJ45 ethernet cable Once a connection is established the LED corresponding to that port illuminates see Front Panel LEDs on page 9 Connect to the BOSST101 LAN via the following IP Phone BOSST101 supports SIP based IP phones such as the AQ 101 desktop phone Use a switch hub to extend your LAN ports to connect more phones PC Connection Enables a...

Page 14: ...configurations and their required bandwidths for an encrypted network e g when VPN is used Table 4 Connection Bandwidth Encrypted Packet Size msec G711 kbit s G729 kbit s 10 146 92 20 105 49 30 91 35 40 84 29 50 80 25 60 77 22 The BOSST101 s WAN port is compatible with standard category 5 RJ45 ethernet cable Once a connection is established the LED corresponding to that port illuminates see Front ...

Page 15: ...ce quality depends on bandwidth availability PSTN Connection Connecting BOSST101 to your Landline You can connect your PSTN line s from the wall jack s to your BOSST101 Take note of which telephone line is connected to which BOSST101 FXO line jack as you will need it for configuration Connecting Analog Extensions You can connect analog devices such as telephones fax machines or answering machines ...

Page 16: ...15 W EB C ONFIGURATOR Web Configurator This chapter details how to access and configure the screens of BOSST101 Web Configurator ...

Page 17: ...BOSST101 LAN port see LAN Connections on page 12 2 Configure your PC for use with the TCP IP protocol and enable DHCP IP addressing to automatically obtain an IP address from BOSST101 3 Open a web browser and type http 192 168 100 1 8000 as the URL Internet address 4 Type in the username admin and password 1234 Now click Login You are now ready to begin configuring your BOSST101 NOTE Please note t...

Page 18: ...reens may vary slightly with the increased number of ports setup however remains the same The following figure shows the first screen displayed after login INFO There is a special assistant on the web configurator Check the Help box highlighted on the top left to view information for each setting and their examples ...

Page 19: ...e see the following steps for minimal configuration Table 1 Quick Configuration Steps Reference 1 Connect the hardware Connecting BOSST101 page 12 2 Configure WAN settings WAN Settings page 57 3 Create Users Users List page 43 4 Assign handsets to users Handsets page 46 5 Set up trunks to allow incoming and outgoing calls Trunks page 32 6 Define Auto Attendants Auto Attendants page 40 For more det...

Page 20: ...out your BOSST101 It also lists the office hours of a working week and includes non working days The following table describes the fields in the System Status screen Table 2 System Status Menu Field Description Hardware Information Serial Number This field displays the serial number of your BOSST101 Firmware Version This field displays the current version of the software embedded in your BOSST101 ...

Page 21: ...o the Internet DNS Server This field displays the location of the server that resolves IP addresses from easy to remember domain names e g www MAC Address This field displays the Media Access Control address assigned at the factory This is a unique identifier used for every network enabled device LAN Information IP This field displays the IP address identifying BOSST101 on the LAN Netmask This ide...

Page 22: ...Status screen Table 3 Trunk Status Menu Field Description Trunk Status PSTN PSTN connects calls via the traditional landline Trunk Status VoIP VoIP can use SIP to receive calls and ITSP for Internet telephony for free or at a reduced rate from the traditional landline Trunk Status Bridge Bridge Calls enable direct connection to remote locations via another BOSST101 over IP Group This field display...

Page 23: ...icon in the SIP table to view the IP address for that handset The following table describes the fields in the Handsets Status screen Table 4 Handsets Status Screen Field Description Handset Status Analog This table shows a brief summary of all analog traditional handsets configured for use with BOSST101 Handset Status SIP This table shows a brief summary of all SIP IP phones handsets registered fo...

Page 24: ...reen on page 44 The following table describes the fields in the Users status screen Table 5 Users Status Screen Field Description Users This table displays a summary of all users and provides a link to their telephone records ID This field displays the unique identifier associated with this user Ext No This field displays the extension number to call this user User Name This is the name or descrip...

Page 25: ... Day Click this combo box to select the day of the week to view call logs for the selected user Query Click this button to retrieve call logs for this user Cancel Click this button to return to the User screen CDR List Date This field displays the date this call was made Time This field displays the time this call was made Talking Time sec This field displays the duration of this call Call Type Th...

Page 26: ...tes The following table describes the fields in the Voice Mail screen Table 7 Voice Mail Status Screen Field Description Voice Mail Status Total Memory Capacity This field displays the total length of voice mail messages in minutes your BOSST101 can record Used Memory This field displays the length of recorded messages in minutes on your BOSST101 ...

Page 27: ...ividual settings take priority over global settings For example an Auto Attendant configured for a specific trunk line see Trunks on page 32 takes precedence over the companywide Auto Attendant Extension Length This field sets the length of the telephone extension number used in the PBX You can select to use 03 digits with maximum 900 extensions within the range 100 899 04 digits with maximum 9000...

Page 28: ...ant Break Time This field is only available if the Multi Auto Attendants field is set to Enable This Auto Attendant provides answering services during the afternoon break This field is set to 401 by default Auto Attendant Off Duty This field is only available if the Multi Auto Attendants field is set to Enable This Auto Attendant provides answering services outside of office hours This field is se...

Page 29: ... the non working days for scheduled services such as Auto Attendants see Auto Attendants on page 40 INFO BOSST101 will play a holiday greeting on non working days Description This field describes non working days Month This field lists the month of this non working day Day This field lists the day of this non working day Select Click this checkbox next to an entry or entries you want to remove Now...

Page 30: ...od Duty Time 2 Enter the start and end time of the afternoon working hours using the following format hh mm start time hh mm end time Where hh hours in 24h format and mm minutes Click the Combo boxes in this field to configure the working times for this period Save Click this button to save your settings and close the Duty Time Configuration screen Cancel Click this button to close the Duty Time C...

Page 31: ...vels available 0 Routing 1 Priority 2 Immediate 3 Flash 4 Flash Override 5 CRITIC ECP Voice Precedence ToS This field defines the ToS for voice signals data packets For information regarding Tos please see the previous field G 711 Packet Size This field defines the packet size using the G 711 codec ranging from 20 to 80 G 729 Packet Size This field defines the packet size using the G 729 codec ran...

Page 32: ...ne cadence Enter the value for ringback tone cadence The default value is set to be 1440 ms on 920 ms off Play Busytone Frequency Enter the value for busytone frequency The default value is set from 480 to 620 Hz Play Busytone cadence Enter the value for busytone cadence The default value is set from 240ms on 240ms off Detect BusyTone Frequency Enter the value for busytone frequency The default va...

Page 33: ...ocations via another BOSST101 over IP ID Click this hyperlink to enter the edit screen in order to configure the desired trunk Group No This field displays the group to which this trunk belongs groups range from 01 to 10 In order to control telephony traffic users are assigned a group through which they make their calls Type There are three types of trunks in BOSST101 PSTN CO SIP trunk and Remote ...

Page 34: ...ATOR Table 12 Trunks Screen Add Bridge only Click this button to insert a new trunk configuration into the Bridge List Delete Bridge only Click this button to remove the selected trunk configuration from the Bridge List ...

Page 35: ...is mode defines the way in which calls are answered for this trunk Use the combo box to select from the following methods Shutdown If not in use then please shut down this trunk Dial In Out Accepts both incoming and outgoing calls Dial In Only Accepts incoming calls only Dial Out Only Accepts outgoing calls only DID Direct Inward Dialing Call the desired extension bypassing the Auto Attendant Exte...

Page 36: ...TN network to BOSST101 Volume level ranges from 1 low to 6 loud Co D to A Gain This field is only available if the Mode field is set to Dial In Out Dial In Only Dial Out Only DID Select the volume level from BOSST101 to the PSTN network Volume level ranges from 1 low to 6 loud CID Detection This field is only available if the Mode field is set to Dial In Out Dial In Only Dial Out Only DID This fie...

Page 37: ...between 1 and 10 Type This field is only available if the Mode field is set to Dial In Out Dial In Only Dial Out Only DID This field displays the trunk type Mode This mode defines the way in which calls are answered for this trunk Use the combo box to select from the following methods Shutdown If not in use then please shut down this trunk Dial In Out Accepts both incoming and outgoing calls Dial ...

Page 38: ...nter the name to display for your SIP account User Name This field is only available if the Mode field is set to Dial In Out Dial In Only Dial Out Only DID Enter the username to login to your SIP account Registration Account This field is only available if the Mode field is set to Dial In Out Dial In Only Dial Out Only DID Enter your SIP number in this field Use the number or text that comes befor...

Page 39: ...ly available if the Mode field is set to Dial In Out Dial In Only Dial Out Only DID Enable this field to have BOSST101 periodically send a signal to the SIP server to keep the connection open if required Click this button to save the current settings and return to the previous screen Click this button to return to the previous screen without saving your settings Edit Add Bridge Trunk Data Left cli...

Page 40: ...nts This field is only available when Dial In Out is selected in the Mode field Enable this field to configure Auto Attendants for this trunk that differs from the attendants set on the PBX Global Configuration on page 26 For more details on setting Auto Attendants please see Auto Attendants on page 40 Auto Attendant All Day This field is only available if the Multi Auto Attendants field is set to...

Page 41: ...own personalized greeting recorded using an analog extension please see Appendix B Handset Commands on page 80 or upload a pre recorded message see Voice Upload on page 75 Description This field displays a brief summary for this Auto Attendant up to 32 alphanumeric characters Ext No This field displays the 3 or 4 digit see PBX Global Configuration on page 26 extension number for this Auto Attendan...

Page 42: ...g table describes the fields in the Add Auto Attendants screen Table 17 Add Auto Attendants Screen Field Description Add Auto Attendants Description Enter a brief description to quickly recognise the functions of this Auto Attendant up to 32 alphanumeric characters EXT No Enter a 3 or 4 digit extension see PBX Global Configuration on page 26 for this Auto Attendant By default extension numbers for...

Page 43: ...fferent department Idle Function Specify how this Auto Attendant reacts to no input from the user see above for the list of functions Ring Period Enter the time in seconds to ring and wait before returning to the Auto Attendant if there is no response Dial by Name Select First Last to dial an extension by entering the persons first last name This function is useful if you know the name of the pers...

Page 44: ...splays this users extension number User Name This field displays an identifier for this user i e name Call Restriction This field displays this users options for making calls see Add Edit User Screen on page 44 Trunk Group This field displays the trunk groups available for this user see Trunks on page 32 Follow Me This field displays the method that see Add Edit User Screen on page 44 Select Click...

Page 45: ...licate extension numbers Password Enter a numeric password in the range 0000 9999 for this user to log in to BOSST101 If no password is supplied the default password is 1234 First Name Enter this user s first name up to 16 characters This field is used for the Dial By Name service where you can place a call using the letters on the handset to spell a name Middle Name Enter this user s middle name ...

Page 46: ...Answer Busy Forward field Enter an extension number to forward calls to this user When the user is in busy status incoming calls will be transferred immediately No answer status incoming calls will wait for 10 secs before transferring the call Extension Number This field is only available when To Another Extension is selected in the Follow Me field Select an extension number to forward this call O...

Page 47: ...n to the previous screen without saving Handsets BOSST101 supports two types of handsets Analog and IP IP phones can be desktop phones WiFi phones or soft phones uses existing laptop or PC hardware Each user can have up to 3 handsets ensuring you won t miss any call NOTE During power outage the All PSTN Line will bypass to the all analog handsets The following table lists the fields in this screen...

Page 48: ...hether or not the phone will sound when called Owner Ext No This field displays the extension number of the registered owner of this handset Description This field displays a brief description of this handset Select Click this checkbox next to an entry or entries you want to remove Now click Delete to complete removal Add Click this button to add a new handset entry to the list Delete Click the Se...

Page 49: ...nd as the first part of a phone number before sending the dialled number Ext A to D Gain Select the volume level from BOSST101 to this handset Levels range from 1 to 9 with Level 9 being the loudest It is recommended that you adjust the gain separately for each handset Ext D to A Gain Select the volume level from this handset to BOSST101 Levels range from 1 to 9 with Level 9 being the most sensiti...

Page 50: ... available if the Seizure Dedicated Trunk field is set to Enable Select a trunk to assign to this handset see Trunks on page 32 for details on how to configure a trunk Prefix Enter up to 16 digits to send as the first part of a phone number before sending the dialled number Registration Account Enter a SIP number to register this handset with BOSST101 Registration Password Enter the password to re...

Page 51: ...e version on your handset the AQ 101 automatically updates Save Click this button to save your settings and return to the previous screen Cancel Click this button to exit this screen without saving your settings Call Restriction If there are call policies assigned to trunk for users of this exchange you can define up to 40 domestic and 20 international prefixes on the Call Restriction screen The f...

Page 52: ...llows this dialling plan to place the call PBX Dialling Plan BOSST101 matches a pattern of digits and routes them to a specific trunk NOTE BOSST101 does not check numbers beginning with 0 or 9 with the PBX Dialling Plan The following screen displays a summary of the trunk dialing plans available The following table lists the fields in this screen Table 23 Dial Plan Trunk PBX Screens Field Descript...

Page 53: ...ove that entry Edit Add Dial Plan Trunk PBX Click the ID number next to the dialling plan to edit or click the Add button to enter a new dialling plan to the list The following table lists the fields in this screen Table 24 Edit Add Dial Plan Trunk PBX Screens Field Description Edit Add Dial Plan Trunk PBX No This field displays the BOSST101 assigned identifier for this dialling plan Click this hy...

Page 54: ...elete using the Remove Length field Remove Length This field is only available when the Remove Prefix Postfix field is set to Prefix or Postfix Select the number of digits to remove from the dial string Save Click this button to save your settings and return to the previous screen Cancel Click this button to return to the previous screen without saving Speed Dial BOSST101 reserves 100 speed dial n...

Page 55: ...emoval 0 2 4 6 8 Reserved speed dial numbers are divided into five pages of 20 numbers E g click 2 to view speed dial IDs from 021 to 040 Delete Click the Select checkbox next to any entry you wish to remove Now click this button to remove that entry Edit System Speed Dial Data The following table lists the fields in this screen Table 26 Edit System Speed Dial Screen Field Description Edit System ...

Page 56: ... Bridge Screen on page 38 Trunk Description This field displays a short description of the configured trunk Ext No List This field list the available extensions to call for this bridge Bridge Call List Click the Trunk_Id hyperlink in the previous screen to configure the Bridge Call List for the selected bridge trunk The following table lists the fields in this screen Table 28 Bridge Call List Fiel...

Page 57: ...idge call The following table lists the fields in this screen Table 29 Add Edit Bridge Call Field Description Add Edit Bridge Call Trunk Description This field displays a brief description of the Trunk used for this bridge call Ext No Enter the extension number of this bridge call Check Ext No Click this button to test for duplicate extension numbers Remote Number Enter the digits to the remote IP...

Page 58: ...r Internet Service Provider Select PPPoE if your ISP assigned a username password and in some cases the DNS Select DHCP Client automatically obtain the IP address from a DHCP server IP Address Enter the IP address of BOSST101 on your WAN if WAN Mode is set to Static IP Netmask This field is only available when Static IP is selected in the WAN Mode field Enter the identifier of your network on the ...

Page 59: ...IP addresses in the same way a DNS server works When accessing a device within the BOSST101 network by name DNS lookup is not required if the device is already mapped and therefore allows faster connection setup No This field displays the assigned identifier for this mapping Click the hyperlink to edit the settings for this mapping Host Domain This field displays the name of the host device or dom...

Page 60: ...s button to add a new route to this list Delete Click the Select checkbox next to any entry you wish to remove Now click this button to remove that entry Add Host to IP Mapping Click the Add button on the Host to IP Mapping to configure a new mapping The following table lists the fields in this screen Table 31 Add Host to IP Mapping Screen Field Description Add Host to IP Mapping No This field dis...

Page 61: ... Netmask Enter the mask for this IP prefix Gateway Enter the static WAN IP address of the remote server that connects to the Internet Interface Select whether this route is through the WAN or LAN Save Click this button to save the current settings and return to the previous screen Cancel Click this button to return to the previous screen without saving your settings LAN Settings A Local Area Netwo...

Page 62: ...r the domain name of BOSST101 network IP Address Range Enter the range of IP addresses valid for the DHCP server to assign LAN clients Values must be between 1 and 254 and the second value must be higher than the first Static DNS 1 Enter the IP address of the primary server that resolves IP addresses from easy to remember domain names e g www Static DNS 2 Enter the IP address of the secondary serv...

Page 63: ... you wish to remove Now click this button to remove that entry Port Triggering List Packets arriving at a particular IP address port are translated and redirected to a different IP address or port This is to create a persistent passage through NAT allowing hosts behind BOSST101 to provide services requiring a static host i e static IP address Port triggering is only necessary for incoming connecti...

Page 64: ...f the internal network Select Click this checkbox next to an entry or entries you want to remove or add Now click Delete to complete removal Add Click this button to add a new entry to the Port Mapping List Delete Click the Select checkbox next to any entry you wish to remove Now click this button to remove that entry Address Mapping Click the Address Mapping ID hyperlink or click the Add button i...

Page 65: ... BOSST101 stream data packets across the network suitable for video BOTH to have BOSST101 determine the best method of transport Source Port This field displays the port to hold open on BOSST101 for this service Only one port per service per host can be used for port triggering Target Port This field displays the IP address of the destination host Target IP This field displays the port to hold ope...

Page 66: ...s screen Table 38 Firewall Settings Screen Field Description Firewall Service Firewall Service Select Start to enable the firewall service on BOSST101 and Stop to disable the firewall Save Click this button to save this setting and start stop the firewall Default Rule This feature enables you to define if all ports are opened or closed by default Accept any port Drop any port Click Accept any port...

Page 67: ...ou wish to remove Now click this button to remove that entry Drop Rule List Click Exceptional in the Default Rule table to configure the Drop Rule List NOTE Before you click Exceptional you must first click Save in the Default rule table The following table lists the fields in this screen Table 39 Drop Rule List Screen Field Description Drop Rule List No This field displays the system assigned ide...

Page 68: ...Port to use for this service Ensure the port number entered is not already in use Click Save to retain the current settings and Cancel to close this screen QoS Settings Quality of Service QoS is an important feature that ensures voice packet data sent from BOSST101 is not delayed or dropped due to interference from lower priority traffic The following table lists the fields in this screen Table 40...

Page 69: ...ng table lists the fields in this screen Table 41 Add QoS Rules Screen Field Description Add QoS Rule No This field displays the system assigned identifier for this QoS rule Protocol Select the protocol to configure this QoS rule Port This field displays the BOSST101 assigned port for this service Rule Select from the available bandwidth management configuration Guarantee 50 Max 100 Voice data has...

Page 70: ...this screen Table 42 Wireless Settings Screen Field Description Wireless Switch Setting Switch Select an appropriate switch setting for your wireless network to use Save Click this button to save the current settings Wireless Setting ESSID Enter the name of your wireless network Encryption mode BOSST101 supports up to five wireless data encryption modes for security Select the encryption method to...

Page 71: ... the encryption mode Enter the key to be used to decrypt the wireless data WPA2 TKIP Key This field is only available when WPA2 TKIP Key is selected as the encryption mode Enter the key to be used to decrypt the wireless data WPA2 CCMP Key This field is only available when WPA2 CCMP Key is selected as the encryption mode Enter the key to be used to decrypt the wireless data Save Click this button ...

Page 72: ...er a numerical password to login to BOSST101 within the range 0000 and 9999 If no password is entered the default is 1234 Verify Password Repeat the same password to confirm the Password field was entered correctly within 0000 and 9999 Save Click this button to save the current settings System Mail Account Configure the system mail account to email voice message notifications to users or backup im...

Page 73: ...hentication Full Name Enter the name to display when you send an email Sender Mail Address Enter the email address of this sender Save Click this button to save the current settings Send Test Mail Click this button to send a test email to the account configured in the following screen Auto Provisioning Password This service enable automation of setting up a file server FTP automated IP phone confi...

Page 74: ...ically update the system time on BOSST101 This field is set to NTP Disable by default Time Zone Select the time zone for your location This field is set to 0 00 Greenwich by default Year Month Date Hour Min Enter the year in four digits and then select the settings for the month date hour and time Save Click this button to save the current settings Backup and Recovery BOSST101 can store a snapshot...

Page 75: ... specified File Path Auto Backup Service Use this feature to configure automatic backup weekly NOTE The Dial By Name settings in the Add Auto Attendants Screen on page 41 are not saved Backup Mode Select Weekly to have BOSST101 create backup image files weekly Send System Image to E_mail address at Enter an address to send an email with the backup image file attached Save Click this button to save...

Page 76: ...to open a file requestor to find your greeting sound file on your pc Upload Click this button to begin transferring the file to BOSST101 Firmware Upgrade In order to keep up with the latest software updates and improved features The following table lists the fields in this screen Table 47 Firmware Upgrade Screen Field Description Firmware Upgrade File Path This field displays the img file of the n...

Page 77: ...request packets to the target host and listens for the response Host Domain This field is only available when Connection mode is set to DomainName Enter up to 25 alphanumerical characters for the domain name to test with the ping tool Status This field displays if the Ping test was successful or not Done Click this button to start the ping test System Restart Changes made to Global Settings Voice ...

Page 78: ...77 A PPENDICES Appendices This chapter details additional information regarding your BOSST101 ...

Page 79: ...power adapter and contact your reseller if a replace ment is required The following table lists common scenarios and their suggested solutions Table 1 Common Configuration Problems Scenario Suggested Action Accessing BOSST101 I cannot access Web Configurator page of BOSST101 Make sure your PC is properly connected to the BOSST101 s LAN port see Rear Panel Connections on page 10 Check the IP addres...

Page 80: ...sion when making a call on an IP extension at the called party when a call is placed from an analog extension at the called party when a call is placed from an IP extension As every phone may differ in specifications and hardware it is recommended that you set the speaker and volume settings for each phone individually For analog handsets see Edit Handset Screen Analog on page 47 For IP based hand...

Page 81: ...Greeting Use this command to record a personal greeting 02 Playback Personal Greeting Use this command to playback your personal greeting 03 Follow Me Use this command to configure user defined stations to ring simultaneously when one extension is dialed 04 Toggle the ringtone Use this command to switch the ringtone on or off 05 Set the Alarm Use this command to configure the alarm function using ...

Page 82: ...1155 to confirm analog handset only 63 Reset PBX Global Configuration Use this command to reset PBX global configuration then press 171155 to confirm analog handset only 64 Reset All Configura tions Back to Fac tory Settings Use this command to reset all configurations back to fac tory settings and then press 171155 to confirm analog handset only The following table lists the available in call com...

Page 83: ...dwidth Unsecured 13 Copyright 2006 1 D DHCP Server 20 DHCP Service Screen 61 Dial Plan 50 Dialling Plan Screens 51 52 DMZ List Screen 65 DNS Server 20 Drop Rule List Screen 66 Duty Time Setup 28 Duty Time Setup Screen 28 Edit Speed Dial Entry Screen 54 Edit Trunk Data PSTN 34 Edit Add Trunk Data Bridge 38 encrypted network 13 Encryption Key 70 Extend LAN Ports 12 F FCC COMPLIANCE 1 Firewall Settin...

Page 84: ...itch 12 System Mail Account 71 System Maintenance 71 System Restart 76 System Speed Dial Screen 54 System Status 19 System Time Screen 73 T Telephone Ports 10 Telephony Services 31 Time Settings 73 Tools 76 Tools Screen 76 ToS 30 TRADEMARKS 1 Troubleshooting 78 Trunk List Bridge 33Trunk List PSTN 32 Trunk List VoIP 33 Trunk Status 21 Trunk Status Bridge 21 Trunk Status PSTN 21 Trunk Status VoIP 21...

Reviews:

Related manuals for BOSST101