137
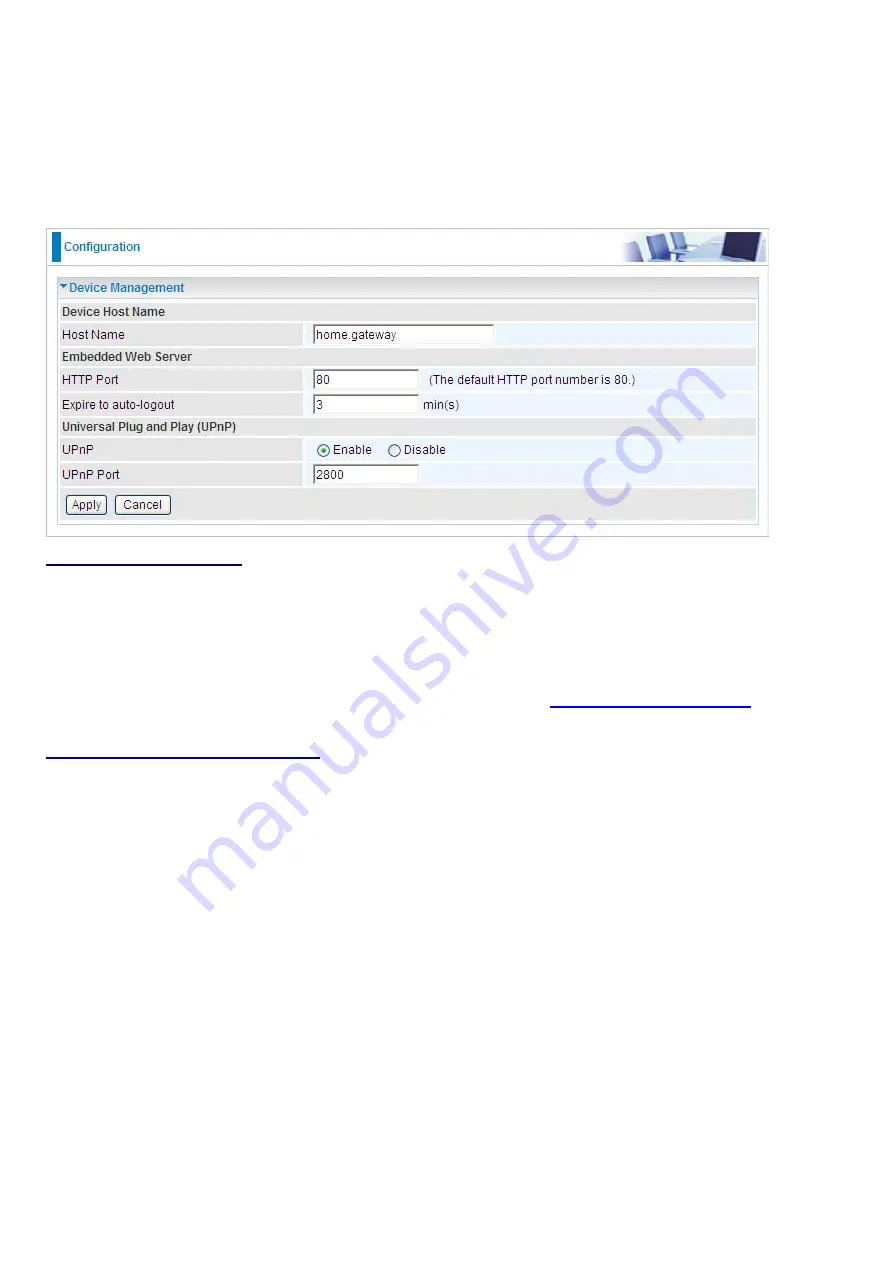
Device Management
The Device Management advanced configuration settings allow you to control your router’s security
options and device monitoring features.
Embedded Web Server
HTTP Port:
The port number of the router’s embedded web server (for web-based configuration uses.
The default value is the standard HTTP port, 80. You may specify an alternative if, for example, you
are running a web server on a PC within your LAN.
For Example:
User A changes HTTP port number to
100
, specifies their own IP address of
192.168.1.55
, and sets the logout time to be
100
minutes. The router only allows User A access from
the IP address
192.168.1.55
to logon to the Web GUI by typing:
in their web
browser. After 100 minutes, the device automatically logs out User A.
Universal Plug and Play (UPnP)
UPnP offers peer-to-peer network connectivity for PCs and other network devices, along with control
and data transfer between devices. UPnP offers many advantages for users running NAT routers
through UPnP NAT Traversal, and on supported systems makes tasks such as port forwarding much
easier by letting the application control the required settings, removing the need for the user to control
advanced configuration of their device.
Both the user’s Operating System and the relevant application must support UPnP in addition to the
router. Windows XP and Windows Me natively support UPnP (when the component is installed), and
Windows 98 users may install the Internet Connection Sharing client from Windows XP in order to
support UPnP. Windows 2000 does not support UPnP.
Disable:
Check to disable the router’s UPnP functionality.
Enable:
Check to enable the router’s UPnP functionality.
UPnP Port:
The Default setting is 2800. It is highly recommended you use this port value.
If this value conflicts with other ports already in use you may wish to change the port.
Summary of Contents for BiPAC 6200WZL R2
Page 11: ...7 Applications of 6200WZL R2...
Page 12: ...8 Chapter 2 Product Overview Important note for using this router...
Page 95: ...91 3 Choose the directory which you want to delete then click Delete to romove this directory...
Page 96: ...92 Samba Server...
Page 102: ...98 Step 3 To continue click Next Step 4 Select network printer and apply Next button...
Page 104: ...100 Step 7 Click Finish to complete the add printer...
Page 124: ...120 Enter the necessary message and press Reload Delete...


