


7
Setting up the machine
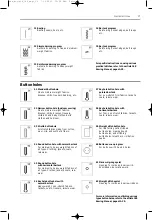
Larger sewing surface
· the sewing table
increases the sewing
surface
· free arm for larger
tubular items such as
pant legs and waistbands
Power cable
· the power cable is stored in the case
· plug A into machine
· plug B into electrical outlet
Foot control cable
· plug C into machine
Sewing speed
· control the sewing speed
by depressing the foot
control with your toe
· raise or lower the needle
by tapping on the foot
control with your heel
Use only foot controller
type LV1/LV2 for sewing
machine model 170/180
(USA/Canada only)
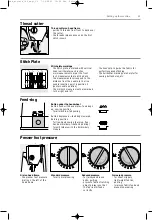
Raising and lowering the
presser foot
· the presser foot lifter
raises and lowers the
presser foot
· push to the right with
your knee
· the presser foot is raised
and the feed-dogs are
lowered simultaneously
· the feed-dogs come up
automatically as soon as
the first stitch is sewn
Sewing table
Power cable
Foot control
Cable tidy
· wind the cable round the
spool
· insert the plug into A
When sewing
· unwind the cable to the
desired length and slip
into B or C
Power switch
Power switch
The power switch is on the
handwheel side of the machine
1
the machine is switched on
0
the machine is switched off
The sewing light is switched on
and off within the Setup
program.
Refer to the safety
instructions!
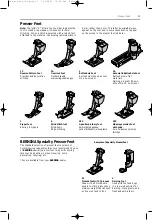
FHS (Free Hand System) presser foot lifter
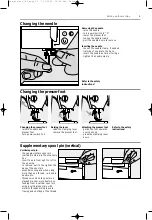
Attaching the presser foot
lifter
· the presser foot lifter is
stored in the case.
· insert the presser foot
lifter into the opening in
the base plate
· you should be able to
operate the lifter in your
normal sitting position.
Note:
Your dealer can adjust the
position if necessary
A
B
C
To attach
· push over the free arm
and press firmly so that it
engages on the fixing lug
(needle and presser foot
fully raised)
To remove
· pull to the left
· remove by pulling it
completely from the
free arm
Seam guide
· insert into the groove
(underside of table) from
the right
· it can be freely adjusted
over the whole width of
the table
Scale
· number “0” corresponds
to the center needle
position
A
B
C
Important! (USA/Canada only)
This sewing machine has a polarized plug
(one blade wider than the other). To
reduce the risk of electric shock, this plug
is intended to fit only one way into a
polarized outlet. If the plug does not fit
fully in the outlet, reverse the plug. If it
still does not fit, contact a qualified
electrician to install the proper outlet. Do
not modify the plug in any way.
bed_artista_180_engl_V3 7.10.2002 16:29 Uhr Seite 7


