


21
Buttonholes
Thread tension
· the tension is set automatically when a buttonhole
is selected
· the upper tension is slightly looser than normal
· this gives a slightly rounded appearance to the beads,
making the buttonhole more attractive
Manual buttonholes
· stitched using Buttonhole foot 3C
· the buttonhole length of manually stitched buttonholes
must be marked on the fabric in the appropriate
position
Automatic buttonholes
· stitched using Automatic buttonhole foot 3C
· mark the length of the first buttonhole
· after sewing the first buttonhole, the length for all
subsequent buttonholes is automatically programmed
· mark the starting point of all subsequent buttonholes
· Buttonhole length = buttonhole opening in mm
Test sewing
· always sew a test on the fabric(s) you will use with the
same interlining, interfacing, and stabilizers
· select the same buttonhole type
· sew the buttonhole in the same direction on the
fabric (with or against the grain)
Corrections
To adjust the bead width:
· alter the stitch width
Altering the stitch length:
· any alterations to the stitch length affect both beads
(making them more or less dense)
· always stitch a new sample to reprogram the buttonhole after
any changes are made to the stitch length
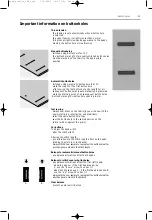
Balance for automatic/manual buttonholes
· any balance alterations affect both beads
Balance for stitch counter buttonholes
· any balance alterations affect the
first
(left) bead:
Bead too dense
– if the first bead looks like
A, use the “down” arrow to correct it
Bead not dense enough –
if the first bead looks like B,
use the “up” arrow to correct it
· always stitch a new sample to reprogram the buttonhole after
any changes are made to the balance
Clear balance
· press the external clr button
Important information on buttonholes
A
B
naeh_artista_180_engl. 7.10.2002 16:31 Uhr Seite 23


