


33
Darning
Simple Darning Program No. 22 or Reinforced Darning
Program No. 23
size and type suitable for the fabric selected
lightweight darning thread
up (sewing position)
Automatic buttonhole foot No. 3A
Reverse pattern foot No. 1C
Preparation
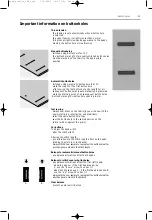
· stretch fine fabrics into a darning or embroidery ring to
prevent distortion
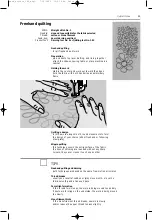
Simple Darning Program No. 22
· replaces threads along the lengthwise grain in all fabrics
· use Reverse pattern foot No. 1C
· touch the foot 3 on the toolbar across the lower part of
the screen
· sew the first row
· press and release the quick reverse button at the desired
length; this programs the first length
· sew the second row
· press and release the quick reverse button; this programs
the second length
· continue sewing; the machine stops automatically
Corrections
· if the darning becomes distorted, correct with the Balance
function (see page 50–51)
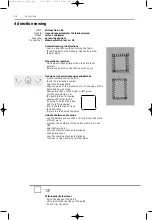
Reinforced Darning Program No, 23
· replaces threads along the lengthwise and crosswise
grains in all fabrics
· use Automatic buttonhole foot No. 3A
· insert the needle in the top left of the worn area
· sew the first vertical row
· press and release the quick reverse button at the desired
length; his programs the length needed
· continue sewing; the machine stops automatically when
finished
Large areas
· reposition the work under the foot to continue covering
the worn area
· begin sewing;the program will repeat (length is saved)
Automatic darning
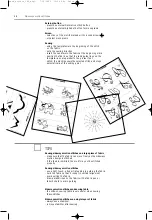
TIPS
Reinforced darning
· place a piece of gauze under the worn area before
darning
Large areas
· increase the darning area lengthwise and crosswise by
moving the work under the foot
Stitch:
Needle:
Thread:
Feed-dog:
Presser foot:
☞
Quick darning of holes or
worn areas
naeh_artista_180_engl. 7.10.2002 16:31 Uhr Seite 35


