background image

Copiscan 8000 Plus Series Operator Manual 

www.bellhowell.imagingcomponents.com


August 25, 2000 

1-800-SCAN495  


79


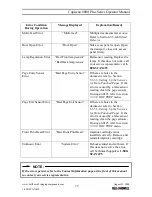
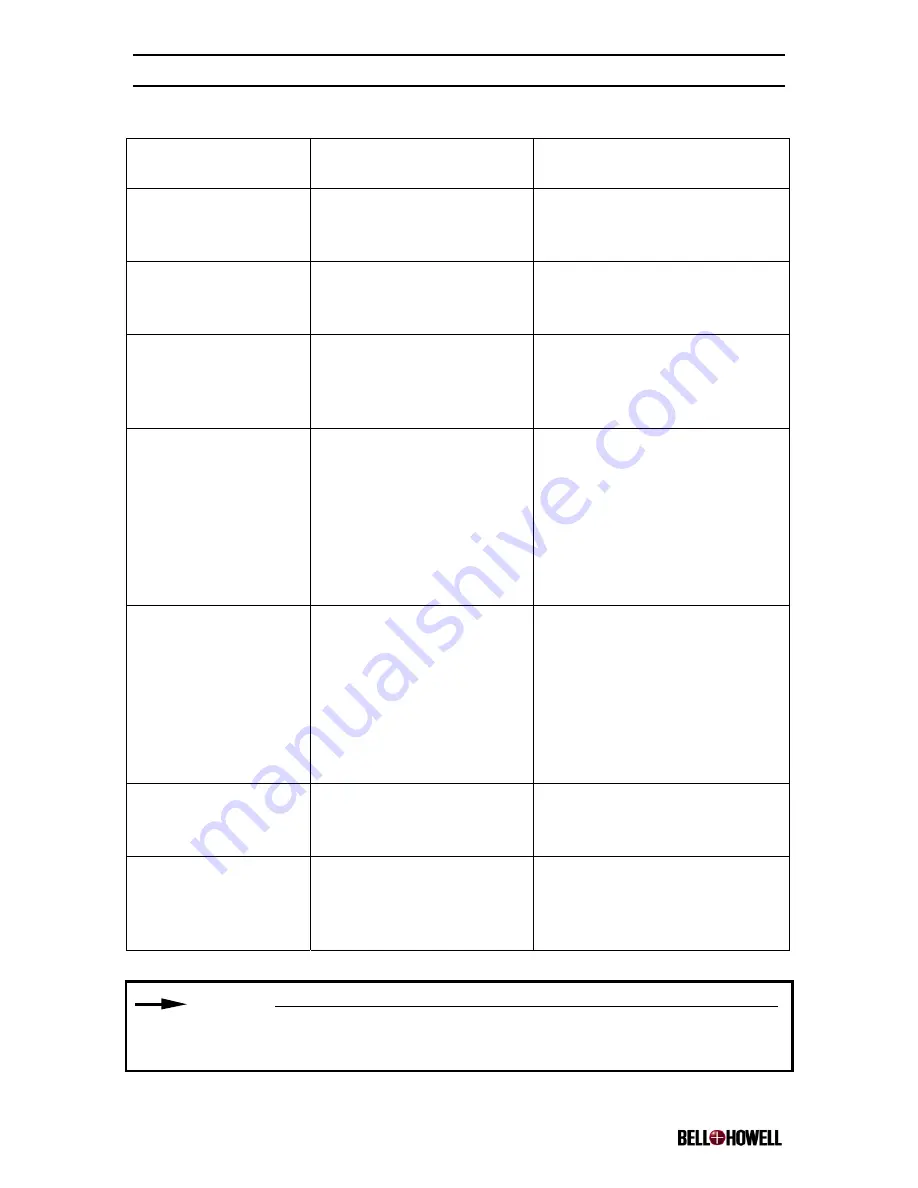
Error Condition 

During Operation 

Message Displayed 

Explanation/Remedy 

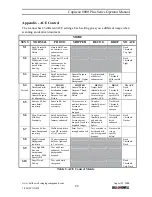
Multi-Feed Error 

“Multi-feed” 

Multiple documents fed at once. 
Refer to Section 5.5, 

Multifeed 

Detector

Door Open Error 

“Door Open” 

Side access panel is open. Open 
the transport, close side access 
panel firmly.  

Lamp Regulation Error 

“Bad Front lamp/sensor” 

“Bad Back lamp/sensor” 

Bad sensor reading. Replace the 
lamps. If this does not work, call 
your service representative at 

1-

800-SCAN495

Page Entry Sensor 
Error 

“Bad Page Entry Sensor” 

If there are holes in the 
document, refer to Section 
5.3.3.3, 

Setting Up the Sensors 

for Hole-Punched Paper

. If the 

error is caused by a false sensor 
reading, clean the page sensors. 
If using an 8125 refer to section 

5.3.3.8 DOC PREP

 menu. 

Page Exit Sensor Error 

“Bad Page Exit Sensor” 

If there are holes in the 
document, refer to Section 
5.3.3.3, 

Setting Up the Sensors 

for Hole-Punched Paper

. If the 

error is caused by a false sensor 
reading, clean the page sensors. 
If using an 8125 refer to section 

5.3.3.8 DOC PREP

 menu. 

Front Print Head Error 

“Bad Front Print Head” 

Imprinter cartridge is not 
installed correctly. Remove and 
reinstall imprinter cartridge. 

Unknown Error 

“System Error” 

Reboot scanner and software. If 
this does not resolve the error, 
call Technical Support at

 1-800-

SCAN495


NOTE:

If the errors persist, refer to the Contact Information page at the front of this manual 
to contact your service representative. 

Summary of Contents for Copiscan 8000 Plus Series

Page 1: ...August 25 2000 Copyright Bell Howell Imaging Components 1999 All rights reserved Copiscan 8000 Plus Series Operator Manual Bell Howell Imaging Components S004082 Rev B R ...

Page 2: ...ax 1 847 933 3252 US Facility Bell Howell Imaging Solutions 6800 McCormick Rd Chicago Illinois 60712 Phone 1 800 722 6494 Europe Facility Bell Howell Imaging International Isis House Horton Road Colnbrook Berkshire SL3 0DF United Kingdom Phone 44 1753 680055 Asia Facility Bell Howell Imaging Components 1005 Level 10 Block B Phileo Demansara 1 9 Jalan 16 11 Petaling Jaya 46350 Malaysia Phone 603461...

Page 3: ... if not installed and used in accordance with the instructions may cause harmful interference with radio communications However there is no guarantee that interference will not occur in a particular installation If this equipment does cause harmful interference to radio or television reception which can be determined by turning the equipment off and on the user is encouraged to try to correct the ...

Page 4: ...cess Panel 7 2 1 5 Operator Controls 7 2 2 REAR OF SCANNER 7 2 2 1 Power Switch 8 2 2 2 Power Receptacle 8 2 2 3 Host Interface 8 2 2 4 Diagnostic Interface 9 2 2 5 Air Vents 9 2 2 6 Service Dip Switches 9 3 SCANNER SPECIFICATIONS 10 3 1 RECOMMENDED SYSTEM CONFIGURATION GUIDELINES 10 3 2 SCANNER ENVIRONMENT 11 4 INSTALLATION 12 4 1 UNPACKING THE SCANNER 12 4 1 1 Repacking the Scanner 16 4 2 WHAT Y...

Page 5: ...5 2 1 12 CLEAR 26 5 2 1 13 STOP 26 5 2 2 Control Panel Display 26 5 2 2 1 SCANNER INITIALIZING 27 5 2 2 2 READY 28 5 2 2 3 SCANNING 28 5 2 2 4 STOPPED 28 5 2 2 5 ERROR PROCESSING 28 5 2 2 6 Blinking Bulb Icon 29 5 2 2 7 DOOR OPEN 29 5 3 NORMAL OPERATING ROUTINE 29 5 3 1 Initializing the Scanner 29 5 3 2 Document Preparation 29 5 3 2 1 Determining Width Length and Thickness 30 5 3 2 2 Preventing Do...

Page 6: ...anner Control Panel 48 5 4 2 4 Setting the Alphanumeric Imprint String 48 5 4 2 5 Setting the Imprint Font Attributes 50 5 4 2 6 Setting the Imprint Delay from the Start of Page 50 5 4 2 7 Setting the Imprinter Mechanism 51 5 4 2 8 Initial Cleaning Priming of the Imprinter Head 51 5 4 2 9 Testing the Imprint String 52 5 4 2 10 Enabling and Disabling the Imprinter 53 5 4 2 11 Changing the Imprinter...

Page 7: ...SARY 84 List of Figures FIGURE 1 COPISCAN 8000 PLUS SERIES SCANNER 5 FIGURE 2 FRONT VIEW OF SCANNER 6 FIGURE 3 REAR VIEW OF SCANNER 8 FIGURE 4 SCANNER PACKAGE ON A SKID 12 FIGURE 5 LIFTING THE BOX OFF THE SCANNER 13 FIGURE 6 SCANNER PACKAGING 14 FIGURE 7 SCANNER AFTER REMOVING TOP PACKAGING MATERIAL 15 FIGURE 8 TWO PEOPLE LIFTING THE SCANNER OFF THE SKID 15 FIGURE 9 TWO PEOPLE PLACING THE SCANNER ...

Page 8: ...NGERS ON THE GLASS FLAT FOR REMOVAL 60 FIGURE 37 REMOVING THE GLASS FLAT 61 FIGURE 38 REPLACING THE GLASS FLAT 62 FIGURE 39 SPRAYING THE SKIMMER CLEANING SHEET 63 FIGURE 40 LETTING THE SKIMMER ROLLERS SPIN ON THE CLEANING SHEET 63 FIGURE 41 ENTRY PAGE TRANSMIT SENSOR LOCATIONS 65 FIGURE 42 EXIT PAGE SENSOR TRANSMIT LOCATIONS 66 FIGURE 43 EXIT PAGE RECEIVER SENSOR LOCATIONS 66 FIGURE 44 FEEDER SENS...

Page 9: ... and tell you how to do the following Safely operate the scanner Start run and stop the scanner Clear jams etc Perform daily maintenance tasks Find commonly used definitions for terms used at the scanner Before operating and or servicing your scanner please read this manual carefully If you need help and cannot find the information in manual refer to the Contact Information page in the front of th...

Page 10: ... keep the scanner in good working order It includes cleaning procedures as well as removal and replacement procedures Section 7 Troubleshooting The seventh section contains troubleshooting information regarding scanner components Appendix ACE Control Appendix A contains a list of sensitivity levels and mode types It details how the scanner operates in each mode It also contains information for get...

Page 11: ...ad all the information in the section before you continue NOTE This symbol identifies important information that requires special attention When you see this symbol be sure to read all the information in the section before you continue 1 3 Safety Guidelines Please read the guidelines below before you operate or maintain the scanner Any machine can be dangerous to you or to others if you do not kno...

Page 12: ...erlock protects the user from the possibility of the transport running while the user panel is open Do not override the safety interlocks Do not place cups containing liquids or other such objects on top of the scanner Normal scanner operation may cause cups to overturn and spill their contents into it causing damage to the scanner Do not lean on the scanner NOTE There are no user replaceable fuse...

Page 13: ...m in size and do not require a lot of preparation such as sorting or removal of staples Uncontrolled documents business cards sticky notes carbon copies and dog eared paper are rarely uniform The scanner minimizes prep work by handling controlled and uncontrolled documents alike The scanner adjusts itself to accommodate the size volume condition and skew of each document The front of the scanner h...

Page 14: ...of the scanner These are components that you will use to operate the scanner and monitor its status Section 5 Operation contains detailed instructions about how to operate and read these components The figure below illustrates the front of the scanner and points out where the components are located Figure 2 Front View of Scanner The table below provides a legend for the above figure 1 Exit Tray 2 ...

Page 15: ...sport latch located to the right of the skimmer assembly and above the feeder To open the transport disengage the latch by depressing it with your hand The scanner will not operate with the transport open 2 1 4 Side Access Panel The side access panel is located on the left side of the scanner It allows access for replacing lamps inserting and or removing color dropout filters air filter and mainte...

Page 16: ...ost Interface 37 PIN Video Connection or SCSI II Interface 2 Service Dip Switch 3 Diagnostic Interface 4 Power Receptacle 5 Power Switch 6 Air Vents 2 2 1 Power Switch This is the main switch for applying power to and removing power from the scanner 2 2 2 Power Receptacle A power cord connects to the receptacle and to an external AC power source 2 2 3 Host Interface Your scanner can have a video c...

Page 17: ...to the host computer so that the scanner can receive commands from the host and the host can receive document images from the scanner 2 2 4 Diagnostic Interface This is for service personnel use only 2 2 5 Air Vents These vents allow air to circulate through the scanner to cool the internal components 2 2 6 Service Dip Switches This is for service personnel use only ...

Page 18: ...landscape 21 59 cm x 27 94 cm at 200 dpi 8080 80 ppm 8100 100 ppm 8125 125 ppm Host Interface Proprietary video interface compatible with commercially available image compression boards or standard 50 PIN SCSI II connector Electrical Requirements 115 230 VAC Autosensing 50 60 Hz Power Usage 450 watts maximum Size H x W x D 18 x 22 75 x 27 5 with feeder 45 72 cm x 57 79 cm x 69 85 cm with feeder We...

Page 19: ...ve the following PC host with minimum 32 Mb RAM 200 MHz Pentium processor or equivalent Video card Contact the video card manufacturer for scanner support Video cable Provided with scanner NOTE Contact your interface card vendor for the connection on the workstation side 3 2 Scanner Environment The scanner equipment has been designed to operate in a normal office environment Please note the follow...

Page 20: ...ll the scanner 4 1 Unpacking the Scanner This section contains instructions for unpacking the scanner Figure 4 Scanner Package on a Skid NOTE Save all of the shipping cartons and packaging materials If it is ever necessary to move or ship the unit or any of its accessories pack them in their original cartons NOTE The scanner s packaging material does not contain PCB polybrominated biphenyloxide po...

Page 21: ...scanner by its feeder in front Lift it from beneath its sides Take the following steps to unpack the scanner 1 Inspect the shipping cartons and their contents for any signs of damage Lift the box off of the scanner If there is damage notify the freight carrier immediately to file a damage claim Figure 5 Lifting the Box Off the Scanner ...

Page 22: ...llhowell imagingcomponents com August 25 2000 1 800 SCAN495 14 Figure 6 Scanner Packaging 2 Remove the plastic shipping bag and the packaging inserts from on top of the scanner Remove the scanner accessories from the cut outs in the packaging inserts ...

Page 23: ...t 25 2000 1 800 SCAN495 15 Figure 7 Scanner After Removing Top Packaging Material 3 With another person grasp the scanner firmly underneath each side and lift it from the shipping carton Figure 8 Two People Lifting the Scanner Off the Skid 4 Place the scanner on a sturdy level surface ...

Page 24: ...s feeder in front Lift it from beneath its sides 1 Use the original shipping carton and packaging materials you saved from unpacking the scanner 2 If you don t have this carton you may purchase one from Bell Howell Imaging Components Refer to the Contact Information page at the front of this manual to contact a Bell Howell sales representative for reorder information 3 With another person grasp th...

Page 25: ...0 Plus Series Operator Manual www bellhowell imagingcomponents com August 25 2000 1 800 SCAN495 17 Figure 10 Scanner After Replacing the Scanner Accessories Figure 11 Scanner After Replacing the Packaging Material ...

Page 26: ...h shipment Copiscan 8000 Plus Series scanner with feeder and exit tray Power cord US Domestic or International 8000 Plus CD which includes Copiscan 8000 Plus Series Operator Manual Copiscan ISIS Twain Drivers Scanner Product Line Brochures Consumable Re Order sheet Warranty card VRS Manual with video models only VRS proprietary video cable with video models only NOTE The SCSI cable that connects t...

Page 27: ...e or visit our online store at www bellhowell imagingcomponents com 4 3 AC Power and Host Connection Once you have set up the scanner you are ready to connect it to an AC power source and to the host computer Take the following steps to connect the scanner to AC power 1 Plug the female end of the power cord into the power receptacle on the rear of the scanner NOTE You can plug the scanner into eit...

Page 28: ... to connect the scanner to the host 1 Connect the interface cable supplied with the host to the connector on the back of the scanner Figure 14 Connecting the Scanner to the Host 2 Make sure that the cable connectors are secure at both ends Once you have completed all of the tasks in Section 4 Installation move on to Section 5 Operation ...

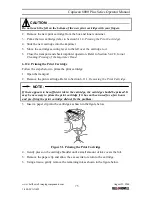
Page 29: ...ain how to turn on the scanner and how to turn it off once you have finished using it 5 1 1 Turning the Scanner On NOTE If you have a SCSI scanner you must turn it on before you turn on the host CAUTION Never connect or disconnect the data cable from the rear panel of the scanner while power is being applied to the scanner or to the workstation Doing so may damage the scanner Take the following st...

Page 30: ... scanner steadily displays a READY message Refer to Section 5 2 2 Control Panel Display for an explanation of these messages and the home menu 4 Power up your host computer 5 Start the scanner application software on the host computer according to the manufacturer s instructions 5 1 2 Turning the Scanner Off To turn the scanner off simply press the power switch located on its rear panel ...

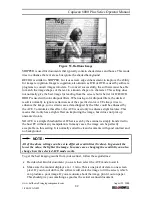
Page 31: ...l The control panel is your interface to the scanner system It contains 13 buttons that control basic operation and a two line display Figure 15 Control Panel 1 MULTIFEED IGNORE 2 CLEANING MENU 3 BATCH COUNTER RESET 4 F1 5 F2 6 F3 7 LEFT 8 UP 9 RIGHT 10 Control panel display 11 decrease value 12 increase value 13 CLEAR 14 STOP ...

Page 32: ...urned to the top of the stack in the feeder MULTIFEED IGNORE can be enabled to clear the error and ignore the multifeed error that would be generated by feeding this document After this document is fed the multifeed detection setting is automatically restored to STOP for the rest of the batch NOTE Note that with VRS Auto Resolve enabled after a multifeed scanning will resume as soon as CLEAR or th...

Page 33: ...ayed This button selects the function on the display panel corresponding directly above the F2 key The key is inactive if nothing is displayed 5 2 1 6 F3 The function of this key depends on the current menu displayed This button selects the function on the display panel corresponding directly above the F3 key The key is inactive if nothing is displayed 5 2 1 7 LEFT This button enables you to move ...

Page 34: ...nel display shows the various menus and function options available to the user through the control panel There are two main types of operator interface menus on the scanner including Home menus and User menus Home menus include the initialization and start up screens software download options and the READY menu The initialization screens are only seen when the scanner first powers up or when it is...

Page 35: ...The following seven subsections describe these states in more detail 5 2 2 1 SCANNER INITIALIZING When you apply power to the scanner or request a reset through the application software the scanner goes through a power up sequence The scanner cycles through a series of diagnostic routines If a scanner component fails an error is displayed NOTE Errors displayed during initialization should be repor...

Page 36: ... menu 5 2 2 3 SCANNING The scanner executes commands from the host computer There is no message display for most commands they execute too quickly During the scanning process however the information line displays the SCANNING message and a count of the number of pages in the batch The scanner can queue up to six scan requests to ensure maximum throughput for different document sizes The number of ...

Page 37: ...el warns you if the side door or the transport are open The side access panel cannot close unless the transport is open Take the following steps to secure the scanner 1 Open the transport 2 Close the side access panel located on the left side of the scanner 3 Close the transport 4 Resume scanning 5 3 Normal Operating Routine Normal scanner operation includes the following Initializing the scanner ...

Page 38: ...ment Jams and Multifeeds Documents that contain tape staples or more than four pages can cause jams or multifeeds Take the following steps to prevent jams and multifeeds from occurring 1 Be sure that nothing sticky such as the sticky side of tape is exposed on the document 2 Be sure that no documents are taped together 3 Remove any staples 4 Remove any multiple part forms that contain more than fo...

Page 39: ...and colors to provide the best possible document resolution Sensitivity also pays attention to the number of pixels per square inch dots that make up pictures or images to provide fine resolution for drawings and photos Sensitivity increases as the numbers increase To extract more detail from your documents then you would increase the sensitivity setting For low contrast documents the sensitivity ...

Page 40: ...OLOR DROPOUT NO ACE NOTE See Appendix A ACE Control for information on sensitivity levels and ACE settings 8 Choose the sensitivity level by pressing either the button to lighten the image or the button to make the image darker If you don t believe that the documents to be scanned are too light or too dark you can use the scanner s default sensitivity setting 9 Press F2 BACK on the control panel o...

Page 41: ... MODE Front Filter is White FRONT BACK Back Filter is Green FRONT BACK User Setup NEXT Multifeed Mode Stop NEXT SCSI Identifier 6 NEXT SCSI Termination On NEXT Deskew Enabled NEXT Auto Balance Disabled NEXT Max Hole Size 0 25 NEXT Scanned 244657 NEXT Time On 381hr 36min NEXT Pages Fed 245681 NEXT Code Revision Numbers NEXT Back Printer On 100 ON OFF REFILL CLEAN 1 87 Feb 16 2000 Scanner Rev NEXT 0...

Page 42: ... the skimmer assembly 5 Place the documents in the feeder 6 Set the feeder guides to the proper width so that the documents are center justified 7 Push the skimmer assembly down 8 Begin scanning procedures by following software application instructions To set the scanner in Manual mode follow the directions below 1 Make sure that the scanner is in the proper mode before scanning It should say MANU...

Page 43: ...er 5 3 3 4 Enabling Deskew Video scanners have the ability to deskew the images from the grayscale data stored in the scanner prior to sending the images to your scanning application This section shows you how to enable and disable the deskew feature SCSI scanners have deskew capabilities within the scanning application Contact your software vendor to learn how to activate this feature To enable d...

Page 44: ...up Setting these parameters sets the default behavior on detection of a multifeed 1 From the READY menu press the RIGHT key until you reach the USER SETUP menu Press F3 NEXT until you reach the MULTIFEED MODE menu 2 From the MULTIFEED MODE menu press to select STOP NOTIFY or OFF depending on what you wish to occur Select STOP if you want the scanner to beep display an error message and stop feedin...

Page 45: ...1 From the READY menu press the RIGHT key until you reach the USER SETUP menu Press F3 NEXT until you reach the DOC PREP menu 2 Press to select GOOD or AVERAGE depending on how well your document batch is prepared Press CLEAR to return to the READY menu 5 3 4 Adjusting the Feeder Guides The document guides on the feeder tray are self centering Moving either guide toward the center of the tray also...

Page 46: ...g to the procedure below 1 Place your fingers on the bottom of the extension with your thumbs on the top where it meets the feeder tray Figure 21 Removing the Feeder Extension Tray 2 Push up with your fingers while prying the tray away from its mounting brackets with your thumbs 3 Pull the extension tray toward you so that it slides fully out of its mounting rails 4 Turn it over and slide the moun...

Page 47: ...in their original stacking order Do not reposition documents in the exit tray This might cause mishandling of the return order The exit tray may be placed in various positions for various sizes and types of documents For instance if you are scanning very small documents such as checks tilt the exit tray so that it slopes downward toward the exit This keeps the documents together If you are scannin...

Page 48: ...ts com August 25 2000 1 800 SCAN495 40 Figure 24 Setting the Exit Tray Figure 25 Various Positions of the Exit Tray Like the automatic feeder the exit tray has document guides called side guides The side guides should be adjusted for the width of the documents being scanned ...

Page 49: ...e side guides and gently slide them in the grooves 2 Set the guides slightly wider than the width of the documents to ensure that the documents do not bind on the guides The document guides on the automatic feeder tray should roughly match the setting of the guides on the exit tray 3 If you are going to scan very short documents such as checks slide the document stop toward the transport exit Figu...

Page 50: ...r NOTE If you do not have a Deluxe model scanner proceed to Section 5 5 Scanning Documents 5 4 1 Color Dropout Multiple color dropout allows you to drop out red green or blue from the image NOTE The red green and blue color dropout filters do not drop every shade of these colors You can choose red green or blue to be dropped out from the image Changing colors can be completed in just a few steps F...

Page 51: ...the glass of the color dropout filters during installation Hold them by their labeled edges Fingerprints and smudges can degrade images and cause problems in the dropout NOTE Keep your color dropout filters in the filter case to prevent dust from accumulating on them This will keep the filters in optimal condition To configure the color dropout follow the procedure below 1 Choose a filter for the ...

Page 52: ...dropout slot making sure it goes through the gold colored guide inside the slot 6 Push the filter in until it stops You should see about an inch of the handle of the filter with the label sticking out of the slot Figure 31 Inserting the Front Page Filter 7 Choose a filter for the color you want to drop out on the back page of the documents you are scanning green red or blue 8 Place the chosen filt...

Page 53: ...nu 14 Press F1 FRONT The display indicates the current color of the front filter NOTE Select white when no filters are installed NOTE If the filter selection does not match the scanner s color dropout configuration or lack thereof image quality will be degraded 15 Press to select the color that corresponds to the inserted filter in the front page green red or blue You have now completed setting th...

Page 54: ... imprint a string of characters for each page one at a time or imprint a repeating character string with an automatically incrementing suffix on each page that is scanned The string of characters is printed one at a time in the direction of scanning The print head is stationary and prints as the paper passes under it The printed character string s position from the leading edge of each document is...

Page 55: ...ontrol Panel in this manual Fonts Fonts are user definable from the scanner control panel or the host software application The available font types include Standard Normal 10 cpi Standard Wide 5 cpi Large 8 cpi and Large Wide 4 cpi Character Orientation Character orientation is user definable from the scanner control panel or the host software application Imprinting is always in the vertical direc...

Page 56: ... access to the following functions STRING enables the user to establish the alphanumeric string to the imprinter FONT enables the user to establish the size width and angle of the imprint string 5 4 2 4 Setting the Alphanumeric Imprint String Turn OFF the imprinter from the FRONT IMPRINTER menu and select SETUP F3 to establish the imprint characteristics Select STRING F1 to establish the alphanume...

Page 57: ... include the following characters SP _ 0 9 A Z 2 Underline is not supported 3 Leading spaces in the message string are stripped trailing spaces are not This allows a gap to be inserted between the base and index strings 4 Maximum length of the base string is 22 characters 5 Press the UP key to exit the menu To establish the initial index string select INDEX F2 The index string is a numeric string ...

Page 58: ... attributes To set the font size select SIZE F1 When setting the font size use the keys to toggle between Large and Normal To set the font width select WIDTH F2 When setting the font width use the keys to toggle between Normal and Double To set the font angle select ANGLE F3 When setting the font angle use the keys to toggle between 0 90 180 and 270 degrees Press the UP key to exit these menus 5 4...

Page 59: ...ox and inner container 5 Prime the new cartridge refer to Section 6 11 4 Priming the Print Cartridge 6 Slide the new cartridge into the imprinter Use the clear plastic handle to hold the cartridge as you insert it into the seat 7 Move the black cartridge securing the lever to the left over the cartridge to secure it 8 Using the green imprinter handle locate the imprinter in the position that you w...

Page 60: ...d into the scanner and a black rectangle will be printed on the document This primes all nozzles on the imprint head To cancel select CANCEL F3 NOTE If there is a white streak through the rectangle power cycle the scanner to pre fire the imprinter and run another sheet through the scanner If you cannot get rid of the white streak prime the cartridge as indicated in Section 6 11 4 Priming the Print...

Page 61: ...e is installed into the imprinter CAUTION Do not operate the scanner with the imprinter in the SERVICE position the left most position where it is protruding beyond the scanner s metal frame To disable the imprinter remove the ink cartridge while in the SERVICE position and slide the imprinter to one of the four other positions before closing the transport CAUTION Always remove the ink cartridge a...

Page 62: ...s remove the ink cartridge and slide the imprinter to one of the four endorsing locations when not in use 5 5 Scanning Documents When you scan a variety of document sizes and types it s unlikely that all scanner runs will require the same settings Therefore you may have to adjust scanner parameters the feeder and or the exit tray This section integrates procedures for making and adjusting those se...

Page 63: ... have found an acceptable setting 5 5 2 Scanning a Full Batch of Documents Now that you have set up scanner parameters and made any necessary adjustments you are ready to scan a full batch of documents Take the following steps to scan a full batch of documents NOTE Follow all guidelines for setting feeder guides and exit tray guides before you begin scanning 1 Lift the skimmer assembly 2 Place an ...

Page 64: ...ressed the multifeed detection returns to STOP on multifeed 5 7 Document Skew Document skew occurs when a document enters the scanner at an angle Skew happens for several reasons Documents are poorly prepared not neatly stacked Document guides are not properly adjusted There is dust buildup on the feeder rollers The feeder rollers should be cleaned to solve this problem Refer to Section 6 5 Cleani...

Page 65: ...mmed sheet 4 Remove the sheet or sheets that jammed and inspect the steel trays for debris that might have caused the jam CAUTION Do not use sharp objects when clearing document jams NOTE If you cannot clear the jam contact your service representative Refer to the Contact Information page at the front of this manual 3 Close the transport firmly 4 Press the operator control panel CLEAR button to re...

Page 66: ...application Your maintenance schedule may vary somewhat depending on the documents that are being scanned and the scanner environment Activity Hours of Operation Symptoms Clean glass flat Once per day or as needed Streaks in the image Reduced recognition rates Blurred images Clean skimmer rollers feeder Once per day or as needed Skewed documents Multifeeds Feeder jams Clean transport Once per week...

Page 67: ...u reach the COUNTER menu NOTE F1 PAGE displays the total number of pages scanned F2 HOUR displays the total number of hours the scanner has been switched on F3 TOTAL displays the total number of pages that have been fed through the transport 2 Press F3 NEXT to view page count hours used and total pages scanned 3 Press CLEAR to return to the READY menu 6 3 Cleaning the Glass Flat Figure 35 Glass Fl...

Page 68: ...ance Kit Item 5 carefully clean the front surface of the glass Inspect the glass flat after cleaning to ensure all dust and residue have been removed 3 Close the transport 6 3 1 Removing the Glass Flat for Replacement or for Cleaning Both Sides CAUTION Handle the glass flat by its edge to avoid smudges and scratches CAUTION Do not twist or turn the glass flat while removing it To remove the glass ...

Page 69: ...t to twist or leverage the tip where it still touches the scanner 5 Check the glass flat for chips and scratches NOTE If the glass flat is chipped or scratched use the Reorder Fax Sheet on the 8000 Plus CD or call your Bell Howell sales representative to order a new glass flat Refer to the Contact Information page at the front of this manual You may also visit our online store at www bellhowell im...

Page 70: ... Maintenance Kit Item 5 carefully clean the exposed surface of the glass Inspect the glass flat after cleaning to ensure all dust and residue have been removed 10 Close the transport firmly 6 4 Cleaning the Skimmer Rollers As the skimmer rollers become dirty they may begin to slip on the paper or cause multi feeds To prevent feeding problems clean the skimmer rollers once a day or as needed NOTE T...

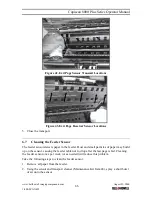
Page 71: ...ace the skimmer cleaning sheet in the feeder holding the back of the page with one hand 7 Lower the skimmer Figure 40 Letting the Skimmer Rollers Spin on the Cleaning Sheet 8 Holding the sheet let the skimmer rollers spin on the area of the sheet that has been sprayed with rubber tire cleaner The skimmer wheels should spin freely on the paper 9 Slowly let the scanner pull the sheet into the scanne...

Page 72: ...ress the CLEAR button to put the scanner in READY mode 5 Press the CLEANING MENU key on the front panel 6 Press the F1 key to start the scanner 7 Place one of the transport path cleaning sheets Maintenance Kit Item 8 in the feeder and lower the skimmer The sheet will be pulled through the scanner 8 Remove the sheet from the exit tray and run it through the scanner again 9 Remove the sheet from the...

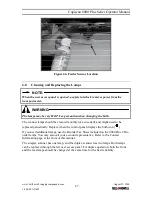
Page 73: ...he page sensors with cotton swabs or anything else when cleaning them Use the transport cleaner only CAUTION Do not turn the sensor and transport cleaner Maintenance Kit Item 4 can upside down while using 4 Clean the front sensors of the scanner using the sensor and transport cleaner Maintenance Kit Item 4 Direct the nozzle toward each of the sensors as shown in the figures below There are five pa...

Page 74: ...Sensor The feeder sensor detects paper in the feeder Dust and small particles of paper may build up on the sensor causing the feeder table not to drop after the last page is fed Cleaning the feeder sensor once per week or as needed will reduce this problem Take the following steps to clean the feeder sensor 1 Remove all paper from the feeder 2 Using the sensor and transport cleaner Maintenance Kit...

Page 75: ...cleaned monthly or as needed and might need to be replaced periodically Replace when the control panel displays the bulb icon If you need additional lamps use the Reorder Fax Sheet included on the 8000 Plus CD to order lamps You may also call your account representative Refer to the Contact Information page at the front of this manual The simplex scanner has one lamp and the duplex scanner has two...

Page 76: ...ss panel of the scanner by folding it down to the left as you would open the cover of a book The operator accessible areas of the scanner are now exposed 3 Remove the front page lamp by grasping the green bulb housing and gently pulling it toward you Slide the lamp out carefully 4 Using an optic cleaning pad Maintenance Kit Item 5 wipe the lamps until they are free of dust 5 Repeat steps 3 and 4 t...

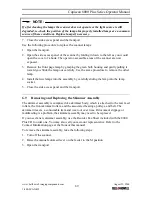
Page 77: ...t carefully Use the same procedure to remove the other lamp 4 Install the new lamps into the assembly by carefully sliding the lamp into the lamp socket 5 Close the side access panel and the transport 6 9 Removing and Replacing the Skimmer Assembly The skimmer assembly is comprised of a skimmer body which is attached to the rear feed rollers the front skimmer rollers and the associated bearings pu...

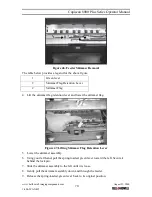
Page 78: ... Skimmer Flag 4 Lift the skimmer flag retention lever and lower the skimmer flag Figure 47 Lifting Skimmer Flag Retention Lever 5 Lower the skimmer assembly 6 Using your left hand pull the spring loaded green lever toward the left Secure it behind the lock pin 7 Slide the skimmer assembly to the left until it is loose 8 Gently pull the skimmer assembly down and through the feeder 9 Release the spr...

Page 79: ... the skimmer flag into position and let the skimmer flag retention lever lower back to its normal position 8 Lower the manual autofeed lever on the feeder to the A position 9 Clean the tires as described in Section 6 4 Cleaning the Skimmer Rollers 6 10 Replacing the Separator Roller Sleeve The separator roller is comprised of a separator roller sleeve a brake assembly spacers and retaining o rings...

Page 80: ... of the separator roller assembly 8 Slide the separator roller sleeve away from the brake assembly 9 Slide the new separator roller sleeve onto brake assembly The brake assembly is keyed to allow the separator roller sleeve to slide on in only one position 10 Put the new spacers on each end of the separator roller assembly 11 Slide the new retaining o rings onto each end of the separator roller as...

Page 81: ...E Keep your color dropout filters in the filter case to prevent dust from accumulating on them This will keep the filters in optimal condition NOTE Clean the filters with care as you would clean a camera lens Be careful not to scratch the filters Clean the filter before inserting it into the scanner Even if the glass flat is clean dirty color dropout filters can cause unclear images artifacts in t...

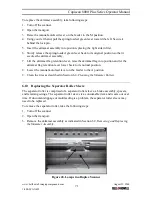
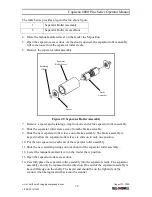
Page 82: ...ance check the amount of ink remaining in the cartridge 6 12 2 Checking the Print Cartridge Ink Print cartridges are a consumable item Replace the cartridge if there is little or no ink in the cartridge You can either purchase a new HP51604A print cartridge locally or obtain one from your dealer To check the amount of ink remaining in the cartridge follow the directions below 1 Lay the print cartr...

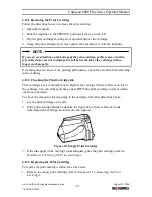
Page 83: ...r Head 6 12 4 Priming the Print Cartridge Follow the steps below to prime the print cartridge 1 Open the transport 2 Remove the print cartridge Refer to Section 6 11 1 Removing the Print Cartridge NOTE If there appears to be sufficient ink in the cartridge the cartridge should be primed It may be necessary to prime the print cartridge if it has not been used for a few hours and pre firing the prin...

Page 84: ...peration Refer to Section 5 4 2 8 Initial Cleaning Priming of the Imprinter Head 6 12 5 Storing the Print Cartridge To get optimal use out of your imprinter the print cartridge should be removed from the imprinter and stored if it has not been used for more than one hour A plastic storage container has been provided for this purpose CAUTION Make sure that the storage container lid is secured durin...

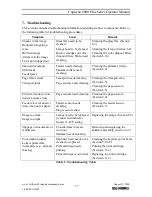
Page 85: ...sport needs cleaning Page sensors need cleaning Cleaning the transport area Section 6 5 Cleaning the page sensors Section 6 6 Entry exit sensor errors Sensor bounce errors Page sensors need cleaning Cleaning the page sensors Section 6 6 Feeder elevator doesn t drop when out of paper Feeder sensor needs cleaning Flag is out of sensor Cleaning the feeder sensor Section 6 7 Image too dark Image too l...

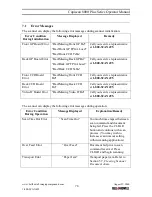
Page 86: ...your service representative at 1 800 SCAN495 Back CCD Board Error Bad Missing Back CCD Bd Call your service representative at 1 800 SCAN495 Video IF Board Error Bad Missing Video IF Bd Call your service representative at 1 800 SCAN495 The scanner can display the following error messages during operation Error Condition During Operation Message Displayed Explanation Remedy Scan Time Out Error Scan ...

Page 87: ... 5 3 3 3 Setting Up the Sensors for Hole Punched Paper If the error is caused by a false sensor reading clean the page sensors If using an 8125 refer to section 5 3 3 8 DOC PREP menu Page Exit Sensor Error Bad Page Exit Sensor If there are holes in the document refer to Section 5 3 3 3 Setting Up the Sensors for Hole Punched Paper If the error is caused by a false sensor reading clean the page sen...

Page 88: ...COG Darker fixed threshold details enhanced Good for most high contrast OCR DROP Fixed Threshold darker no speckle fill or delete NO ACE Fixed Threshold Average Lightness S5 Same as S4 but more detail sensitivity Same as S4 but more detail sensitivity Very sensitive to mid size features Screened backgrounds dropped Adaptive threshold detail enhanced Dark Fixed Threshold mild detail sharpen S6 More...

Page 89: ...to enhance the features you want to read such as text data and to ignore the features you do not want such as backgrounds To do this ACE needs to be configured to enhance the desired features If configured to enhance the whole image it will include features you may not want ACE can recognize basic items such as small text photos backgrounds and boxes This means that rather than just shades being s...

Page 90: ... be enhanced by the ACE To minimize this effect the ACE is used only to enhance slight features This means that it only has a slight effect on improving the image but it does not pick up unwanted colors NO ACE is a simple threshold level What is seen by the scanner is simply transferred to the host PC without any manipulation In many cases the image can be perfectly acceptable on this setting It i...

Page 91: ...he scanner to get the desired results When using the scanner for ICR OCR only the image you perceive to be the best by eye may not be the best for data reading Background noises on the document may not affect the ICR OCR rate but can look bad on the host PC monitor Try to keep the characters to a quality where they are not filled or have gaps If using ICR OCR then try to pick documents with the be...

Page 92: ...matic or manual feeder between which the document is fed Duplex scanner A scanner capable of scanning both sides of a document in a single pass through the scanner Elevator table The input tray of the feeder which raises the top of the stack of documents to the correct height for proper feeding After the last document has been fed from the tray the tray in ADF mode drops to permit loading another ...

Page 93: ...e curved path taken by a document as it passes through the scanner Paper transport The mechanical system for moving a document through the scanner Power cord The cord which connects the scanner to AC power Power cord receptacle The connector at the rear of the scanner into which the power cord is inserted The other end of the power cord is plugged into the wall outlet or other source of AC power P...

Page 94: ...b is adjusted so that the feeder feeds single documents only into the scanner Side access panel The door panel located on the left side of the feeder It allows access to the lamps and color filters Simplex scanner A scanner designed to scan a single side of a document as it passes through the scanner Skew The result of feeding a document at an angle It looks crooked on the display and also looks t...

Reviews: