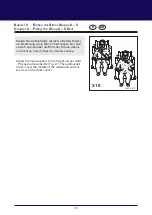
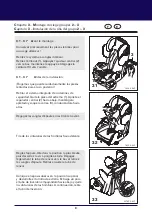
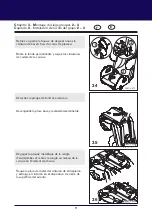
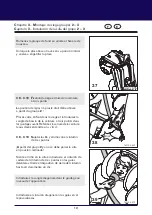

13
5
.
1
1649
-
4
-
03
/
1
GB
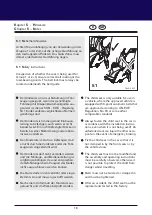
D
D
er
K
indersitz
ist
nur
zur
B
enutzung
in
F
ahr-
zeugen
geeignet,
wenn
das
genehmigte
F
ahrzeug
mit
D
reipunktautomatikgurten
aus-
gerüstet
ist,
die
nach
UN
–
ECE
–
R
egelung
N
r.
16
oder
anderen
vergleichbaren
N
ormen
genehmigt
sind.
D
er
K
indersitz
ist
immer
gemäß
E
inbauan-
leitung
zu
befestigen,
auch
wenn
er
nicht
benutzt
wird.
E
in
nicht
befestigter
S
itz
kann
bereits
bei
einer
N
otbremsung
andere
A
uto-
insassen
verletzen.
D
en
K
indersitz
im
A
uto
so
befestigen,
daß
er
nicht
durch
die
V
ordersitze
oder
die
F
ahr-
zeugtüren
eingeklemmt
wird.
D
er
K
indersitz
darf
nicht
verändert
werden
und
die
M
ontage-
und
B
edienanleitung
ist
sorgfältig
zu
befolgen,
da
sonst
entsprechen-
de
G
efährdungen
beim
T
ransport
des
K
indes
nicht
ausgeschlossen
werden
können.
D
ie
G
urte
dürfen
nicht
verdreht
oder
einge-
klemmt
sein
und
müssen
gestrafft
werden.
N
ach
einem
U
nfall
muß
der
K
indersitz
aus-
getauscht
und
im
W
erk
überprüft
werden.
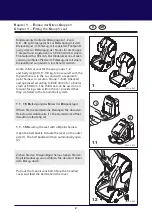
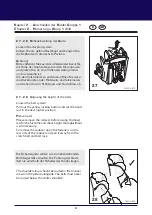
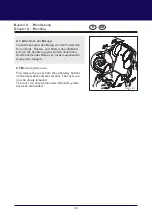
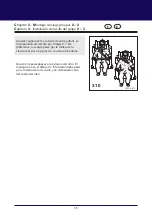
5
.
1 S
icherheitshinweise
A
chten
S
ie,
unabhängig
von
der
V
erwendung
in
der
G
ruppe
1
oder
2
+
3
,
auf
die
richtige
G
urtführung
an
den
lasttragenden
P
unkten.
D
as
G
urtschloss
muss
immer
unterhalb
der
G
urtführung
liegen.
5
.
1 S
afety
instructions
I
rrespective
of
whether
the
seat
is
being
used
for
G
roup
1
or
2
+
3
,
ensure
correct
belt
routing
at
the
load-bearing
points.
T
he
belt
lock
must
always
be
located
underneath
the
belt
guide.
K
apitel
5
–
H
inweise
C
hapter
5
–
N
otes
T
he
child
seat
is
only
suitable
for
use
in
a
vehicle,
where
the
approved
vehicle
is
equipped
with
3
-point
automatic
belts
that
are
approved
according
to
UN
-
ECE
R
egulation
N
o.
16
or
some
other
comparable
standards.
A
lways
fasten
the
child
seat
in
the
car
in
accordance
with
the
installation
instruc-
tions,
even
when
it
is
not
being
used!
A
n
unfastened
seat
can
injure
the
other
occu-
pants
in
the
event
of
emergency
braking.
F
ix
the
child
seat
in
the
car
so
that
it
is
not
clamped
in
by
the
front
seats
or
by
the
vehicle
doors.
T
he
child
seat
must
not
be
modified
and
the
assembly
and
operating
instructions
must
be
carefully
observed,
otherwise
it
is
not
possible
to
protect
the
child
from
danger
whilst
travelling.
B
elts
must
not
be
twisted
or
clamped
in
and
must
be
tightened.
A
fter
an
accident,
the
child
seat
must
be
replaced
and
tested
in
the
factory.