background image

 Other Tabs 

Compu-Dobby 5 User’s Manual 

Page | 50 

Tabby Tab 

3)


Enter the new name in the window and click OK. 

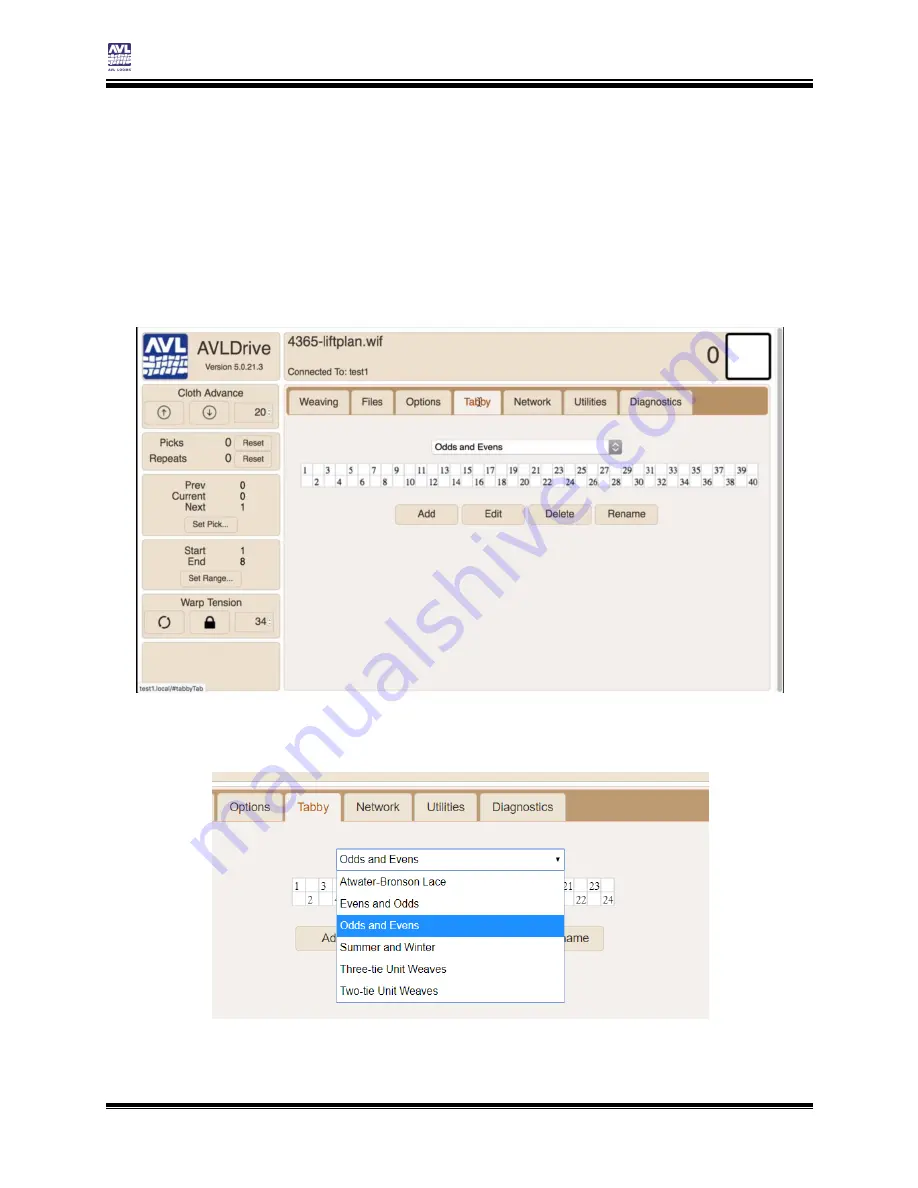
Use a Tabby 

When you change the tabby in the drop-down menu, you change the tabby 
that will be used by the loom when you click Tabby on the Weaving tab. 

1)


Open the Tabby Tab by clicking on the name. The tabby will only 
show the number of shafts available on your loom. 


2)


From the drop-down menu, choose the tabby to use with your 
threading. Several defaults are available. 


Summary of Contents for Compu-Dobby 5

Page 1: ...Compu Dobby 5 User s Manual AVL Looms 2360 Park Avenue Chico CA 95928 6785 U S A 530 893 4915 530 893 1372 fax sales avlusa com www avlusa com Version 1 3 4a July 14 2020 ...

Page 2: ......

Page 3: ... 16 Loss of Communication 19 Logout User 19 Reboot the Loom 19 Shutdown the loom 20 Using Weavepoint 20 Weaving with the Compu Dobby 5 23 Open a file for Weaving 24 Resume a weaving session 26 Tabby 27 Reverse 29 Set the Range 29 Unweave 32 Adjust the Pick 33 Zoom in on the WIF 34 Power Off 36 Other Tabs 37 File Tab 38 Options Tab 41 Tabby Tab 47 Utilities 51 Diagnostics 52 Additional Functions K ...

Page 4: ...ce 56 Set Warp Tension 57 Unweave 58 Lock the warp beam 60 Options Tab 61 Trouble shooting the Compu Dobby 5 63 Send Troubleshooting Information to AVL 64 Appendix I Additional Information 67 Using a Tablet with Compu Dobby 5 68 Compu Dobby 5 Connection Information 70 The Fine Print 71 AVL Customer Service 72 AVL Warranties 72 ...

Page 5: ...Compu Dobby 5 User s Manual Introductory Information Page 3 INTRODUCTORY INFORMATION ...

Page 6: ...iolette moved Ahrens and Violette Looms to Chico where it officially became known as AVL Looms Inc and has operated ever since In 1982 Violette was instrumental in the development of the first computerized dobby then called the Apple Dobby He retired from active life in the company in 1987 Once known for our production looms AVL has broadened its line considerably and we now offer customers a full...

Page 7: ...LDrive is compatible with all major browsers including Safari Chrome Edge Firefox and Opera The current version of the browser should be used Warp Beams and Automatic Warp Tension System A first in our industry some looms offer digital control of warp tension using a small electrical motor and drive system connected via spring and brake cable to the warp beam The motor is controlled by the Compu D...

Page 8: ...es advance the cloth at any time during weaving by a click of the mouse or a touch of the finger on the touchscreen This system allows very fine repeatable control with a range from hundreds of picks per inch or centimeter to gross movements needed when starting a new warp ...

Page 9: ...Compu Dobby 5 User s Manual Connecting to the Loom Loom Features Page 7 CONNECTING TO THE LOOM ATTENTION Please read through this entire section before powering on your loom ...

Page 10: ...tc and type in the loom s address When the loom is started it will try to connect to the router LAN it is normally connected to first If it cannot find the router it will start LoomDirect The USB connection is always available LOOM MODES The loom is designed to be controlled through the AVLDrive software so there is no power button anywhere on the loom We recommend the use of a good surge protecto...

Page 11: ...dby Mode through AVLDrive Shutting down the loom through AVLDrive is the proper way to stop all power to the loom Once the loom has been shutdown the power cord can be unplugged If the loom has been Shutdown through the software but is still plugged in simply unplugging it and plugging it back in will initiate Standby Mode POWERING ON THE LOOM When powering on the loom for the first time you will ...

Page 12: ...OWER Orange light means power to the loom in standby mode Red light means power to the loom in weaving mode NETWORK Different colors indicate the network status Blinking Red searching for a router Red connected to a router Green LoomDirect is available not searching for a router COM Green light shows the loom is connected to a device No light means there is no device connected ERROR Red light will...

Page 13: ...osoft Edge Firefox Opera etc 3 In the Address Bar type in 192 168 6 2 when using a Mac or 192 168 7 2 when using a Windows PC and press Enter to open AVLDrive This is the IP address for the loom when connecting via USB You can also use the Loom Name URL once it has been setup Note Any time you re connected via USB you can use the IP address or the loom name to open AVLDrive If the loom name is ent...

Page 14: ...ect to If it does not find one it will automatically switch to LoomDirect and create its own network Note If no router LAN connection is established your loom will automatically switch to LoomDirect 1 Wait for the loom to switch to LoomDirect and the private network to show up on your device This should occur quickly 2 When the Network light shines green the loom is now putting off its own network...

Page 15: ...om will default to using the USB cable even if a network connection is setup 7 When the device is connected the COM Light will come on The COM light indicates only that a device is connected 8 Once you establish the LoomDirect connection you won t have to go through this process again You can shut down your loom and you ll be able to turn the loom on and connect to AVLDrive automatically Note If y...

Page 16: ...ss to the internet If you don t have internet you can still connect via WiFi with LoomDirect connection covered in its own section 1 Connect your device to the loom via USB or LoomDirect 2 Go to Network tab in AVLDrive 3 Click Enable Router Connection 4 Select your network from the dropdown list and enter the password for your router 5 Click the Restart Network button 6 Unplug the USB or disconnec...

Page 17: ...ter 8 Connect your device laptop tablet phone to the same WiFi network you connected the loom to 9 You can refresh your browser 10 When the device is connected the COM Light will come on The COM light indicates only that a device is connected 11 Once you establish the router connection you won t have to go through this process again You can shut down your loom and you ll be able to turn the loom o...

Page 18: ...oftware is a default part of a Mac computer There is no similar software for Android If are using an Android device or you prefer not to install the software on your Windows computer you can continue to use the IP address to access AVLDrive Bonjour Print Services for Windows lets you access AVLDrive via your web browser using your loom name as the URL Example http loom name local This service need...

Page 19: ...d at either the top or bottom of the screen Once the download is complete you may be able to click on the notification to open and install the software 3 Navigate to the correct folder 4 Open the downloaded file to initiate the install wizard Add Loom Name Naming your loom is an important step that will make it easy to access your loom via WiFi from any device ...

Page 20: ...piece of text with no spaces If a space is added to the name the URL will only be the letters before the space even though the Loom Name shows the complete name with the space GOOD EXAMPLES myloom my_loom my loom BAD EXAMPLES my loom loom would only show up as my Note If you ever forget the name of your loom you can always connect with the IP address 1 Once you have AVLDrive open select the Option...

Page 21: ...nd the COM Light will light up once communication is established with the loom You can now use this URL to access AVLDrive via USB router and LoomDirect LOSS OF COMMUNICATION If the loom and the software does not seem to be communicating correctly reload the AVLDrive page 1 Reload the AVLDrive page by pressing Ctrl R Windows or Cmd R Mac You can also click the reload icon on your browser LOGOUT US...

Page 22: ... above offers direct access to AVLDrive for your loom with Compu Dobby 5 The loom control function in Weavepoint will open the software and upload the pattern you have open in Weavepoint Note Weavepoint is a Windows based program If you want to activate AVLDrive directly from Weavepoint you will need to use a Windows based device AVLDrive only works with WIF files When a file is opened in AVLDrive...

Page 23: ...oosing Compu Dobby 5 will launch AVLDrive with the pattern you have open If this is selected there will be no other options you can choose in Weave Options window Connect to Loom 1 Have the pattern you want to weave with open You can use WeavePoint files or WIF files 2 Select Loom Control on the Weave menu ...

Page 24: ...IP Address or the Loom Name for the Compu Dobby 5 5 If you have a pattern open in WeavePoint the pattern name will display here 6 Select Replace any existing pattern with same name if you want to overwrite a pattern already on the loom with the same name 7 If Start loom control with this pattern is checked the pattern will open in the loom control so that it is ready for you to weave with 8 Click ...

Page 25: ...Compu Dobby 5 User s Manual Weaving with the Compu Dobby 5 Using Weavepoint Page 23 WEAVING WITH THE COMPU DOBBY 5 ...

Page 26: ... available on the K series loom When you power on the loom using the software the loom will go through a solenoid self test Once the self test is complete you will be able to continue using the software The software allows you to make changes to the loom as you weave including the pick to be woven If the shed is closed the changes will be made immediately as the button is pressed in the software I...

Page 27: ...the loom using the software the loom will go through a solenoid self test Once the self test is complete you will be able to continue using the software Note If you open a file for weaving see page 24 when the loom is powered off the loom will automatically power on The Power button is used to turn weaving mode on off It is not used to completely Shutdown the loom Shutting down the loom is done th...

Page 28: ...nterface will turn briefly yellow then red 3 Once the loom has completed its self test you will be able to commence weaving RESUME A WEAVING SESSION 1 Connect to the loom as described previously The software defaults to the File tab For complete information on the Files tab including how to import files see page 38 2 Click the file that was last being used to resume the session 3 Click Open for We...

Page 29: ... be able to switch to it at any point by clicking the Tabby button on the Weaving tab For information on how to setup new tabbies please see page 47 When selected the tabby will begin with pick A The tabby defaults include both Odds and Evens and Evens and Odds Choose the best option depending on the last pick before the tabby section 1 Open the Tabby Tab by clicking on the name The tabby will onl...

Page 30: ...pre defined tabby The pattern showing on the weaving tab will change to plain weave and the button will have a checkmark The tabby will begin with pick A which is the top pick shown on the Tabby tab Note If the pattern that is showing is not plain weave you may have chosen the wrong tabby Return to the tabby tab and change the tabby ...

Page 31: ... the weaving pattern This allows you to automatically reverse the weaving order of the WIF 2 The button will have a checkmark Click the button again to return to the original pattern SET THE RANGE The default range for the WIF is from the first to last pick If you do not want to weave the whole pattern enter the range of picks you want to use Once you reach the end of the range the range will repe...

Page 32: ...ll section from a longer pattern to help create a set of differing sized items for example a table runner and napkins 1 In the Set Range Area click Set Range 2 The Set Range window appears 3 Enter the Start and End Picks Click Apply The following examples show the full pattern then 1 10 and then 1 15 were set as the range for the same WIF file Each pattern appears slightly different ...

Page 33: ...Compu Dobby 5 User s Manual Weaving with the Compu Dobby 5 Set the Range Page 31 ...

Page 34: ...g will be damaged The Unweave button is used when you need to remove some of your weft threads When you press down the treadle the shed will open the picks in the reverse order that you wove Once you have unwoven the desired amount adjust the tension on your loom by rewinding any loose warp and adjusting the woven cloth so that the fell line is in the correct position 1 Unwind some of your woven c...

Page 35: ...the shed is closed the solenoids will fire to adjust the pick The display will be adjusted to show the changes Changing the pick with the arrow keys is the fastest way to step through the design When a range is set the pick will wrap around when the value would stray outside the bounds set by the range When opening the last file you used most versions of the Compu Dobby 5 software will ask you if ...

Page 36: ...d to increase the pick by one Press the left arrow on the keyboard to decrease the pick by one Set the Pick 1 In the Pick area click Set Pick 2 The Set Pick window appears 3 Enter the pick you want to start with and click Apply ZOOM IN ON THE WIF You can zoom in on the WIF in order to see it in more detail You can zoom out on the WIF in order to see more of it 1 Click the or zoom buttons until you...

Page 37: ...Compu Dobby 5 User s Manual Weaving with the Compu Dobby 5 Zoom in on the WIF Page 35 The following examples show a weaving tab that is zoomed out and then one that shows it zoomed in ...

Page 38: ...5 Compu Dobby 5 User s Manual Page 36 Power Off POWER OFF 1 When you are done weaving click Power to return the loom to its normal standby state If you are going to turn off power to the loom shutdown the loom through the software ...

Page 39: ...Compu Dobby 5 User s Manual Other Tabs Power Off Page 37 OTHER TABS ...

Page 40: ... files are stored directly on the loom From the files tab you can open WIF files that have been stored on the loom You can also upload files from your computer to the loom for use Note If no file is selected only Transfer to Loom and Open Upload to Loom and Backup to Local Machine will be available Button What it does Transfer to Loom and Open Transfer a file from local storage to the loom and ope...

Page 41: ...rom Loom For future use Backup to Local Machine For future use Transfer to Loom and Open This option allows you to find WIF files on your computer and transfer them to the loom storage system for use The file will be transferred to and also opened in the Weaving tab for use 1 Click Transfer to Loom and Open The standard open file window for your device will appear This screenshot is from a Windows...

Page 42: ... Loom This option will transfer the WIF file to the loom for use in the future but it will not be opened in the Weaving tab 1 Click Upload to Loom The standard open file window for your device will appear This screenshot is from a Windows computer 2 Navigate to the folder where you have stored the WIF file you want to use 3 Choose the desired WIF file from the folder by clicking on it 4 Click Open...

Page 43: ...uncheck the box Note Use metric cm for advance and Enable Cloth Beam Advance will only be available if your loom supports the automatic cloth beam advance As of the publication of this manual only the K series loom supports Cloth Beam Advance Loom Name The name of your loom Changing the name will change the address you need to type to access your loom See page 15 for complete instructions ...

Page 44: ... Dobby 5 User s Manual Page 42 Options Tab History Percent Move the percentage bar to indicate how much of the screen should be devoted to history The following examples show a screen with more history and less history ...

Page 45: ...ber in the software The Repeats number will indicate the number of times the range has been repeated If the repeat includes picks 1 8 when the 8th pick is beaten Repeats will show 1 when the 16th pick is beaten Repeats will show 2 The following examples show the screen with the repeat counter on and with it off ...

Page 46: ...Other Tabs Compu Dobby 5 User s Manual Page 44 Options Tab Show color bar The color bar to the right of the draft will appear The following examples show the color bar on and the color bar off ...

Page 47: ...s Options Tab Page 45 Show drawdown in color Allows you to view the WIF in color This can be helpful when the design has the same color warp and weft The following examples show the WIF in color and the WIF with the color option turned off ...

Page 48: ...rn this option off This is also what will appear if the file is zoomed too far out to show legible numbers The examples for the color drawdown on the previous page show harness numbers Fabric scrolls down If selected the fabric will scroll down on the screen as you weave if not the fabric will scroll up The following example shows this option turned on The other screenshots in this manual show the...

Page 49: ...you can add a new tabby You can also edit delete or rename existing tabbies 1 With the AVLDrive software open click Tabby 2 To select a tabby choose it from the drop down menu The tabby that appears in the tab is the one that will be selected when the Tabby button is clicked on the Weaving tab Add a Tabby Once you have added a new tabby you will need to edit so that the correct harnesses rise on e...

Page 50: ... Tabs Compu Dobby 5 User s Manual Page 48 Tabby Tab 2 Enter the name of the Tabby 3 Click OK Edit a Tabby 1 Choose the Tabby from the drop down list 2 Click Edit The background color of the tabby will change ...

Page 51: ...ck A is the starting pick when Tabby is chosen on the weaving tab 4 When you are done click Edit again Delete a Tabby Note The Default tabby cannot be deleted 1 Choose the Tabby from the drop down list 2 Click Delete 3 Click OK at the confirmation window Rename a Tabby Note The Default tabby cannot be renamed 1 Choose a Tabby from the drop down list 2 Click Rename ...

Page 52: ...he tabby in the drop down menu you change the tabby that will be used by the loom when you click Tabby on the Weaving tab 1 Open the Tabby Tab by clicking on the name The tabby will only show the number of shafts available on your loom 2 From the drop down menu choose the tabby to use with your threading Several defaults are available ...

Page 53: ...ts configuration information for your software The loom must be connected to the internet Only click this when told to by AVL personnel Show Log Displays a log of software events This window can be selected and copied to send to AVL for diagnostics if necessary If the loom is connected to the internet the information can be sent by email automatically You can also copy the log and paste the inform...

Page 54: ...r Tabs Compu Dobby 5 User s Manual Page 52 Diagnostics DIAGNOSTICS This tab allows you to view information about your solenoids If this information is needed you will be directed to view it by AVL personnel ...

Page 55: ...Compu Dobby 5 User s Manual Additional Functions K Series Loom Diagnostics Page 53 ADDITIONAL FUNCTIONS K SERIES LOOM ...

Page 56: ...ing Easily change the advance setting or manually advance the cloth at any time during weaving by a click of the mouse or a touch of the finger on the touchscreen This system allows very fine repeatable control with a range from hundreds of picks per inch or centimeter to gross movements needed when starting a new warp LOOM SELF TESTS When you power on the loom using the software the K series loom...

Page 57: ... page 24 when the loom is powered off the loom will automatically power on 3 Click Power to boot up the loom 4 The loom will begin its self tests At the same time the button will gain a checkmark and the Power light on the interface will turn briefly yellow then red 5 Click the free warp tension button 6 The button will turn red to indicate it is activated Click the button again to turn it off ...

Page 58: ...5 Set the PPI The default for the cloth advance is picks per inch but you can change inches to centimeters in the options tab See page 62 for instructions on changing to centimeters It s important to note that PPI can be affected by types of yarn and the sett so please use the PPI as indicated in the Cloth Advance Box as a starting point and understand that numbers may need to be adjusted to get t...

Page 59: ... the beater arms hit the bumpers and the fell line is at the reed 3 In the software go to the Cloth Advance area 4 Use the up arrow to advance the warp Click the arrow until the warp has advanced as far as you want it SET WARP TENSION You can set the tension by entering a number in the field or by using the up and down arrows on the field The default tension is set at 55 When the loom is powered o...

Page 60: ...hed cloth so that the loom will not be damaged The Unweave button is used when you need to remove some of your weft threads When you press down the treadle the shed will open the picks in the reverse order that you wove The warp beam will move backwards when Unweave is selected Once you have removed the weft back to the desired point you can use the manual advance buttons in the cloth advance sect...

Page 61: ... When the loom is treadled each shed that has been woven will open in reverse order so that you can remove the weft threads 6 Unweave the cloth until you are satisfied 7 Click the button to return to normal functionality 8 Wind any loose warp back on the warp beam Adjust the fell line as needed 9 Place the pin back in the cloth advance beam 10 Adjust the tension on the loom as necessary 11 Resume ...

Page 62: ...he pin easily move the cloth advance beam by using the beater until you see the hole The cloth advance beam will not wind on cloth unless the pin is in the hole 6 If there is any slack in the cloth you can tighten up by using the beater LOCK THE WARP BEAM There is a button that allows you to lock the warp beam in place When the warp beam is locked the cloth advance is automatically disabled This f...

Page 63: ...oth advance 1 Open the software 2 Click the Lock warp beam button 3 Click the button again to turn it off OPTIONS TAB Most of these options are available for all Compu Dobby 5 looms and are covered starting on page 41 The options discussed in this section are only available on the K series loom 1 To activate an option check the box 2 To turn off an option uncheck the box ...

Page 64: ...you to turn on or off the cloth beam advance The cloth beam advance is also turned off if the warp beam is locked This can be used to halt the cloth advance when stepping through the design Use metric cm for advance This option allows you to use the metric system for the cloth advance if available The default is imperial inches ...

Page 65: ...Compu Dobby 5 User s Manual Trouble shooting the Compu Dobby 5 Options Tab Page 63 TROUBLE SHOOTING THE COMPU DOBBY 5 ...

Page 66: ...t after the URL or IP address in your web browser The loom should reboot this clears the log file Note The option to reboot the loom was added in v 1 2 0 If your loom is on a previous version you will need to shutdown the loom completely then turn it back on 2 Wait for the loom to reboot and for the network to reconnect This may take a couple of minutes 3 Reload AVLDrive The reboot will cause the ...

Page 67: ...nual Trouble shooting the Compu Dobby 5 Send Troubleshooting Information to AVL Page 65 7 Click Show Log 8 Select all of the text in the log file 9 Copy the log file and paste into the email Send the email to sales avlusa com ...

Page 68: ......

Page 69: ...Compu Dobby 5 User s Manual Appendix I Additional Information Send Troubleshooting Information to AVL Page 67 APPENDIX I ADDITIONAL INFORMATION ...

Page 70: ...d IP address will need to be used See page 16 for more information about the loom name and IP addresses Choosing an arm The first thing is to choose how you will attach the arm to the loom Many arms attach with a clamp while some will need screw holes in the frame of the loom A clamp is not usually as stable as a more permanent mounting and if you want to be able to move the tablet aside with a qu...

Page 71: ... happens automatically with computers but because of the difference in the way connections are handled by tablets it becomes a manual step If you forget the next time you attempt to connect to the loom you will probably get a busy message and you can send a logout message at that time 1 When connecting to the loom you receive the message below 2 Enter logout after the URL or IP address in your web...

Page 72: ...e 70 Compu Dobby 5 Connection Information COMPU DOBBY 5 CONNECTION INFORMATION The Compu Dobby 5 uses a connection known as http which your browser may indicate is unsafe Since no personal information is passed over the connection additional security is not required ...

Page 73: ...Compu Dobby 5 User s Manual The Fine Print Compu Dobby 5 Connection Information Page 71 THE FINE PRINT ...

Page 74: ...orm according to AVL s specifications Any repair during the Original Warranty Period will be carried out without charge to you for parts except applicable taxes if any You will be responsible for all labor in connection with installation of the parts and service upon the Product as well as the cost of shipping involved New Accessories Loom Upgrade Parts and Replacement Parts Subject to the limitat...

Page 75: ...al Assistant or a Personal Computer which are manufactured by a third party ies and which may be under warranty through the original manufacturer AVL is not responsible for any warranty coverage that may be offered concerning these products and you must contact those manufacturers directly regarding any available warranty coverage The performance or functionality of any software that is sold eithe...

Reviews:

Related manuals for Compu-Dobby 5