


47
Software continued…
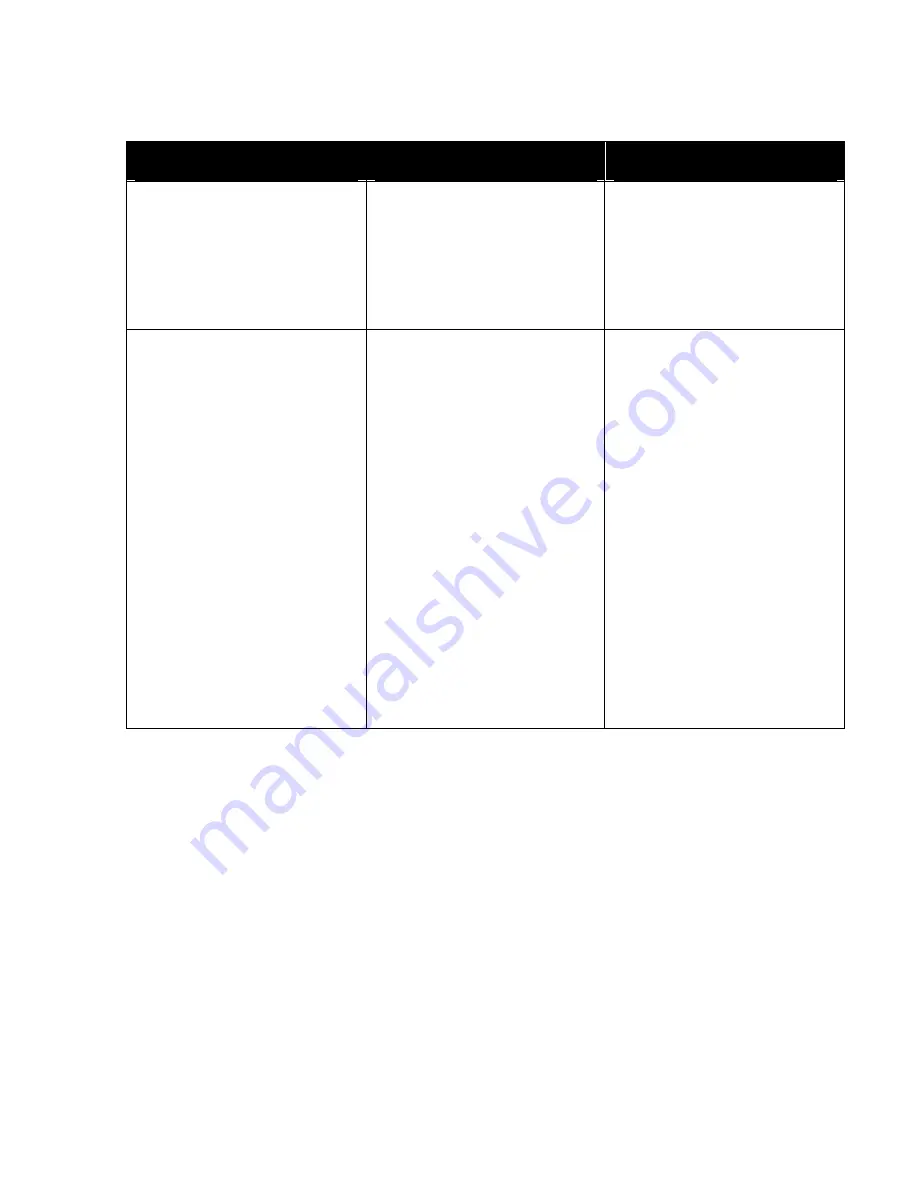
ERROR MESSAGE
PROBLEM
SOLUTION
New Fields missing from layout
screen. Continued…
Fields not visible in blotter area
on Layout Screen.
Right click on one of the fields
that has already been positioned
and click OK on the field property
sheet an they should re-appear
Right click on one of the fields
that has already been positioned
and click OK on the field property
sheet an they should re-appear
Printing in Wrong Location on the
mailing piece.
Printing too far to the Left or
Right.
Make sure that the size of the
mailing piece entered in the
Setup Menu is correct.
Make sure that the mailing piece
on the Layout Screen looks
EXACTLY the way you want your
piece to look. Use the rulers to
verify that the fields are located
the proper number of inches form
the edges.
Adjust the left margin setting.
Check the product detection
sensor to verify that it is properly
aligned.
Printing Too High or Low
Check image on layout screen.
Adjust the paper guide, or
individual printheads on their
mounting brackets to adjust how
far from the bottom edge of a
piece the fields are printed.
Summary of Contents for astrojet II plus
Page 1: ...ASTRO ASTROJET IMAGE BLASTER High Speed Inkjet Printer Installation Operating and Parts Manual...
Page 4: ...ii Notes...
Page 6: ...2 Notes...
Page 18: ...14 Notes...
Page 38: ...34 8 Click Okay and Yes to make structures permanent 9 Exit FoxPro...
Page 46: ...42 Notes...
Page 52: ...48 Notes...
Page 55: ...51 IMAGE BLASTER PARTS LIST...
Page 56: ...52...
Page 58: ...54...
Page 60: ......
Page 61: ...Notes...
Page 62: ...Copyright 2000 Astro Machine Corporation Elk Grove Village Illinois 60007 12 20 2000...


