


24
Click on
File
and select either
Save Template
or
Save Template As…
and the “Save
As” window will appear. You must give the template file a unique name with the
extension “
.AJPJT
” then click
Save
. The Template will be saved in the AstroJet Data
1
Projects folder.
Saving the Job
IMPORTANT:
Before exiting the “Layout Editor” you must create a job so that the data
base and the layout can be
output on your printer. To
do this select,
File
and
then select
New Job
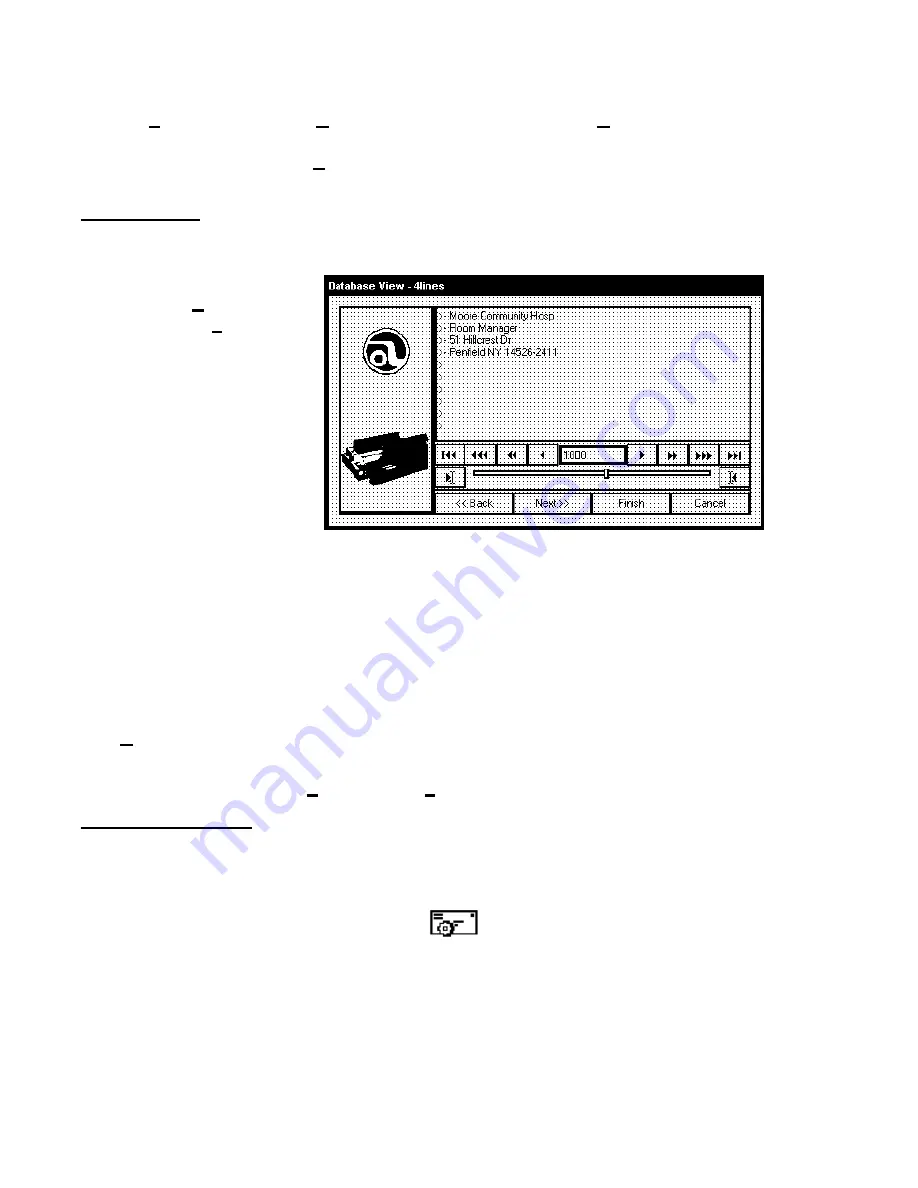
. The
“Layout Wizard – Select
Print Range” window will
appear. Click
Next>>
to
select “Database View –
(database name)“. At this
point, it is possible to
select a specific range of
records to be output. To
set the range select the
starting record that you
wish to use by using the database advance buttons. Click on the left (
4
4
É
) to choose the
starting record. Use the same buttons to step to the last record you wish to print and
click on the right button (
É
3
3
) to set the end of the job.
Selection of specific records to print can be done anytime by following this procedure.
Always save the job to make the range changes permanent.
If you wish to print all of the database records then skip this step and click on
Next>>
.
The “Save As” window will appear. The default is the layout file name is displayed.
Click save to save it or enter a unique name for the job with the “
.AJJOB
” extension and
click
Save
.
The template and the job that have been created are now ready to be printed. Close
the layout window by clicking
File
and then
Exit
.
Running the Job
Before running the job make sure that the AstroJet Printer is turned on and properly
connected to the computer.
There are two ways that a job can be selected to be run. One is from the
AstroJet
Control Panel
button in the “Layout Editor”.
The other is from the “AstroJet
Control Panel” icon on the desktop of the computer.
For the purpose of this tutorial, double click on the “AstroJet Control Panel” icon on the
desktop. The following window will appear:
Summary of Contents for astrojet II plus
Page 1: ...ASTRO ASTROJET IMAGE BLASTER High Speed Inkjet Printer Installation Operating and Parts Manual...
Page 4: ...ii Notes...
Page 6: ...2 Notes...
Page 18: ...14 Notes...
Page 38: ...34 8 Click Okay and Yes to make structures permanent 9 Exit FoxPro...
Page 46: ...42 Notes...
Page 52: ...48 Notes...
Page 55: ...51 IMAGE BLASTER PARTS LIST...
Page 56: ...52...
Page 58: ...54...
Page 60: ......
Page 61: ...Notes...
Page 62: ...Copyright 2000 Astro Machine Corporation Elk Grove Village Illinois 60007 12 20 2000...


