SECTION 2
INSTALLING PRINTER
10
Leveling Printer
It is critical that Printer is level front-to-back and left-to-right (
side-to-side
). Printer will send a
“Tilt”
warning if it is not properly leveled. First make sure that surface you are placing Printer on is flat and
level. Level Printer by adjusting casters using wrench (
included
).
NOTE:
Steps 4 and 5
below are optional if Printer Driver is installed.
To Level Printer:
1.
Open Top Cover.
2.
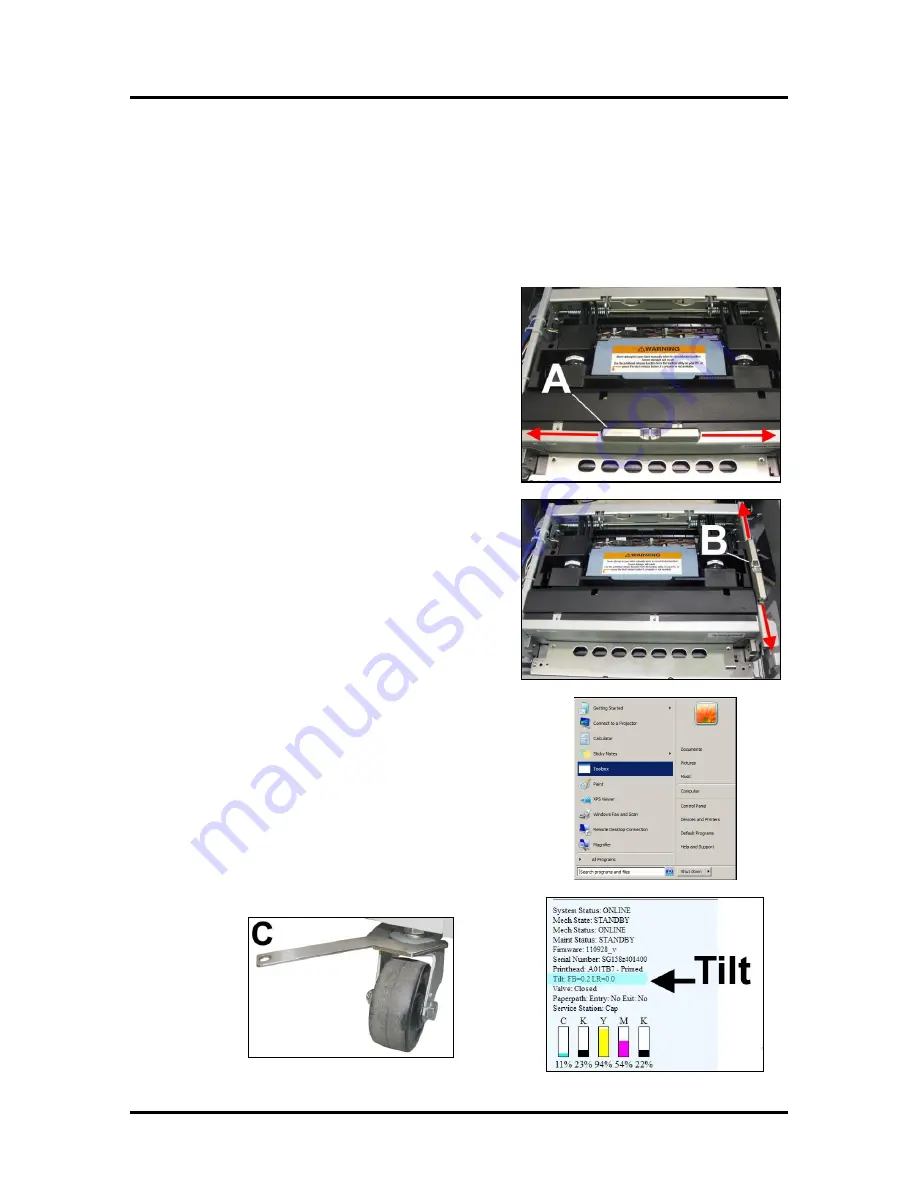
Left to Right (Side-to-Side):
Check Bubble Gauge
on front bridge of Print Engine.
NOTE:
If no
Bubble Gauge is mounted, place a small level (
9" or
smaller
) across front bridge of Print Engine (
as
shown
)
[A]
. (
If level does not fit on front bridge, you
can place level on rear bridge frame on Print
Engine.
) Adjust casters as necessary to level Printer.
(See Step 6) NOTE:
Level(s) must be placed on
Print Engine or Print Engine frame (
not on Printer
Cabinet
) to get an accurate reading.
3.
Front to Back:
Place level on either Print Engine
Side Frame
[B]
. Adjust Printer feet/casters as
necessary to level Printer. See
Step 6
below.
NOTE:
May have to repeat Steps 2 & 3 to
level Printer.
4.
If you have already installed Printer Driver, you can
use
Printer Toolbox
to check if Printer is level both
Left-to-Right and Front-to-Back. Go to
Start Menu
,
then open
“Toolbox”
.
5.
On
User Interface
screen, find
“Tilt”
in status
information in top left corner. Reading for
Front-to-Back
(FB) and Left-to-Right (LR)
should be
“0”
or very close to
zero. If Tilt readings are
black or purple
, Printer is ready to
operate. If readings are
red
, Printer must be leveled again.
NOTE:
Printer will operate if readings are
purple
. This
indicates readings are near zero.
If readings show more
than
±
2 degrees, (
even if Printer operates
) level Printer
again to prevent damage or printing issues!
6.
Adjusting Casters.
Use wrench (
included
) to loosen large
nut on top of caster
[C]
. Adjust caster to desired height, then
tighten nut so it snugs up against bottom of Printer to lock
caster in place.
Summary of Contents for AstroJet M2
Page 6: ......
Page 13: ...SECTION 1 GETTING ACQUAINTED 7 MORE TROUBLESHOOTING GUIDES IN SECTION 5...
Page 88: ...Feed Table Status Light Indicator Chart...
Page 89: ......


