62
Premmia GL Series
Installing a Processor
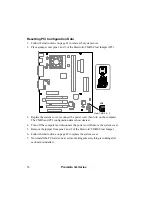
1. Raise the processor socket lever to the vertical open position.
2. Remove the processor from its anti-static package; do not touch the pins on the
underside.
3. The corner of the socket closest to pin 1 is identified with a white triangular pointer
on the motherboard. The corner of the processor closest to pin 1 is clipped. Align
the processor with the socket then lower it into the socket, taking care not to bend
the pins.
4. Rotate the socket lever down until it clicks into the horizontal closed position.
5. Remove any old thermal tape still on the heatsink and apply new thermal tape to the
top of the processor.
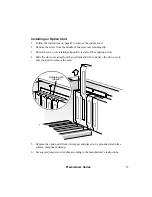
6. With the extended lip of the heatsink toward the back of the socket, center the
heatsink/fan assembly over the processor and lower it. The edges of the heatsink
extend beyond the edges of the processor and socket.
7. Take care in this step to not scrape the motherboard or components with the
retention clip.
Hook the back end of the retention clip over the plastic tab on the back end of the
processor socket.
Lower the front end of the clip over the heatsink and hook it over the plastic tab on
the front of the socket.
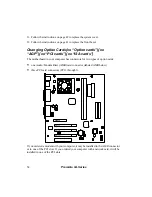
8. Plug the heatsink fan into the connector (FAN2) on the motherboard.
9. Follow the instructions on page 42 to replace the system cover


