42
Premmia GL Series
Removing the System Cover{ XE “System cover” }
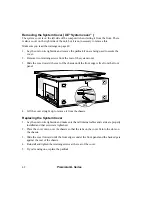
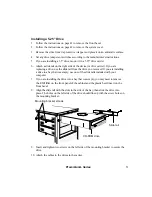
The system cover is on the left side of the computer when viewing it from the front. There
is also a cover on the right side of the unit, but it is not necessary to remove this.
Make sure you read the warnings on page 40.
1. Lay the unit on its right side and remove the padlock if one is being used to secure the
cover.
2. Remove two retaining screws from the rear of the system cover.
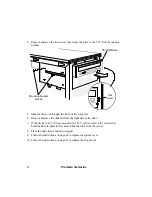
3. Slide the cover toward the rear of the chassis until the front edge is free from the front
panel.
Tab
Slot
4. Lift the cover straight up to remove it from the chassis.
Replacing the System Cover
1. Lay the unit on its right side and make sure that all internal cables and cards are properly
installed and that screws are tightened.
2. Place the cover down over the chassis so that the tabs on the cover fit into the slots on
the chassis.
3. Slide the cover forward until the front edge is under the front panel and the back edge is
against the rear of the chassis.
4. Reinstall and tighten the retaining screws at the rear of the cover.
5. If you’re using one, replace the padlock.


