background image

F)

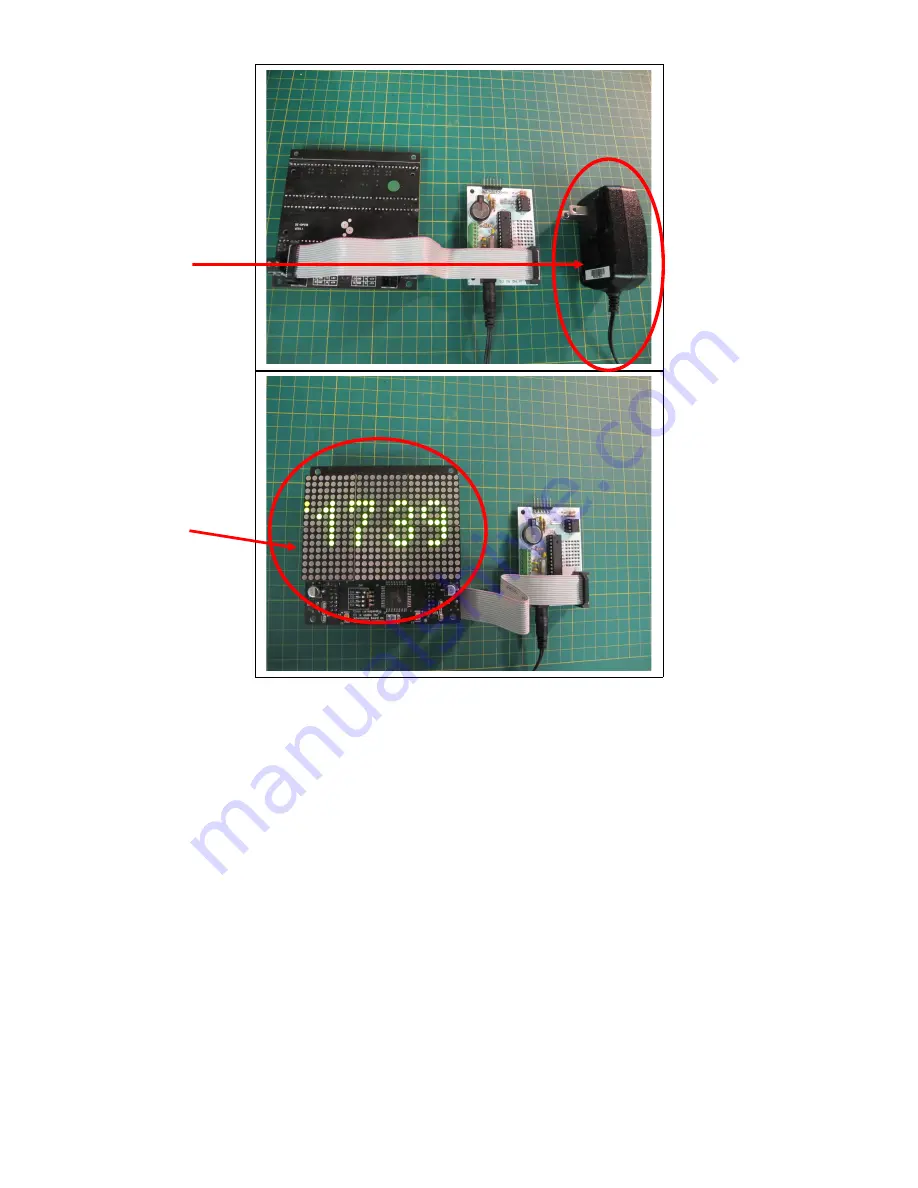
 Once you’ve ensured your screen works properly, you can unhook the power 

supply and remove the ribbon cable from the PCB. You should then use the 
white zip tie to bundle one loop of excess ribbon cable. 

20

Plug the power 

supply into the 

board and plug the 

supply into the wall

The display will 

show a simple 

time animation 

with hours and 

minutes

Summary of Contents for DOTKLOK

Page 1: ...ldering iron solder wire strippers flush cutters wire nippers diagonal cutters multi bit screwdriver small needle nose pliers Optional tools materials helping hands solder fan defumer multi meter solder sucker vacuum solder wick lint free microfiber cloth PART I PCB ASSEMBLY Your final PCB will look like this once fully assembled 1 ...

Page 2: ... extras have been provided TIP the foam housing for the LED screen makes for a handy parts tray while assembling DOTKLOK If your PCB is labeled DOTKLOK 1 1 you will need to solder a wire across the JP1 pads in order for the board to work with the power supply included with your kit Although a specific wire has not been included for soldering this jumper you can can use one of the cut off leads fro...

Page 3: ...pins facing out from PCB 2 Solder SK2 small 8 pin chip holder at IC2 and SK1 large 28 pin chip holder at IC1 matching the notch of the chip holder with the notch on the PCB diagram 3 Note notches circled must match by facing left Note long pins facing out from PCB ...

Page 4: ...components in board during soldering once soldered trim excess leads from back of PCB 4 SK2 small 8 pin chip holder at IC2 Note notch dotted circle faces left Bent leads best hold components in while soldering Excess leads should then be trimmed SK1 large 28 pin chip holder at IC1 Note notch dotted circle faces left ...

Page 5: ... polarity colour bands brown black orange and C5 0 1uF capacitor with long leads no polarity marked 104 trim excess leads from back of PCB 5 Q1 16Mhz crystal with C1 and C2 22pF capacitors R3 10k resistor and C5 0 1 uF capacitor ...

Page 6: ... red and C3 0 1uF capacitor with long leads no polarity trim excess leads from back of PCB 6 Solder R4 and R5 2 2k resistors no polarity colour bands red red red trim excess leads from back of PCB 6 R1 and R2 1k resistors and C3 0 1 uF capacitor R4 and R5 2 2k resistors ...

Page 7: ...connector Openings MUST face outer edge of PCB 7 CR1220 coin cell holder Note square edge points left X1 10 position screw connector opening MUST be placed so open part faces outer edge of PCB as shown in the red circle The connector should NOT be placed with the closed end facing the outer edge as shown in the crossed out picture FAIL ...

Page 8: ... pad Note the negative side of the cap is marked with a silver grey stripe trim excess leads from back of PCB 8 X1 10 position screw connector Note open part faces outer edge of PCB C4 10uF capacitor is polarized Longer positive lead is marked by the black side shorter negative lead is marked by the grey side ...

Page 9: ...leads MUST face upright coming up from top of board Ensure headers are soldered so they are straight and upright You do not want them to be crooked 9 C4 10uF capacitor longer positive lead marked by the black side MUST go into the square left pad on the board Short leads MUST go into the board for soldering ...

Page 10: ... leads from back of PCB Then gently bend crystal down against PCB to match diagram on PCB 10 As best as possible ensure headers are soldered so they are straight and upright You do not want them to be crooked Push the Q2 32 768 kHz crystal ONLY down into the board so that half of the leads can be seen from the top of the board ...

Page 11: ... in the board Solder the leads to the edge of the circular holes It is not necessary to fill in the entire hole 11 Once the crystal is soldered in the board bend the crystal down against the PCB so it covers the diagram on the PCB Place CN1 power jack into three round holes on PCB note these holes are not labeled on board Silver power jack must face out from board ...

Page 12: ...12 Solder the leads to the edge of the circular holes note the solder does not need to fill the hole a decent solder connection just needs to be made Note how opening is facing out from board ...

Page 13: ... chip holder Ensure notch on chip lines up with notch on chip holder Make sure all pins are aligned Note chip pins may need to be slightly bent with pliers to ease insertion Then gently press into place 13 Note these breakout pins have intentionally been left empty so you can use your creativity to add sensors extra buttons buzzers etc to your DOTKLOK Note notch on chip ...

Page 14: ...d to be slightly bent with pliers to ease insertion Gently press chip into place 14 Notch on chip must align with notch on chip holder Make sure all pins are aligned before gently pressing the chip into place Notch on chip must align with notch on chip holder Make sure all pins are aligned before gently pressing the pin into place Note notch on chip ...

Page 15: ...oin cell into coin cell holder CR1220 by slipping under metal tab The side must face upward when placed into coin cell holder 15 Note writing or side of coin cell must face upward when placed in coin cell holder ...

Page 16: ... connections If you find any solder bridges they are easily removed with the soldering iron though sometimes a solderer sucker vacuum or solder wick may be needed to remove larger amounts of excess solder If you have a multi meter now would be a good time to ensure there isn t a short between power 5V and ground GND You can test for continuity or resistance across the 5V and GND pads of the protot...

Page 17: ...e chips and selector switch on the same side of the board as the LEDs The steps for the new Sure screens are in section III 2B A With the screen facing right side up so the LEDs are showing ensure CS1 pin 1 of SW1 on the screen is flipped to the right on position and pins 2 3 and 4 are all flush left 17 Test for continuity or resistance across the 5V and GND pads of the prototyping area Ensure CS1...

Page 18: ...ector pins are facing downward and the red side of ribbon cable is at the top Then insert the notched connector into the left socket BR2 of the screen 18 Screen placed face down so solder connections and electrical sockets show Connector pins must face downward with the red side of ribbon cable at the top The notched connector goes into the left socket BR2 of the screen ...

Page 19: ...hed for setting the time or switching the animations once you plug the power supply into the board and plug the supply into the wall the display should show a simple time animation with hours and minutes The DOTKLOK may take a few seconds to start up this is normal A note about the power supply only use a 5V supply as included with your kit input voltages greater than 5V WILL DAMAGE the board 19 T...

Page 20: ...er supply and remove the ribbon cable from the PCB You should then use the white zip tie to bundle one loop of excess ribbon cable 20 Plug the power supply into the board and plug the supply into the wall The display will show a simple time animation with hours and minutes ...

Page 21: ... side of the board as the LEDs A With the screen facing down so the LEDs are not showing ensure CS1 pin 1 of SW1 on the screen is flipped to the up on position and pins 2 3 and 4 are all flush down 21 Bundle one loop of excess ribbon cable with the zip tie provided Ensure CS1 pin 1 of SW1 on the screen is flipped to the up on position and pins 2 3 4 are all flush down ...

Page 22: ...2 text on the PCB Also make sure all the connector holes align with the header pins The red edge of the ribbon cable should be closest to the prototyping area of the PCB D You re now ready to power the screen up for testing Although the buttons are not yet attached for setting the time or switching the animations once you plug the power supply into the board and plug the supply into the wall the d...

Page 23: ...e a 5V supply as included with your kit input voltages greater than 5V WILL DAMAGE the board E Once you ve ensured your screen works properly you can unhook the power supply and remove the ribbon cable from the PCB 23 Plug the power supply into the board and plug the supply into the wall The display will show a simple time animation with hours and minutes ...

Page 24: ...ed to notch out the top holes of the screen This is done carefully with sharp wire nippers or a small saw Due to a manufacturing discrepancy this only needs to be done w the new Sure screens which have the chips on the back of the panel opposite the LED side 24 Notch the top two holes of the display using sharp wire nippers or a small saw ...

Page 25: ...t ends of each wire by applying a small amount of solder to each split end while optional this will aid with assembly in later steps 3 Insert the split ends of each 8 wire in the two holes located on the metal prongs of a button B1 B4 no polarity solder the wire to the button Repeat for the two 7 wires Trim the excess wire 25 Split the ends of each of the wires into two halves Then strip a bit of ...

Page 26: ... first two wholes on top the left Note the top is marked by the CSA logo 26 Insert the split ends of the wire into the holes on the button solder the connection Solder the 3 wire so the wire is placed in the first two wholes on top the left Note the top is marked by the CSA logo ...

Page 27: ...PART V ASSEMBLING THE KLOK For this section please refer to these DOTKLOK panel diagrams for hole identification 27 ...

Page 28: ...not showing Place spacers S2 onto each screw 4 Place the PCB on top of the spacers so that HDR1 on the PCB points to the top away from the square slot at the bottom left Then secure each screw with a 4 40 nut N1 Tighten snuggly without over tightening 28 Insert each inch screw MS3 through the top of the back panel text side showing into the holes labeled C the screw head should be face up Flip the...

Page 29: ...g Place B5 sliding switch onto the screws The switch should be placed so the pins are showing and the wire is at the top right corner Then flip the panel back over and secure each screw with a 2 56 nut N2 Tighten snuggly without over tightening 29 Note HDR1 on the PCB points to the top Note B5 sliding switch should be placed so pins are showing and the wire is at the top right corner ...

Page 30: ... X1 Tighten the connector screws with a screw driver and make sure the wires are secured in the connector 8 Find the two buttons with 8 wires and remove the black plastic nut from each button 30 Insert one side of the split wire into the first top slot and the second wire into the second next closest to top slot of the green screw terminal connector Remove the black plastic nut from each button by...

Page 31: ...the buttons with the black plastic nut by placing the serrated edge of the nut against the acrylic panel 11 Arrange the top and bottom panels so they are placed beside each other Such that the top of each panel faces out the buttons with the longer 8 wires are at the top of the photo below 12 Connect the B2 wires no polarity to the next two openings closest to the left right beside the B5 connecti...

Page 32: ...ires in the green screw terminal connector X1 Tighten the connector screws with a screw driver and ensure the wires are secure 32 Connect the B2 wires to the left most openings in the green screw terminal connector Connect the B1 wires to the next left most openings in the green screw terminal connector ...

Page 33: ...he last two right most openings in the green screw terminal connector X1 Tighten the connector screws with a screw driver and ensure the wires are secure 16 Now is a good time to take a lint free cloth and remove any unwanted finger prints or dust 33 Connect the B4 wires to the next left most openings in the green screw terminal connector note how wire is routed under the PCB Connect the B3 wires ...

Page 34: ...loose end of the ribbon cable to the PCB ensuring the bump on the black connector is aligned with the HDR2 text on the PCB In this orientation the red edge of the ribbon cable will be closest to the prototyping area 34 Place each 1 5 screw into the holes labeled D then place each 1 spacer followed by each 0 125 spacer onto each screw Connect the loose end of the ribbon cable to the PCB ensuring th...

Page 35: ...rea 19 Place the screen on top of the D spacers and screws ensuring the button wires are routed through the sides as opposed to the bottom of the screen Route place the ribbon cable such that it does not block the power jack CN1 35 Place the screen on top of the spacers note the wires are routed through the sides not bottom of the screen Connect the loose end of the ribbon cable to the PCB ensurin...

Page 36: ...the screen down gently yet firmly 21 Place the silver 3 8 screws MS2 through the back panel text side showing holes labeled A Then on the no text component side of the back panel attach each 2 S1 standoff 36 Secure each screw with the 4 40 nuts Place the silver 3 8 screws MS2 into the back panel holes labeled A then attach each 2 standoff ...

Page 37: ...s MS5 through the front panel DOTKLOK text showing holes labeled A 23 Tighten the front and back screws in the holes labeled A with a screwdriver Then tighten the nuts that hold the screen on 37 Place the black 3 8 screws into the front panel holes labeled A Tighten the nuts and screws ...

Page 38: ...our labor Congratulations on assembling your DOTKLOK Show off a photo of your newly assembled DOTKLOK at www facebook com dotklok Support is available at the DOTKLOK forum www technoetc net dotklok forum Thanks again for your DOTKLOK purchase Etsy feedback would be greatly appreciated Andrew O Malley www aomalley org 38 Insert the power jack to the connector located on the bottom of the PCB to the...

Reviews: