32
-EN
Playing MP3 Files with the CD Changer
(Optional)
If you connect a changer compatible with MP3, you can play CD-
ROMs, CD-Rs, and CD-RWs containing MP3 files on this unit.
1
Press
SOURCE/POWER
to switch to the MP3
Changer mode.
2
Press
FUNC.
to activate the direct disc recall
mode.
Source selection mode
↔
Audio function mode
↔
Direct disc
recall mode
↔
Source selection mode
3
Select a disc (1 to 6) by touching the
GlideTouch
bar
and sliding your finger to the left or right.
Press the
GlideTouch bar
under the desired disc.
4
To pause playback, press
-
/
J
.
Pressing
-
/
J
again will resume playback.
• The unit can play discs containing both audio data and MP3 data.
• For operating MP3 with an MP3 compatible CD Changer, refer to
“CD/MP3/WMA” pages 10 to 14.
Multi-Changer Selection (Optional)
Alpine's Ai-NET system will support up to 6 CD Changers. When
operating two or more changers, the KCA-400C (Multi-Changer
Switching device) must be used. If you use 1 Switching device, you
can connect up to 4 CD Changers. If you use 2 Switching devices,
you can connect up to 6 CD Changers. When using KCA-410C
(Versatile Link Terminal), you can connect two changers and two
external outputs (AUX).
1
Press
SOURCE/POWER
on this unit to activate
the CD Changer mode.
Alternatively, press
SOURCE
on the remote control (RUE-
4202) to activate the CD Changer mode.
2
Press
BAND
on this unit or the RUE-4202 to
activate the CD Changer Selection mode.
The CD Changer Selection mode remains active for a few
seconds.
3
Press
BAND
until the desired CD Changer
indicator appears on the display.
Alternatively press
BAND
on the Remote Control until the
desired changer indicator appears on the display.
• If the selected CD Changer is not connected, the display will show
“NO CHGR.”
• To operate the selected changer, see “CD/MP3/WMA” (page 10).
• For further details about the external input (AUX) when using
KCA-410C, see “Setting the AUX Mode (V-Link)” on page 27.
BAND
SOURCE
Remote Control
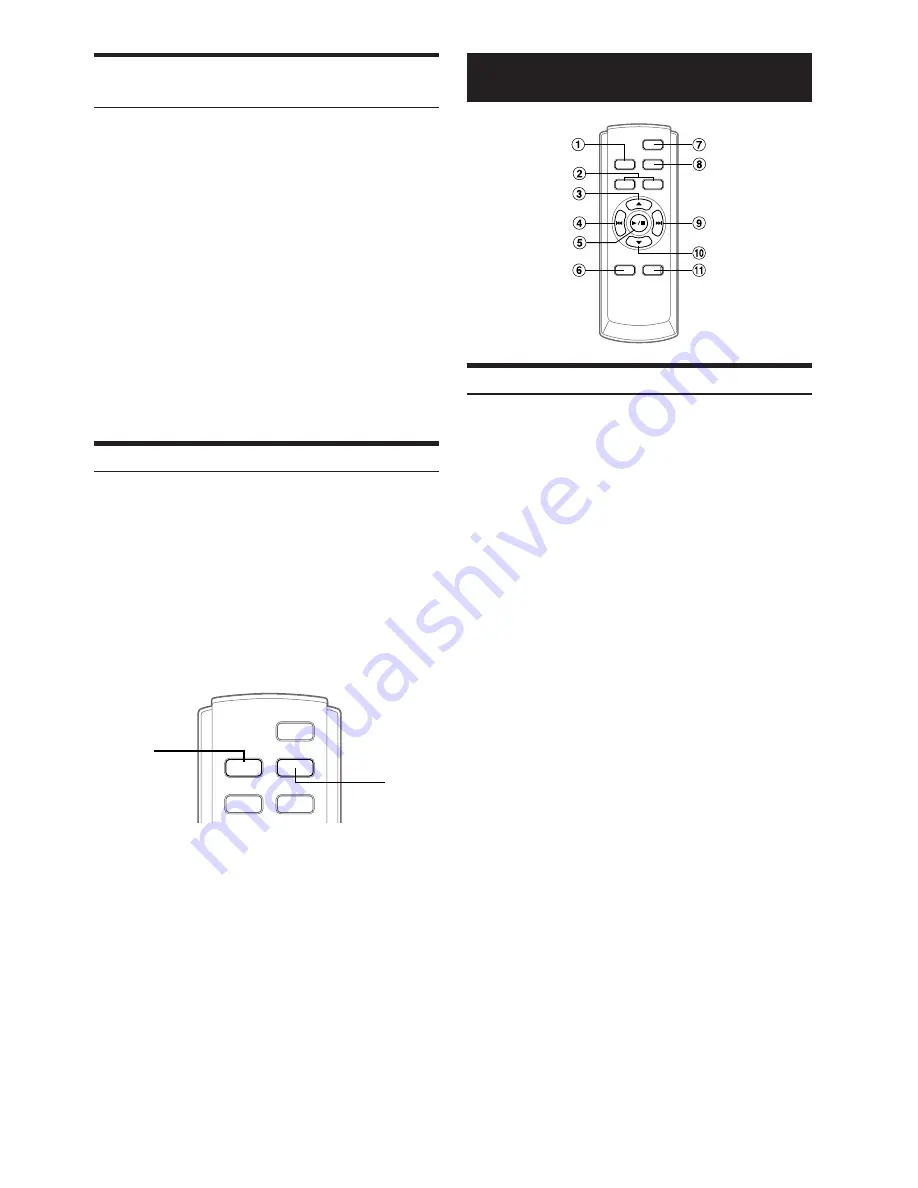
Controls on Remote Control
1
Source Button
Press this button to select the audio source.
2
Volume Adjustment Buttons
To increase the volume level:
Press the
L
button
To decrease the volume level:
Press the
K
button
3
8
Button
Radio mode: Pressing this button will select, in ascending
order, stations programmed into the radio's presets as
shown below.
1
→
2
...
6
→
1
CD Changer mode: DISC Select (UP) button
Press this button to select a disc in ascending order.
MP3/WMA mode: Folder Select (UP) button. Press this
button to select the folder.
MP3 compatible CD changer mode:
Folder Select (UP) / DISC Select (UP) button
Press this button to select a folder in ascending order.
Press and hold this button to select a disc in ascending
order.
4
g
DN Button
Radio mode: SEEK (DN) Button
CD mode: Press this button to go back to the beginning of
the current track.
5
-
/
J
Button
Press this button to switch between the Play and Pause
modes for CD.
6
Audio Processor Button
Each press of the button changes the audio processor
mode.
For details, refer to “Operating the Audio Processor” as
shown below.
Press the button to call the external audio processor
mode when the external audio processor is connected.
*
1
7
Power Button
Press this button to turn the power on/off.


