background image

Front AlienFX LED boards

Removing the front AlienFX LED board

Prerequisites
1. 
Follow the procedure in 

Before working inside your computer

.

2. Remove the 

left-side cover

.

3. Remove the 

right-side cover

.

4. Remove the 

top-cover

.

5. Remove the 

front bezel

.

About this task
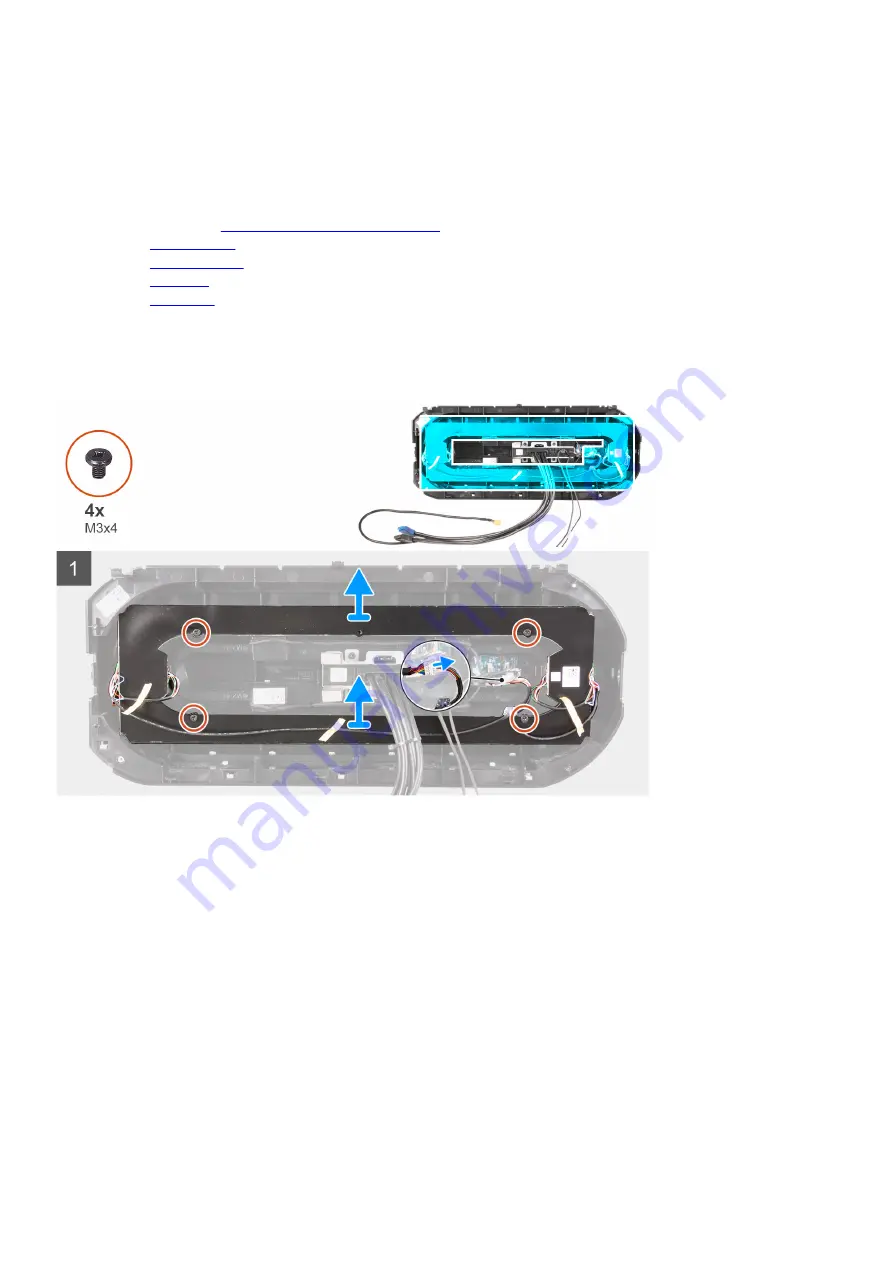
The following images indicate the location of the front AlienFX LED board and provides a visual representation of the removal

procedure.

Steps
1. 
Disconnect the AlienFX LED board cable from a Y-cable.
2. Remove the four screws (M3x4) that secure the AlienFX LED board to the front bezel.
3. Lift the AlienFX LED board off the front bezel.

Installing the front AlienFX LED board

Prerequisites
If you are replacing a component, remove the existing component before performing the installation procedure.

About this task
The following images indicate the location of the front AlienFX LED board and provides a visual representation of the installation

procedure.

86

Summary of Contents for Aurora R11

Page 1: ...Alienware Aurora R11 Service Manual Regulatory Model D23M Regulatory Type D23M002...

Page 2: ...age to hardware or loss of data and tells you how to avoid the problem WARNING A WARNING indicates a potential for property damage personal injury or death 2020 Dell Inc or its subsidiaries All rights...

Page 3: ...ving the right side cover 15 Installing the right side cover 16 2 5 inch hard drive 18 Removing the 2 5 inch hard drive 18 Installing the 2 5 inch hard drive 19 3 5 inch hard drive 21 Removing the 3 5...

Page 4: ...7 Removing the front bezel 57 Installing the front bezel 60 Top bezel 65 Removing the top bezel 65 Installing the top bezel 66 Bottom cover 67 Removing the bottom cover 67 Installing the bottom cover...

Page 5: ...5 Downloading the graphics driver 95 Downloading the USB driver 96 Downloading the WiFi driver 96 Downloading the media card reader driver 97 Downloading the chipset driver 97 Downloading the network...

Page 6: ...riodically touch an unpainted metal surface to dissipate static electricity which could harm internal components CAUTION When you disconnect a cable pull on its connector or on its pull tab not on the...

Page 7: ...is dissipative and parts can be placed on it during service procedures When using an anti static mat your wrist strap should be snug and the bonding wire should be connected to the mat and to any bare...

Page 8: ...ponents Transporting sensitive components When transporting ESD sensitive components such as replacement parts or parts to be returned to Dell it is critical to place these parts in anti static bags f...

Page 9: ...ts Inside view of your computer 1 power supply unit 2 2 5 inch hard drive 3 2 5 inch hard drive cage 4 graphics card 5 system board 6 VR heat sink 7 processor fan and liquid cooling assembly 8 top cov...

Page 10: ...15 PCI Express x16 mechanical x8 electrical slot SLOT4 16 PCI Express x4 slot SLOT3 17 PCI Express x4 slot SLOT2 18 PCI Express x16 mechanical x8 electrical slot PCIe Gen4 SLOT1 19 processor cooling a...

Page 11: ...d Table 1 Screw list Component Secured to Screw type Quantity Screw image Side panel release latch Chassis 6 32x12 7L 1 2 5 inch hard drive cage Chassis 6 32 2 3 5 inch hard drive cage Chassis 6 32 2...

Page 12: ...ocedure Steps 1 Remove the screw 6 32x12 7L that secures the side cover release latch to the chassis 2 Pull the side cover release latch to release the left side cover away from the chassis 3 Lift the...

Page 13: ...e side cover release latch to the chassis Next steps 1 Follow the procedure in After working inside your computer Top cover Removing the top cover Prerequisites 1 Follow the procedure in Before workin...

Page 14: ...nd may requires force to remove it off the chassis Installing the top cover Prerequisites If you are replacing a component remove the existing component before performing the installation procedure Ab...

Page 15: ...re in After working inside your computer Right side cover Removing the right side cover Prerequisites 1 Follow the procedure in Before working inside your computer 2 Remove the left side cover 3 Remov...

Page 16: ...m the chassis Installing the right side cover Prerequisites If you are replacing a component remove the existing component before performing the installation procedure About this task The following im...

Page 17: ...17...

Page 18: ...all the left side cover 3 Follow the procedure in After working inside your computer 2 5 inch hard drive Removing the 2 5 inch hard drive Prerequisites 1 Follow the procedure in Before working inside...

Page 19: ...the hard drive assembly NOTE Note the orientation of the hard drive so that you can replace it correctly NOTE Repeat the steps to remove any additional 2 5 inch hard drive from your computer Installin...

Page 20: ...NOTE Note the orientation on the hard drive carrier to replace it correctly 20...

Page 21: ...rive NOTE Repeat the steps to install any additional 2 5 inch hard drive from your computer Next steps 1 Install the left side cover 2 Follow the procedure in After working inside your computer 3 5 in...

Page 22: ...e hard drive 4 Lift the hard drive out of the hard drive assembly NOTE Note the orientation of the hard drive so that you can replace it correctly Installing the 3 5 inch hard drive Prerequisites If y...

Page 23: ...NOTE Note the orientation on the hard drive carrier to replace it correctly 23...

Page 24: ...r 2 5 inch hard drive cage Removing the 2 5 inch hard drive cage Prerequisites 1 Follow the procedure in Before working inside your computer 2 Remove the left side cover 3 Remove the 2 5 inch hard dri...

Page 25: ...gn the tabs on the cage with the tabs on the chassis 3 Replace the two screws 6 32 that secure the 2 5 inch hard drive cage to the chassis NOTE Repeat the procedure from step 1 to step 3 to install th...

Page 26: ...drive cage to the chassis 2 Lift the 3 5 inch hard drive cage off the chassis Installing the 3 5 inch hard drive cage Prerequisites If you are replacing a component remove the existing component befo...

Page 27: ...After working inside your computer 460 W power supply unit Removing the 460 W power supply unit Prerequisites 1 Follow the procedure in Before working inside your computer 2 Remove the left side cove...

Page 28: ...28...

Page 29: ...tors 5 Disconnect the power cables from the hard drives 6 Disconnect the processor power cable and system board power cable from the system board 7 Rotate the power supply unit cage towards the chassi...

Page 30: ...power wattage Ensure that you plug in the cable to the correct port Failure to do so may result in damaging the power supply unit and or system components About this task The following images indicate...

Page 31: ...wer supply unit cage release latches towards the locked position 9 Align the screw holes on the power supply unit bracket with the screw holes on the power supply unit cage 10 Replace the two screws 6...

Page 32: ...s from the power supply unit 4 Remove the four screws 6 32 that secure the power supply unit to the chassis 5 Slide and lift the power supply unit along with the cables off the chassis Installing the...

Page 33: ...on the chassis 3 Replace the four screws 6 32 that secure the power supply unit to the chassis 4 Connect all the power cables to the power supply unit 5 Align the screw holes on the power supply unit...

Page 34: ...the top cover 4 Remove the right side cover About this task The following images indicate the location of the right tron light board and provides a visual representation of the removal procedure Steps...

Page 35: ...oard and provides a visual representation of the installation procedure Steps 1 Align the screw holes on the right tron light board with the screw holes on the chassis 2 Replace the four screws 6 32 t...

Page 36: ...cool before you touch it CAUTION To ensure maximum cooling for the processor do not touch the heat transfer areas on the processor liquid cooling assembly The oils in your skin can reduce the heat tra...

Page 37: ...system board 7 Remove the four screws 6 32 that secure the radiator and fan assembly to the radiator and fan cage 8 Lift the VR heat sink off the computer 9 Disconnect the processor cooling assembly...

Page 38: ...before performing the installation procedure CAUTION Incorrect alignment of the processor liquid cooling assembly can damage the system board and processor About this task The following images indicat...

Page 39: ...screws that secure the processor cooler to the system board NOTE If your are using an electric screwdriver torque the screws at 6 9 1 15 kilogram force centimeter 6 1 pound force inch 6 Connect the pr...

Page 40: ...instructions in After working inside your computer For more safety best practices see the Regulatory Compliance home page at www dell com regulatory_compliance CAUTION Removing the coin cell battery r...

Page 41: ...unit cage away from the chassis 5 Press the battery release lever away from the coin cell battery until the coin cell battery pops up 6 Lift the coin cell battery out of its socket Installing the coi...

Page 42: ...Steps 1 Insert a new coin cell battery CR2032 into the battery socket with the positive side facing up and snap the battery into place 42...

Page 43: ...teps 1 Install the left side cover 2 Follow the procedure in After working inside your computer Memory modules Removing the memory modules Prerequisites 1 Follow the procedure in Before working inside...

Page 44: ...e securing clip and then gently ease the memory module out of the memory module slot NOTE Repeat step 5 to step 6 to remove any other memory modules installed in your computer CAUTION To prevent damag...

Page 45: ...Steps 1 Ensure that the securing clips are extended away from the memory module slot 45...

Page 46: ...available memory configuration matrix Table 2 Memory configuration matrix Configuration Slot XMM1 XMM2 XMM3 XMM4 8 GB DDR4 8 GB 16 GB DDR4 8 GB 8 GB 32 GB DDR4 16 GB 16 GB 64 GB DDR4 16 GB 16 GB 16 GB...

Page 47: ...e drive Prerequisites If you are replacing a component remove the existing component before performing the installation procedure CAUTION Solid state drives are fragile Exercise care when handling the...

Page 48: ...ystem board Next steps 1 Install the single graphics card or dual graphics card as applicable 2 Install the left side cover 3 Follow the procedure in After working inside your computer Single graphics...

Page 49: ...49...

Page 50: ...from the chassis 6 Press the releasing clip on the power cable connectors and disconnect the power cables from the graphics card 7 Push the securing tab on the PCIe slot away from the graphics card gr...

Page 51: ...51...

Page 52: ...ace 4 Rotate the power supply unit cage towards the chassis 5 Connect the power cables to the graphics card 6 Slide the power supply unit cage release latches towards the locked position Next steps 1...

Page 53: ...About this task The following images indicate the location of the graphics card and provides a visual representation of the removal procedure 53...

Page 54: ...hics bridge that connects the graphics cards 6 Lift to release the graphics card bracket from the chassis 7 Press the releasing clip on the power cable connectors and disconnect the power cables from...

Page 55: ...u are replacing a component remove the existing component before performing the installation procedure About this task The following images indicate the location of the graphics card and provides a vi...

Page 56: ...56...

Page 57: ...acket into the slot on the chassis and snap it into place 6 Replace the graphics bridge that connects the graphics cards 7 Rotate the power supply unit cage towards the chassis 8 Connect the power cab...

Page 58: ...he right side cover 5 Remove the single graphics card or dual graphics card as applicable About this task The following images indicate the location of the front bezel and provides a visual representa...

Page 59: ...59...

Page 60: ...and remove the cables from the routing guides on the inside of the chassis 7 Place the computer in an upright position 8 Rotate the power supply unit cage towards the chassis 9 Rotate and pull the fro...

Page 61: ...About this task The following images indicate the location of the front bezel and provides a visual representation of the installation procedure 61...

Page 62: ...62...

Page 63: ...63...

Page 64: ...g guides on the inside of the chassis 5 Place the computer in an upright position 6 Rotate the power supply unit cage towards the chassis 7 Connect the power cables to the graphics card 8 Slide the po...

Page 65: ...4 Remove the right side cover 5 Remove the wireless card 6 Remove the front bezel About this task The following images indicate the location of the top bezel and provides a visual representation of t...

Page 66: ...sentation of the installation procedure Steps 1 Route the antenna cable through the slots on the chassis 2 Align the tabs on the top cover with the slots on the chassis and snap the top cover into pla...

Page 67: ...he right side cover 5 Remove the 2 5 inch hard drive cages 6 Remove the front bezel About this task The following images indicate the location of the bottom cover and provides a visual representation...

Page 68: ...provides a visual representation of the installation procedure Steps 1 Align the tabs on the bottom cover with the slots on the chassis 2 Rotate the bottom cover towards the chassis until it snaps int...

Page 69: ...ent time for the heat sink to cool before you touch it CAUTION For maximum cooling of the processor do not touch the heat transfer areas on the heat sink The oils in your skin can reduce the heat tran...

Page 70: ...that secure the processor fan and heat sink assembly to the system board 7 Lift the processor fan and heat sink assembly off the system board Installing the processor fan and heat sink assembly Prere...

Page 71: ...71...

Page 72: ...the system board 5 Rotate the power supply unit cage towards the chassis 6 Connect the power cables to the graphics card 7 Slide the power supply unit cage release latches towards the locked position...

Page 73: ...se it from the tab 2 Extend the release lever completely and open the processor cover 3 Lift the processor off the processor socket Installing the processor Prerequisites If you are replacing a compon...

Page 74: ...ted in the socket close the processor cover 4 Pivot the release lever down and place it under the tab on the processor cover Next steps 1 Install the processor liquid cooling assembly or processor fan...

Page 75: ...ess card from the wireless card slot Installing the wireless card Prerequisites If you are replacing a component remove the existing component before performing the installation procedure CAUTION To a...

Page 76: ...iliary black triangle Black 2 Place the wireless card bracket on the wireless card 3 Align the notch on the wireless card with the tab on the wireless card slot 4 Slide the wireless card at an angle i...

Page 77: ...s a visual representation of the removal procedure Steps 1 Remove the four screws M3x4t that secures the antennas to the top bezel 2 Remove the antenna cables from the routing guides on the top bezel...

Page 78: ...stall the top cover 5 Install the left side cover 6 Follow the procedure in After working inside your computer Front I O panel Removing the front I O panel Prerequisites 1 Follow the procedure in Befo...

Page 79: ...e two clips and lift the front I O panel off the front bezel Installing the front I O panel Prerequisites If you are replacing a component remove the existing component before performing the installat...

Page 80: ...ll the right side cover 3 Install the left side cover 4 Install the top cover 5 Follow the procedure in After working inside your computer Front chassis fan Removing the front chassis fan Prerequisite...

Page 81: ...t the front chassis fan off the chassis Installing the front chassis fan Prerequisites If you are replacing a component remove the existing component before performing the installation procedure About...

Page 82: ...rd or dual graphics card as applicable 2 Install the left side cover 3 Follow the procedure in After working inside your computer Top chassis fan Removing the top chassis fan Prerequisites 1 Follow th...

Page 83: ...Steps 1 Lay the computer on the right side 83...

Page 84: ...move the top chassis fan from the chassis 8 Remove the top chassis fan cable from the routing guide on the top chassis fan bracket 9 Push the rubber grommets through the holes at each corner of the fa...

Page 85: ...he top chassis fan cable through the routing guide on the bracket 6 Align the tabs on the top chassis fan with the slots on the chassis and slide the fan until it snaps into position 7 Replace the scr...

Page 86: ...representation of the removal procedure Steps 1 Disconnect the AlienFX LED board cable from a Y cable 2 Remove the four screws M3x4 that secure the AlienFX LED board to the front bezel 3 Lift the Ali...

Page 87: ...l the right side cover 4 Install the left side cover 5 Follow the procedure in After working inside your computer Power button board Removing the power button board Prerequisites 1 Follow the procedur...

Page 88: ...t the cables from the power button module Installing the power button board Prerequisites If you are replacing a component remove the existing component before performing the installation procedure Ab...

Page 89: ...red in the system board You must enter the Service Tag in the BIOS setup program after you replace the system board NOTE Replacing the system board removes any changes you have made to the BIOS using...

Page 90: ...8 Remove the processor About this task The following images indicate the location of the system board and provides a visual representation of the removal procedure 90...

Page 91: ...em board components 2 Remove the eight screws 6 32 that secure the system board assembly to the chassis 3 Lift the system board off the chassis Installing the system board Prerequisites If you are rep...

Page 92: ...92...

Page 93: ...ssor fan and heat sink assembly as applicable 4 Install the wireless card 5 Install the solid state drive 6 Install the memory modules 7 Install the left side cover 8 Follow the procedure in After wor...

Page 94: ...Next steps NOTE Service tag is the alphanumeric identifier located at the back side of your computer 94...

Page 95: ...talled automatically Review the installation summary to identify if manual installation is necessary 13 For manual download and installation click Category 14 Click Audio in the drop down list 15 Clic...

Page 96: ...8 Click View Drivers for My System 9 Click Download and Install to download and install all driver updates detected for your computer 10 Select a location to save the files 11 If prompted approve req...

Page 97: ...oad and install SupportAssist NOTE Review on screen instructions for browser specific instructions 8 Click View Drivers for My System 9 Click Download and Install to download and install all driver up...

Page 98: ...click Submit NOTE If you do not have the Service Tag use the auto detect feature or manually browse for your computer model 4 Click Drivers downloads 5 Click the Detect Drivers button 6 Review and ag...

Page 99: ...ake effect until you restart the system Keys Navigation Up arrow Moves to the previous field Down arrow Moves to the next field Enter Selects a value in the selected field if applicable or follow the...

Page 100: ...ry Information System Memory Displays the total computer memory installed Memory Speed Displays the memory speed Table 5 System setup options Advanced menu Advanced Advanced BIOS Features PowerNow All...

Page 101: ...disable the Computrace service using the Absolute software Core Ratio Limit Override Allows you to set the core ratio limit Single Core Allows you to select single core or multiple cores Core Voltage...

Page 102: ...m setup and save your changes Discard Changes and Reset Allows you to exit system setup and load previous values for all system setup options Restore Defaults Allows you to load default values for all...

Page 103: ...ure in Before working inside your computer 2 Remove the left side cover About this task The following images indicate the location of the memory modules and provide a visual representation of the remo...

Page 104: ...lone tool that is preinstalled in all Dell computers installed with Windows 10 operating system It consists of tools to diagnose and troubleshoot issues that may occur before your computer boots to th...

Page 105: ...the screen WiFi power cycle About this task If your computer is unable to access the internet due to WiFi connectivity issues a WiFi power cycle procedure may be performed The following procedure pro...

Reviews: