Chapter 12
12-25
Theory of Operation
Signal Separation (8753ES)
Signal Separation (8753ES)
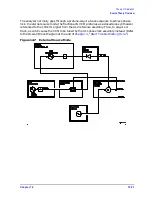
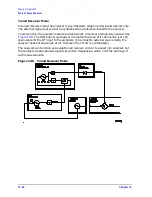
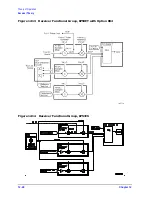
The Built-In Test Set
shows a simplified block diagram of the analyzer’s built-in test set.
A21 and A22 Test Port Couplers
The analyzer’s test port couplers are used to separate signals incident to, reflected from,
and transmitted from the device under test. Each test port coupler has a coupling
coefficient factor of 16 dB.
A23 LED Front Panel
The LED front panel board indicates whether the source power is incident on the
analyzer’s test port 1 or test port 2. The analyzer’s source power is directed to test port 1
when making a forward transmission/reflection measurement. Similarly, source power is
incident at test port 2 when making a reverse transmission/reflection measurement.
A24 Transfer Switch
The A3 source output power is directed to either the analyzer’s test port 1 or test port 2 via
a low loss solid state transfer switch. With this switch, all four S-parameters can be
updated continuously (for example, the data obtained from a full 2-port calibration). In
addition, the transfer switch provides termination for the inactive test port in order to
minimize the crosstalk between the source and receiver sampler.
A25 Test Set Interface
The test set interface board provides biasing for active devices under test with an external
dc voltage. This dc voltage is applied directly to the test port center pin. In addition, the
test set interface board provides the drive signal for the A24 forward/reverse transfer
switch.
Summary of Contents for 8753ES
Page 14: ...Contents xiv Contents ...
Page 15: ...1 1 1 Service Equipment and Analyzer Options ...
Page 26: ...1 12 Chapter1 Service Equipment and Analyzer Options Service and Support Options ...
Page 27: ...2 1 2 System Verification and Performance Tests ...
Page 203: ...3 1 3 Adjustments and Correction Constants ...
Page 262: ...3 60 Chapter3 Adjustments and Correction Constants Sequences for Mechanical Adjustments ...
Page 263: ...4 1 4 Start Troubleshooting Here ...
Page 297: ...5 1 5 Power Supply Troubleshooting ...
Page 317: ......
Page 318: ...6 1 6 Digital Control Troubleshooting ...
Page 337: ...6 20 Chapter6 Digital Control Troubleshooting GPIB Failures ...
Page 338: ...7 1 7 Source Troubleshooting ...
Page 369: ...7 32 Chapter7 Source Troubleshooting Source Group Troubleshooting Appendix ...
Page 370: ...8 1 8 Receiver Troubleshooting ...
Page 381: ...8 12 Chapter8 Receiver Troubleshooting Troubleshooting When One or More Inputs Look Good ...
Page 382: ...9 1 9 Accessories Troubleshooting ...
Page 389: ...9 8 Chapter9 Accessories Troubleshooting Inspect the Error Terms ...
Page 390: ...10 1 10 Service Key Menus and Error Messages ...
Page 439: ...10 50 Chapter10 Service Key Menus and Error Messages Error Messages ...
Page 440: ...11 1 11 Error Terms ...
Page 451: ...11 12 Chapter11 Error Terms Error Correction ...
Page 452: ...12 1 12 Theory of Operation ...
Page 482: ...13 1 13 Replaceable Parts ...
Page 487: ...13 6 Chapter13 Replaceable Parts Ordering Information Figure 13 1 Module Exchange Procedure ...
Page 500: ...Chapter 13 13 19 Replaceable Parts Replaceable Part Listings Figure 13 7 8753ET Cables Top ...
Page 502: ...Chapter 13 13 21 Replaceable Parts Replaceable Part Listings Figure 13 8 8753ES Cables Top ...
Page 512: ...Chapter 13 13 31 Replaceable Parts Replaceable Part Listings Figure 13 13 8753ES Cables Front ...
Page 544: ...14 1 14 Assembly Replacement and Post Repair Procedures ...
Page 550: ...Chapter 14 14 7 Assembly Replacement and Post Repair Procedures Covers Figure 14 2 Covers ...
Page 597: ...14 54 Chapter14 Assembly Replacement and Post Repair Procedures Post Repair Procedures ...


