12
EN
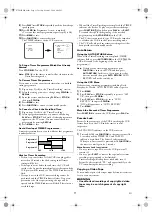
Connect the recording VCR (this unit), playing VCR (another
VCR) and your TV as outline in the following diagram.
1)
Insert a pre-recorded videocassette into the playing VCR.
2)
Insert a blank videocassette, or one you want to record
over, into the cassette compartment of the recording
VCR.
3)
Press
SPEED/SYSTEM
on the remote control to select the
desired recording speed (SP/LP).
4)
Select “AV2” position on the recording VCR. See “Other
Connections”.
5)
Press
REC/OTR
on the recording VCR.
6)
Begin playback of the tape in the playing VCR.
7)
To stop recording, press
STOP/EJECT
on the recording
VCR, then stop playback of the tape in the playing VCR.
Note: •
For best results during dubbing, use the VCR’s front
panel controls whenever possible. The remote control
might affect the playback VCR's operation.
•
If video or colour fades in and out, you may be
copying a copy guarded video tape.
To Monitor the Recording
Turn on the TV and select the video channel on the TV.
A Status Display
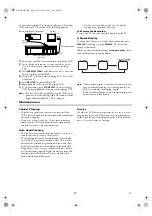
To check the Counter, or Clock & Channel number, press
DISPLAY
. Each time you press
DISPLAY
, TV screen will
change as illustrated:
When you select the channel using the
number buttons
, select
the desired channel (position number).
Note:
If the on screen display or indicators on the front panel
show an abnormal reading or no reading, unplug the
VCR for 2 minutes, then replug it again.
Please note that language, clock, and timer settings will
be cleared after disconnection.
Maintenance
Cabinet Cleaning
• Wipe the front panel and other exterior surfaces of the
VCR with a soft cloth that has been immersed in lukewarm
water and wrung dry.
• Never use a solvent or alcohol. Do not spray insecticide
liquid near the VCR. Such chemicals may cause damage
and discolouration to the exposed surfaces.
Auto Head Cleaning
• This feature automatically cleans the heads as you insert or
remove a cassette to ensure a clear picture.
• The playback picture may become blurred or interrupted
even if the TV programme received is clear. This does not
mean that the recorded programme has been erased. This
problem is caused by dirt accumulated on the head after
long periods of use, or usage of rental or old tapes. In this
case, head cleaning requires highly technical expertise and
the nearest dealer should therefore be consulted. Clean
heads only when problems occur.
Service
Should your VCR become inoperative, do not try to correct
the problem by yourself. There are no user-serviceable parts
inside. Turn the unit off, unplug the power cord, and take the
unit to a Service Centre for servicing.
RF OUT
AERIAL
AV2(DECODER)
AV1(TV)
to RF OUT
to aerial
socket
[Source (Playing) VCR <Monaural>]
(another VCR)
to 21-Pin
Scart Jack
[TV set]
(Use for monitoring)
[Editing (Recording) VCR]
(this unit)
Coaxial cable (supplied)
■
SP
0:12:34
■
SP
17:40
P02
<CLOCK and CHANNEL
NUMBER mode>
<COUNTER mode>
Press once.
Press once.
Press once.
<OFF mode>
HG210ED(EN).fm Page 12 Tuesday, March 2, 2004 4:08 PM

