4
EN
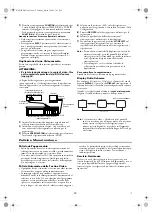
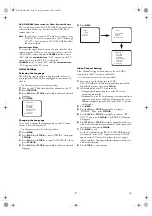
Remote Control
* These buttons do not function for this VCR.
1.
FUNCTION button
2.
number buttons
3.
MENU button
4.
DISPLAY button
5.
REW/
s
button
6.
STOP/
L
button
7.
REC/OTR button
8.
PAUSE/STILL button
9.
SPEED/SYSTEM button
(Only the function of SPEED is available for this VCR.)
10.
F.FWD/
B
button
11.
PLAY/
o
button
12.
TAPE COUNTER RESET button
13.
TAPE COUNTER MEMORY button
14.
CHANNEL (
o
/
p
) buttons
15.
EJECT button
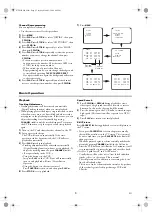
To insert the batteries:
Install two R6 batteries matching the polarity indicated inside
the battery compartment.
Caution
Do not mix old and new batteries. (Also never mix alkaline
batteries with manganese batteries.)
Installation
Connecting the VCR
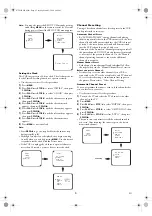
VCR to TV Connection
1)
Disconnect the TV’s power cord from the AC outlet.
2)
Disconnect the VHF/UHF TV aerial coaxial cable from
the TV.
3)
Connect the VHF/UHF TV aerial coaxial cable to the
VCR.
4)
Connect the VCR to the TV using the coaxial cable.
5)
Plug the power cords of the VCR and TV into the AC
outlets.
Other Connections
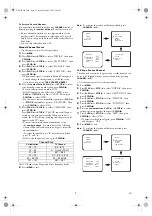
Euro Scart (AV) Sockets
Your VCR is provided with two Scart sockets which you may
connect to other external devices with Scart sockets. We
recommend this connection to ensure a better audio and
picture quality.
Euro Scart cables are obtainable at your dealer.
AV1 (TV) Connection to TV
If your TV has Scart sockets, you may connect your VCR’s
AV1 (TV) scart socket to the Scart socket on the back of your
TV. Please see the instruction manual for your TV.
PLAY
STOP
REW
F.FWD
0
7
8
9
6
5
4
3
2
1
FUNCTION
EJECT
AUDIO
SELECT
CHANNEL
SLOW
TAPE COUNTER
MEMORY
RESET
MENU
DISPLAY
REC/OTR
QUICK-FIND
SEARCH MODE
SPEED/
SYSTEM
PAUSE/STILL
1
2
14
15
3
5
7
6
13
10
9
11
8
12
4
*
*
*
**
*
RF OUT
AERIAL
VHF/UHF
MIXER
to AERIAL
to RF OUT
(Back of the unit)
to aerial socket
(TV)
UHF
VHF
RF OUT
AERIAL
AV2(DECODER)
AV1(TV)
to 21-Pin Scart Jack
Decoder (Not supplied)
(TV)
to RF OUT
socket
Scart Jack
to 21-Pin
to aerial
HG210ED(EN).fm Page 4 Tuesday, March 2, 2004 4:08 PM

